Dell C9000 Line Cards Networking C9010 Getting Started Guide - Page 23
Installing ReadyRails: Tooled Method for a Threaded-Hole Rack
 |
View all Dell C9000 Line Cards manuals
Add to My Manuals
Save this manual to your list of manuals |
Page 23 highlights
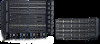
4. Install two cage nuts (item 2 in Figure 14) in each front post at the desired height of the two thumb screws on each flange. Lift the chassis and slide it into the rails installed in the rack (Figure 14). Tighten the thumb screws in the cage nuts to secure the chassis to the rack. Figure 14. Installing the Chassis with ReadyRails in a Non-Threaded-Hole Rack Installing ReadyRails: Tooled Method for a Threaded-Hole Rack To install ReadyRails using a tooled method in a threaded-hole 2- or 4-post rack: 1. Locate the front rack rails in the Dell ReadyRails kit (items 5 and 6 in Figure 10). • For a 2-post rack, take out the left and right rail brackets (items 3 and 4 in Figure 10) and slide them into the front rails. • For a 4-post rack, take out the left and right rear rails (items 7 and 8 in Figure 10) and slide them into the front rails. (The front and rear parts of a rail may arrive pre-assembled.) Installing the Hardware 23
-
 1
1 -
2
-
3
-
4
-
5
-
6
-
7
-
8
-
9
-
10
-
11
-
12
-
13
-
14
-
15
-
16
-
17
-
 18
18 -
 19
19 -
 20
20 -
 21
21 -
 22
22 -
 23
23 -
 24
24 -
 25
25 -
 26
26 -
 27
27 -
 28
28 -
29
-
30
-
31
-
32
-
33
-
34
-
35
-
36
-
37
-
38
-
39
-
40
-
41
-
42
-
43
-
44
-
45
-
46
-
47
-
48
-
49
-
50
-
51
-
52
-
53
-
54
-
55
-
56
 |
 |
