Dell Dimension 4100 Dell Dimension 4100 System Solutions Guide - Page 52
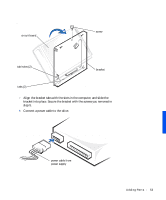
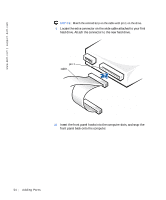
bracket. Align the bracket tabs with the two tab holes in the side of the, drive
 |
View all Dell Dimension 4100 manuals
Add to My Manuals
Save this manual to your list of manuals |
Page 52 highlights
www.dell.com | support.dell.com 5 Remove the screws securing the drive bracket, and lift the bracket out of the computer. drive bracket screws (2) 6 Orient the new drive with its circuit board facing the inside of the bracket. Align the bracket tabs with the two tab holes in the side of the drive, and rotate the drive into the bracket. Then secure the screw. 52 Adding Parts
-
 1
1 -
2
-
3
-
4
-
5
-
6
-
7
-
8
-
9
-
10
-
11
-
12
-
13
-
14
-
15
-
16
-
17
-
18
-
19
-
20
-
21
-
22
-
23
-
24
-
25
-
26
-
27
-
28
-
29
-
30
-
31
-
32
-
33
-
34
-
35
-
36
-
37
-
38
-
39
-
40
-
41
-
42
-
43
-
44
-
45
-
46
-
 47
47 -
 48
48 -
 49
49 -
 50
50 -
 51
51 -
 52
52 -
 53
53 -
 54
54 -
 55
55 -
 56
56 -
 57
57 -
58
-
59
-
60
-
61
-
62
-
63
-
64
-
65
-
66
-
67
-
68
-
69
-
70
-
71
-
72
-
73
-
74
-
75
-
76
-
77
-
78
-
79
-
80
-
81
-
82
-
83
-
84
-
85
-
86
-
87
-
88
-
89
-
90
-
91
-
92
-
93
-
94
-
95
-
96
-
97
-
98
-
99
-
100
-
101
-
102
 |
 |

52
Adding Parts
www.dell.com | support.dell.com
5
Remove the screws securing the drive bracket, and lift the bracket out
of the computer.
6
Orient the new drive with its circuit board facing the inside of the
bracket. Align the bracket tabs with the two tab holes in the side of the
drive, and rotate the drive into the bracket. Then secure the screw.
screws (2)
drive bracket