Dell Dimension 4100 Dell Dimension 4100 System Solutions Guide - Page 62
front panel back onto the computer
 |
View all Dell Dimension 4100 manuals
Add to My Manuals
Save this manual to your list of manuals |
Page 62 highlights
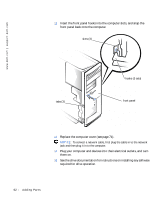
www.dell.com | support.dell.com 12 Insert the front panel hooks into the computer slots, and snap the front panel back onto the computer. slots (3) tabs (3) hooks (3 sets) front panel 13 Replace the computer cover (see page 71). NOTICE: To connect a network cable, first plug the cable in to the network jack and then plug it in to the computer. 14 Plug your computer and devices into their electrical outlets, and turn them on. 15 See the drive documentation for instructions on installing any software required for drive operation. 62 Adding Parts
-
 1
1 -
2
-
3
-
4
-
5
-
6
-
7
-
8
-
9
-
10
-
11
-
12
-
13
-
14
-
15
-
16
-
17
-
18
-
19
-
20
-
21
-
22
-
23
-
24
-
25
-
26
-
27
-
28
-
29
-
30
-
31
-
32
-
33
-
34
-
35
-
36
-
37
-
38
-
39
-
40
-
41
-
42
-
43
-
44
-
45
-
46
-
47
-
48
-
49
-
50
-
51
-
52
-
53
-
54
-
55
-
56
-
 57
57 -
 58
58 -
 59
59 -
 60
60 -
 61
61 -
 62
62 -
 63
63 -
 64
64 -
 65
65 -
 66
66 -
 67
67 -
68
-
69
-
70
-
71
-
72
-
73
-
74
-
75
-
76
-
77
-
78
-
79
-
80
-
81
-
82
-
83
-
84
-
85
-
86
-
87
-
88
-
89
-
90
-
91
-
92
-
93
-
94
-
95
-
96
-
97
-
98
-
99
-
100
-
101
-
102
 |
 |

62
Adding Parts
www.dell.com | support.dell.com
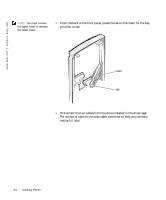
12
Insert the front panel hooks into the computer slots, and snap the
front panel back onto the computer.
13
Replace the computer cover (see page 71).
NOTICE:
To connect a network cable, first plug the cable in to the network
jack and then plug it in to the computer.
14
Plug your computer and devices into their electrical outlets, and turn
them on.
15
See the drive documentation for instructions on installing any software
required for drive operation.
tabs (3)
hooks (3 sets)
front panel
slots (3)