Dell Dimension 4100 Dell Dimension 4100 System Solutions Guide - Page 58
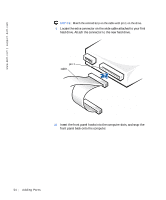
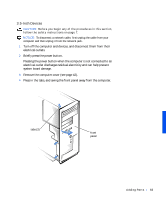
remove it., Press in the two tabs on the insert, and rotate the insert toward you
 |
View all Dell Dimension 4100 manuals
Add to My Manuals
Save this manual to your list of manuals |
Page 58 highlights
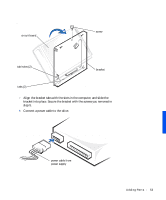
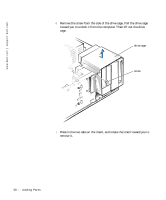
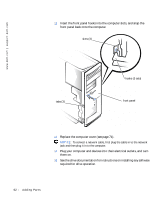
www.dell.com | support.dell.com 6 Remove the screw from the side of the drive cage. Pull the drive cage toward you to unlock it from the computer. Then lift out the drive cage. drive cage screw 7 Press in the two tabs on the insert, and rotate the insert toward you to remove it. 58 Adding Parts
-
 1
1 -
2
-
3
-
4
-
5
-
6
-
7
-
8
-
9
-
10
-
11
-
12
-
13
-
14
-
15
-
16
-
17
-
18
-
19
-
20
-
21
-
22
-
23
-
24
-
25
-
26
-
27
-
28
-
29
-
30
-
31
-
32
-
33
-
34
-
35
-
36
-
37
-
38
-
39
-
40
-
41
-
42
-
43
-
44
-
45
-
46
-
47
-
48
-
49
-
50
-
51
-
52
-
 53
53 -
 54
54 -
 55
55 -
 56
56 -
 57
57 -
 58
58 -
 59
59 -
 60
60 -
 61
61 -
 62
62 -
 63
63 -
64
-
65
-
66
-
67
-
68
-
69
-
70
-
71
-
72
-
73
-
74
-
75
-
76
-
77
-
78
-
79
-
80
-
81
-
82
-
83
-
84
-
85
-
86
-
87
-
88
-
89
-
90
-
91
-
92
-
93
-
94
-
95
-
96
-
97
-
98
-
99
-
100
-
101
-
102
 |
 |

58
Adding Parts
www.dell.com | support.dell.com
6
Remove the screw from the side of the drive cage. Pull the drive cage
toward you to unlock it from the computer. Then lift out the drive
cage.
7
Press in the two tabs on the insert, and rotate the insert toward you to
remove it.
screw
drive cage