Epson PictureMate Deluxe Viewer Edition Using PictureMate Without a Computer - Page 13
want for each photo., outlined in blue, then press
 |
View all Epson PictureMate Deluxe Viewer Edition manuals
Add to My Manuals
Save this manual to your list of manuals |
Page 13 highlights
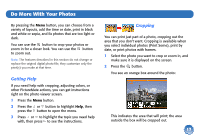
2 Press the OK button. You see small thumbnail images of your photos: 5 Make sure the photos you want to print are outlined in blue, then press OK. 3 Press or to choose the first photo you want to print. Then press OK. The photo outline changes from orange to blue. 4 Press or to choose the last photo you want to print. All your selected photos have blue outlines. 6 Press or to select the number of copies you want for each photo. Note: The number you select will apply to all photos in the range. If you want to adjust any settings, press the Menu button. See page 17 for more information. 7 Press the Print button. You see the Print Confirmation. 8 Make sure you have enough paper loaded, then press Print again to start printing. 12
-
 1
1 -
2
-
3
-
4
-
5
-
6
-
7
-
 8
8 -
 9
9 -
 10
10 -
 11
11 -
 12
12 -
 13
13 -
 14
14 -
 15
15 -
 16
16 -
 17
17 -
 18
18 -
19
-
20
-
21
-
22
-
23
-
24
-
25
-
26
-
27
-
28
-
29
-
30
-
31
-
32
-
33
-
34
-
35
-
36
-
37
-
38
-
39
-
40
-
41
-
42
-
43
-
44
-
45
-
46
-
47
-
48
-
49
-
50
-
51
-
52
-
53
-
54
-
55
-
56
-
57
-
58
-
59
-
60
-
61
-
62
-
63
-
64
-
65
-
66
-
67
-
68
-
69
-
70
-
71
-
72
-
73
-
74
-
75
-
76
-
77
-
78
-
79
 |
 |

12
2
Press the
OK
button. You see small thumbnail
images of your photos:
3
Press
or
to choose the first photo you want to
print. Then press
OK
. The photo outline changes
from orange to blue.
4
Press
or
to choose the last photo you want to
print. All your selected photos have blue outlines.
5
Make sure the photos you want to print are
outlined in blue, then press
OK
.
6
Press
or
to select the number of copies you
want for each photo.
Note:
The number you select will apply to all photos in
the range.
If you want to adjust any settings, press the
Menu
button. See page 17 for more information.
7
Press the
Print
button
.
You see the Print
Confirmation.
8
Make sure you have enough paper loaded, then
press
Print
again to start printing.