Epson PictureMate Deluxe Viewer Edition Using PictureMate Without a Computer - Page 20
Choosing a Layout, Print, Layout
 |
View all Epson PictureMate Deluxe Viewer Edition manuals
Add to My Manuals
Save this manual to your list of manuals |
Page 20 highlights
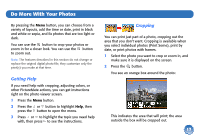
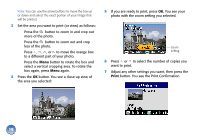
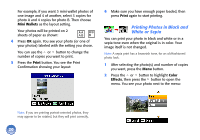
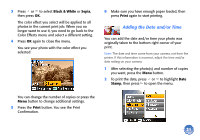
8 Make sure you have enough paper loaded, then press Print again to start printing. Choosing a Layout By default, your photos are printed at the full 4 x 6 size, without borders. If you want to print pictures with white borders or place several small photos on one sheet of paper, you can use the Layout menu. Note: When you print without borders, your images are automatically expanded and cropped around the edges. This may cause part of your image to be cut off. You can control the amount of expansion and cropping; see page 44 for instructions. 1 After selecting the photo(s) and number of copies you want, press the Menu button. 2 Press the or button to highlight Layout, then press the button to open the menu. 3 Press or to highlight the layout setting you want for your photo(s), then press OK. You have six choices: Borderless Proofsheet Border Half Page Wallets (2 per sheet) Mini Wallets (4 per sheet) Note: For the fastest printing, select Border. To print two or more photos on one sheet, select multiple copies or multiple photos. 19
-
 1
1 -
2
-
3
-
4
-
5
-
6
-
7
-
8
-
9
-
10
-
11
-
12
-
13
-
14
-
 15
15 -
 16
16 -
 17
17 -
 18
18 -
 19
19 -
 20
20 -
 21
21 -
 22
22 -
 23
23 -
 24
24 -
 25
25 -
26
-
27
-
28
-
29
-
30
-
31
-
32
-
33
-
34
-
35
-
36
-
37
-
38
-
39
-
40
-
41
-
42
-
43
-
44
-
45
-
46
-
47
-
48
-
49
-
50
-
51
-
52
-
53
-
54
-
55
-
56
-
57
-
58
-
59
-
60
-
61
-
62
-
63
-
64
-
65
-
66
-
67
-
68
-
69
-
70
-
71
-
72
-
73
-
74
-
75
-
76
-
77
-
78
-
79
 |
 |
