Epson Stylus Photo R2000 Basics - Page 21
for Super B-size, to feed small amounts of roll - driver
 |
View all Epson Stylus Photo R2000 manuals
Add to My Manuals
Save this manual to your list of manuals |
Page 21 highlights
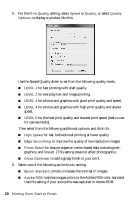
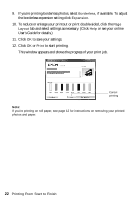
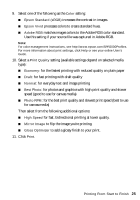
■ Epson Vivid processes colors to create standard hues. ■ Photo Enhance lets you choose from various Scene Correction settings to automatically analyze your photos and, if necessary, adjusts the brightness, contrast, and saturation. ■ ICM automatically adjusts colors based on the printer's ICC profile and the selected Media Type setting, using the Image Color Matching system. ■ Off (No Color Adjustment) disables color management in the printer driver. Note: For color management instructions, see http://www.epson.com/SPR2000Profiles. For more information about print settings, click Help or see your online User's Guide. 7. Choose the paper Source in which you loaded your paper: ■ Sheet: for sheets of paper loaded in the sheet feeder. ■ Roll Paper: for photos or panoramics up to 27 inches (68.6 cm) long. If desired, click Print page frame to print a cutting guideline around each photo. ■ Roll Paper (Banner): for photos or banners over 27 inches (68.6 cm) long. If desired, click Save Roll Paper to feed small amounts of roll paper between each banner. ■ Manual - Rear: for a sheet of compatible paper loaded in the rear manual feed tray (see page 8 for loading instructions). ■ Manual - Front Thick Paper: for thick media loaded in the front manual feed tray (see page 13). ■ CD/DVD: for a disc loaded in the CD/DVD tray (see page 29 for printing instructions). 8. Select the paper Size setting for the paper you loaded. If you loaded roll paper, create a custom paper size. Select User Defined in the Size menu, then click the User Defined button. Type a name for your custom size. For the Paper Width, enter 8.3 for A4- or 12.95 for Super B-size rolls. For the Paper Height enter the desired length up to 44 inches. Click Save, click OK, then select your custom paper size in the Size menu. Note: For roll paper, make sure the maximum width of your photo is 8.3 or 13 inches to fit in the width of your roll paper (set the margins to 0 in your application software). Printing From Start to Finish 21
-
 1
1 -
2
-
3
-
4
-
5
-
6
-
7
-
8
-
9
-
10
-
11
-
12
-
13
-
14
-
15
-
 16
16 -
 17
17 -
 18
18 -
 19
19 -
 20
20 -
 21
21 -
 22
22 -
 23
23 -
 24
24 -
 25
25 -
 26
26 -
27
-
28
-
29
-
30
-
31
-
32
-
33
-
34
-
35
-
36
-
37
-
38
-
39
-
40
-
41
-
42
-
43
-
44
-
45
-
46
-
47
-
48
-
49
-
50
-
51
-
52
-
53
-
54
-
55
-
56
-
57
-
58
-
59
-
60
 |
 |
