Epson Stylus Photo R2000 Basics - Page 24
setting that matches the paper you loaded see, setting, select
 |
View all Epson Stylus Photo R2000 manuals
Add to My Manuals
Save this manual to your list of manuals |
Page 24 highlights
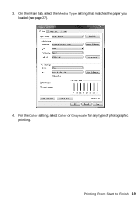
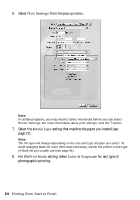
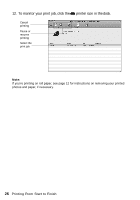
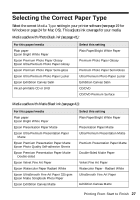
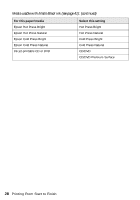
6. Select Print Settings from the pop-up menu. Note: In certain programs, you may need to select Advanced before you can select Printer Settings. For more information about print settings, click the ? button. 7. Select the Media Type setting that matches the paper you loaded (see page 27). Note: The ink type will change depending on the size and type of paper you select. To avoid changing black ink more often than necessary, switch the printer to the type of black ink you usually use (see page 41). 8. For the Print Mode setting, select Color or Grayscale for any type of photographic printing. 24 Printing From Start to Finish
-
 1
1 -
2
-
3
-
4
-
5
-
6
-
7
-
8
-
9
-
10
-
11
-
12
-
13
-
14
-
15
-
16
-
17
-
18
-
 19
19 -
 20
20 -
 21
21 -
 22
22 -
 23
23 -
 24
24 -
 25
25 -
 26
26 -
 27
27 -
 28
28 -
 29
29 -
30
-
31
-
32
-
33
-
34
-
35
-
36
-
37
-
38
-
39
-
40
-
41
-
42
-
43
-
44
-
45
-
46
-
47
-
48
-
49
-
50
-
51
-
52
-
53
-
54
-
55
-
56
-
57
-
58
-
59
-
60
 |
 |

24
Printing From Start to Finish
6.
Select
Print Settings
from the pop-up menu.
Note:
In certain programs, you may need to select
Advanced
before you can select
Printer Settings
. For more information about print settings, click the
?
button.
7.
Select the
Media Type
setting that matches the paper you loaded (see
page 27).
Note:
The ink type will change depending on the size and type of paper you select. To
avoid changing black ink more often than necessary, switch the printer to the type
of black ink you usually use (see page 41).
8.
For the
Print Mode
setting, select
Color
or
Grayscale
for any type of
photographic printing.