Epson Stylus Photo R2000 Basics - Page 38
in the printer, remove it to prevent ink marks on the paper see - print head
 |
View all Epson Stylus Photo R2000 manuals
Add to My Manuals
Save this manual to your list of manuals |
Page 38 highlights
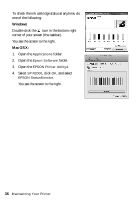
Make sure you have a new ink cartridge before you begin. You must install new cartridges immediately after removing the old ones. 1. Remove the CD/DVD tray or thick media and close the front manual feed slot cover before replacing ink. If you have roll paper or canvas media loaded in the printer, remove it to prevent ink marks on the paper (see page 12). 2. Open the printer cover. 3. Press the H ink button to move the print head to the ink replacement position. If a cartridge is low or expended, the light above the cartridge flashes or stays on. Caution: To avoid damaging your printer, don't move the print head by hand or touch the flat white cable behind the print head. 4. Open the cartridge cover. 38 Maintaining Your Printer
-
 1
1 -
2
-
3
-
4
-
5
-
6
-
7
-
8
-
9
-
10
-
11
-
12
-
13
-
14
-
15
-
16
-
17
-
18
-
19
-
20
-
21
-
22
-
23
-
24
-
25
-
26
-
27
-
28
-
29
-
30
-
31
-
32
-
 33
33 -
 34
34 -
 35
35 -
 36
36 -
 37
37 -
 38
38 -
 39
39 -
 40
40 -
 41
41 -
 42
42 -
 43
43 -
44
-
45
-
46
-
47
-
48
-
49
-
50
-
51
-
52
-
53
-
54
-
55
-
56
-
57
-
58
-
59
-
60
 |
 |

38
Maintaining Your Printer
Make sure you have a new ink cartridge before you begin. You must install new
cartridges immediately after removing the old ones.
1.
Remove the CD/DVD tray or thick media and close the front manual feed
slot cover before replacing ink. If you have roll paper or canvas media loaded
in the printer, remove it to prevent ink marks on the paper (see page 12).
2.
Open the printer cover.
3.
Press the
H
ink button to move the print head to the ink replacement position.
If a cartridge is low or expended, the light above the cartridge flashes or stays
on.
Caution:
To avoid damaging your printer, don’t move the print head by hand or touch the flat
white cable behind the print head.
4.
Open the cartridge cover.