Garmin Oregon 650 Owner's Manual - Page 12
Sending and Receiving Data Wirelessly - oregon 650t user manual
 |
View all Garmin Oregon 650 manuals
Add to My Manuals
Save this manual to your list of manuals |
Page 12 highlights
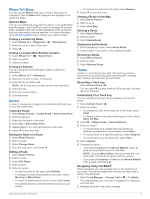
Setting Your Heart Rate Zones Before the device can determine your heart rate zones, you must set up your fitness user profile (page 12). You can manually adjust the heart rate zones according to your fitness goals (page 7). 1 Select Setup > Fitness > HR Zones. 2 Enter the maximum and minimum heart rate for zone 5. The maximum heart rate for each zone is based on the minimum heart rate of the previous zone. For example, if you enter 167 as a minimum heart rate for zone 5, the device uses 166 as the maximum rate for zone 4. 3 Enter your minimum heart rate for zones 4-1. Applications Using the 3D View 1 Select 3D View. 2 Select a category. 3 Select a location. 4 Select Use. 5 Enter a radius, and select . When you enter an area with a proximity alarm, the device sounds a tone. Using the Flashlight NOTE: Using the flashlight can reduce battery life. You can reduce the brightness or use the strobe light to extend the life of the batteries. 1 Select Flashlight > . 2 Select an option: • Use the brightness slider to adjust the brightness. • Use the strobe slider to select a strobe level. 0 No strobe, constant beam. 1-9 Number of strobes per second. SOS Emergency strobe. 3 If necessary, customize a key (page 10) as a shortcut to the flashlight. Calculating the Size of an Area 1 Select Area Calculation > Start. 2 Walk around the perimeter of the area you want to calculate. 3 Select Calculate when finished. 2 Select an option: • To increase the angle of elevation, select . • To decrease the angle of elevation, select . • To pan the 3D map forward, select . • To pan the 3D map backward, select . • To rotate the view to the left, select . • To rotate the view to the right, select . Sending and Receiving Data Wirelessly Before you can share data wirelessly, you must be within 10 feet (3 m) of a compatible device. Your device can send and receive data when paired with another compatible device or smartphone using Bluetooth® or ANT + wireless technology. You can share waypoints, geocaches, routes, tracks, and custom maps. You can share photos with the Oregon 650 and 650t models. 1 Select Share Wirelessly. 2 Select an option: • Select Send, and select a type of data. • Select Receive to receive data from another device. The other compatible device must be attempting to send data. • Select Connect to pair the device with the BaseCamp Mobile application on a smartphone. 3 Follow the on-screen instructions. Setting a Proximity Alarm Proximity alarms alert you when you are within a specified range of a particular location. 1 Select Proximity Alarms > Create Alarm. Using the Calculator The device has a standard calculator and a scientific calculator. 1 Select Calculator. 2 Select an option: • Use the standard calculator. • Select > Scientific to use the scientific calculator functions. • Select > Degrees to calculate degrees. Viewing the Calendar and Almanacs You can view device activity, such as when a waypoint was saved, and almanac information for the sun and moon, and hunting and fishing. 1 Select an option: • To view device activity for specific days, select Calendar. • To view the sunrise, sunset, moonrise, and moonset information, select Sun and Moon. • To view the predicted best times for hunting and fishing, select Hunt and Fish. 2 If necessary, select or to view a different month. 3 Select a day. Setting an Alarm If you are not currently using the device, you can set the device to turn on at a specific time. 1 Select Alarm Clock. 2 Select and to set the time. 3 Select Turn Alarm On. 4 Select an option. The alarm sounds at the selected time. If the device is off at the alarm time, the device turns on and sounds the alarm. Starting the Countdown Timer 1 Select Alarm Clock > > Timer. 8 Applications
-
 1
1 -
2
-
3
-
4
-
5
-
6
-
 7
7 -
 8
8 -
 9
9 -
 10
10 -
 11
11 -
 12
12 -
 13
13 -
 14
14 -
 15
15 -
 16
16 -
 17
17 -
18
-
19
-
20
-
21
-
22
 |
 |