Garmin Oregon 650 Owner's Manual - Page 7
Where To? Menu, Routes, Tracks - review
 |
View all Garmin Oregon 650 manuals
Add to My Manuals
Save this manual to your list of manuals |
Page 7 highlights
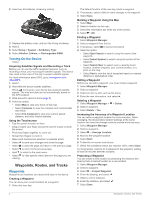
Where To? Menu You can use the Where To? menu to find a destination to navigate to. Not all Where To? categories are available in all areas and maps. Optional Maps You can use additional maps with the device, such as BirdsEye satellite imagery, BlueChart® g2, and City Navigator® detailed maps. Detailed maps may contain additional points of interest, such as restaurants or marine services. For more information, go to http: / / buy .garmin .com or contact your Garmin dealer. Finding a Location by Name 1 Select Where To? > Waypoints > 2 Enter the name or part of the name. 3 Select . > Spell Search. Finding a Location Near Another Location 1 Select Where To? > > Search Near. 2 Select an option. 3 Select a location. Finding an Address You can use optional City Navigator maps to search for addresses. 1 Select Where To? > Addresses. 2 Select the country or state, if necessary. 3 Enter the city or postal code. NOTE: Not all map data provides postal code searching. 4 Select the city. 5 Enter the house number. 6 Enter the street. Routes A route is a sequence of waypoints or locations that leads you to your final destination. Creating a Route 1 Select Route Planner > Create Route > Select First Point. 2 Select a category. 3 Select the first point in the route. 4 Select Use > Select Next Point. 5 Repeat steps 2-4 to add all the points in the route. 6 Select to save the route. Editing the Name of a Route 1 Select Route Planner. 2 Select a route. 3 Select Change Name. 4 Enter the new name, and select . Editing a Route 1 Select Route Planner. 2 Select a route. 3 Select Edit Route. 4 Select a point. 5 Select an option: • To view the point on the map, select Review. • To change the order of the points on the route, select Move Up or Move Down. • To insert an additional point on the route, select Insert. The additional point is inserted before the point you are editing. • To remove the point from the route, select Remove. 6 Select to save the route. Viewing a Route on the Map 1 Select Route Planner. 2 Select a route. 3 Select View Map. Deleting a Route 1 Select Route Planner. 2 Select a route. 3 Select Delete Route. Viewing the Active Route 1 While navigating a route, select Active Route. 2 Select a point in the route to view additional details. Reversing a Route 1 Select Route Planner. 2 Select a route. 3 Select Reverse Route. Tracks A track is a recording of your path. The track log contains information about points along the recorded path, including time, location, and elevation for each point. Recording a Track Log Select Current Track > . You can select to pause tracking. When paused, the track log is not recorded. Customizing Your Track Log You can customize how your device displays and records tracks. 1 Select Current Track > . 2 Select an option: • To change the color of the track line on the map, select Color. • To display a line on the map indicating your track, select Show On Map. 3 Select > Setup Tracks > Record Method. 4 Select an option: • To record tracks at a variable rate that creates an optimum representation of your tracks, select Auto. • To record tracks at a specified distance, select Distance. • To record tracks at a specified time, select Time. 5 Select Interval. 6 Complete an action: • If you selected Auto for the Record Method, select an option to record tracks more or less often. NOTE: Using the Most Often interval provides the most track detail, but fills up the device memory quicker. • If you selected Distance or Time for the Record Method, enter a value, and select . Navigating Using TracBack® While navigating, you can navigate back to the beginning of your track. This can be helpful when finding your way back to camp or the trail head. 1 Select Track Manager > Current Track > > TracBack. The map displays your route with a magenta line, start point, and end point. 2 Navigate using the map or the compass. Waypoints, Routes, and Tracks 3
-
 1
1 -
 2
2 -
 3
3 -
 4
4 -
 5
5 -
 6
6 -
 7
7 -
 8
8 -
 9
9 -
 10
10 -
 11
11 -
 12
12 -
13
-
14
-
15
-
16
-
17
-
18
-
19
-
20
-
21
-
22
 |
 |