Garmin Oregon 650 Owner's Manual - Page 6
Turning On the Device, Waypoints - t gps
 |
View all Garmin Oregon 650 manuals
Add to My Manuals
Save this manual to your list of manuals |
Page 6 highlights
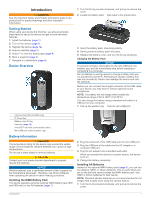
2 Insert two AA batteries, observing polarity. 3 Replace the battery cover, and turn the D-ring clockwise. 4 Hold . 5 Select Setup > System > AA Battery Type. 6 Select Alkaline, Lithium, or Rechargeable NiMH. Turning On the Device Hold . Acquiring Satellites Signals and Recording a Track Before you can use the GPS navigation features, such as recording a track, you must acquire satellite signals. The device may need a clear view of the sky to acquire satellite signals. For more information about GPS, go to www.garmin.com / aboutGPS. 1 Hold . 2 Wait while the device locates satellites. When turns green, your device has acquired satellite signals. The time and date are set automatically based on the GPS position. 3 Walk around to record a track (page 3). 4 Select an option: • Select Map to view your track on the map. • Select Compass to view the compass and customizable data fields. • Select Trip Computer to view your current speed, distance, and other helpful statistics. Using the Touchscreen • Tap the screen to select an item. • Drag or swipe your finger across the screen to pan or scroll the screen. • Pinch two fingers together to zoom out. • Spread two fingers to zoom in. • Make each touchscreen selection a separate action. • Select to save your changes and close the page. • Select to close the page and return to the previous page. • Select to return to the previous page. • Hold to return to the main menu. • Select to view specific menu items for the page you are viewing. Waypoints, Routes, and Tracks Waypoints Waypoints are locations you record and store in the device. Creating a Waypoint You can save your current location as a waypoint. 1 Select the user key. The default function of the user key marks a waypoint. 2 If necessary, select a field to make changes to the waypoint. 3 Select Save. Marking a Waypoint Using the Map 1 Select Map. 2 Select a location on the map. 3 Select the information bar at the top of the screen. 4 Select > OK. Finding a Waypoint 1 Select Waypoint Manager. 2 Select a waypoint from the list. 3 If necessary, select to narrow the search. 4 Select an option: • Select Spell Search to search using the name of the waypoint. • Select Select Symbol to search using the symbol of the waypoint. • Select Search Near to search near a recently found location, another waypoint, your current location, or a point on the map. • Select Sort to view the list of waypoints based on nearest distance or alphabetical order. Editing a Waypoint Before you can edit a waypoint, you must create a waypoint. 1 Select Waypoint Manager. 2 Select a waypoint. 3 Select an item to edit, such as the name. 4 Enter the new information, and select . Deleting a Waypoint 1 Select Waypoint Manager > 2 Select a waypoint. 3 Select Delete > Yes. > Delete. Increasing the Accuracy of a Waypoint Location You can refine a waypoint location for more accuracy. When averaging, the device takes several readings at the same location and uses the average value to provide more accuracy. 1 Select Waypoint Manager. 2 Select a waypoint. 3 Select > Average Location. 4 Move to the waypoint location. 5 Select Start. 6 Follow the on-screen instructions. 7 When the confidence status bar reaches 100%, select Save. For best results, collect 4 to 8 samples for the waypoint, waiting at least 90 minutes between samples. Projecting a Waypoint You can create a new location by projecting the distance and bearing from a marked location to a new location. 1 Select Waypoint Manager. 2 Select a waypoint. 3 Select > Project Waypoint. 4 Enter the bearing, and select . 5 Select a unit of measure. 6 Enter the distance, and select . 7 Select Save. 2 Waypoints, Routes, and Tracks
-
 1
1 -
 2
2 -
 3
3 -
 4
4 -
 5
5 -
 6
6 -
 7
7 -
 8
8 -
 9
9 -
 10
10 -
 11
11 -
 12
12 -
13
-
14
-
15
-
16
-
17
-
18
-
19
-
20
-
21
-
22
 |
 |