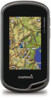
Garmin Oregon 650 Owner's Manual - Page 8
Garmin Adventures, Navigating to a Destination, Marking and Starting Navigation to a Man, Overboard - memory
 |
View all Garmin Oregon 650 manuals
Add to My Manuals
Save this manual to your list of manuals |
Page 8 highlights
Saving the Current Track 1 Select Track Manager > Current Track. 2 Select an option: • Select to save the entire track. • Select > Save Portion, and select a portion. Viewing Track Information 1 Select Track Manager. 2 Select a track. 3 Select . The beginning and the end of the track are marked by flags. 4 Select the information bar at the top of the screen. Information about the track appears. Viewing the Elevation Plot of a Track 1 Select Track Manager. 2 Select a track. 3 Select . Saving a Location on a Track 1 Select Track Manager. 2 Select a track. 3 Select . 4 Select a location on the track. 5 Select the information bar at the top of the screen. Information about the location appears. 6 Select > OK. Changing the Track Color You can change the color of a track to improve the view on the map or compare it to another track. 1 Select Track Manager. 2 Select a track. 3 Select Color. 4 Select a color. Archiving Saved Tracks You can archive saved tracks to save memory space. 1 Select Setup > Tracks > Auto Archive. 2 Select When Full, Daily, or Weekly. Clearing the Current Track Select Current Track > > Clear. Deleting a Track 1 Select Track Manager. 2 Select a track. 3 Select > Delete > Delete. Garmin Adventures You can create adventures to share your journeys with family, friends, and the Garmin community. Group related items together as an adventure. For example, you can create an adventure for your latest hiking trip. The adventure could contain the track log of the trip, photos of the trip, and geocaches you hunted. You can use BaseCamp™ to create and manage your adventures. For more information, go to http: / / adventures .garmin .com. Sending Files to BaseCamp 1 Open BaseCamp. 2 Connect the device to your computer (page 14). Your device and memory card (optional) appear as removable drives in My Computer on Windows® computers and as mounted volumes on Mac® computers. NOTE: Some computers with multiple network drives cannot display device drives. See your operating system help file to learn how to map the drive. 3 Open the Garmin or memory card drive or volume. 4 Select an option: • Select an item from a connected device and drag it to My Collection or to a list. • From BaseCamp, select Device > Receive from Device, and select the device. Creating an Adventure Before you can create an adventure and send it to your device, you must download BaseCamp to your computer and transfer a track from your device to your computer (page 4). 1 Open BaseCamp. 2 Select File > New > Garmin Adventure. 3 Select a track, and select Next. 4 If necessary, add items from BaseCamp. 5 Complete the required fields to name and describe the adventure. 6 If you want to change the cover photo for the adventure, select Change, and select a different photo. 7 Select Finish. Starting an Adventure Before you can start an adventure, you must send an adventure from BaseCamp to your device. 1 Select Adventures. 2 Select an adventure. 3 Select Start. Navigation You can navigate routes and tracks, to a waypoint, geocache, photo, or any saved location in the device. You can use the map or the compass to navigate to your destination. Navigating to a Destination 1 Select Where To?. 2 Select a category. 3 Select a destination. 4 Select Go. The map opens with your route marked with a magenta line. 5 Navigate using the map (page 4) or compass (page 5). Stopping Navigation From the map or compass, select > Stop Navigation. Marking and Starting Navigation to a Man Overboard Location You can save a man overboard (MOB) location, and automatically start navigation back to it. You can customize a key to access the MOB function quickly (page 10). 1 Select Man Overboard > Start. The map opens showing the route to the MOB location. The default appearance of the route is a magenta line. 2 Navigate using the map (page 4) or compass (page 5). Navigating with the Map 1 Begin navigating to a destination (page 4). 4 Navigation
-
 1
1 -
2
-
 3
3 -
 4
4 -
 5
5 -
 6
6 -
 7
7 -
 8
8 -
 9
9 -
 10
10 -
 11
11 -
 12
12 -
 13
13 -
14
-
15
-
16
-
17
-
18
-
19
-
20
-
21
-
22
 |
 |