Garmin fenix 2 Owner's Manual - Page 16
Sensors Settings - gps
 |
View all Garmin fenix 2 manuals
Add to My Manuals
Save this manual to your list of manuals |
Page 16 highlights
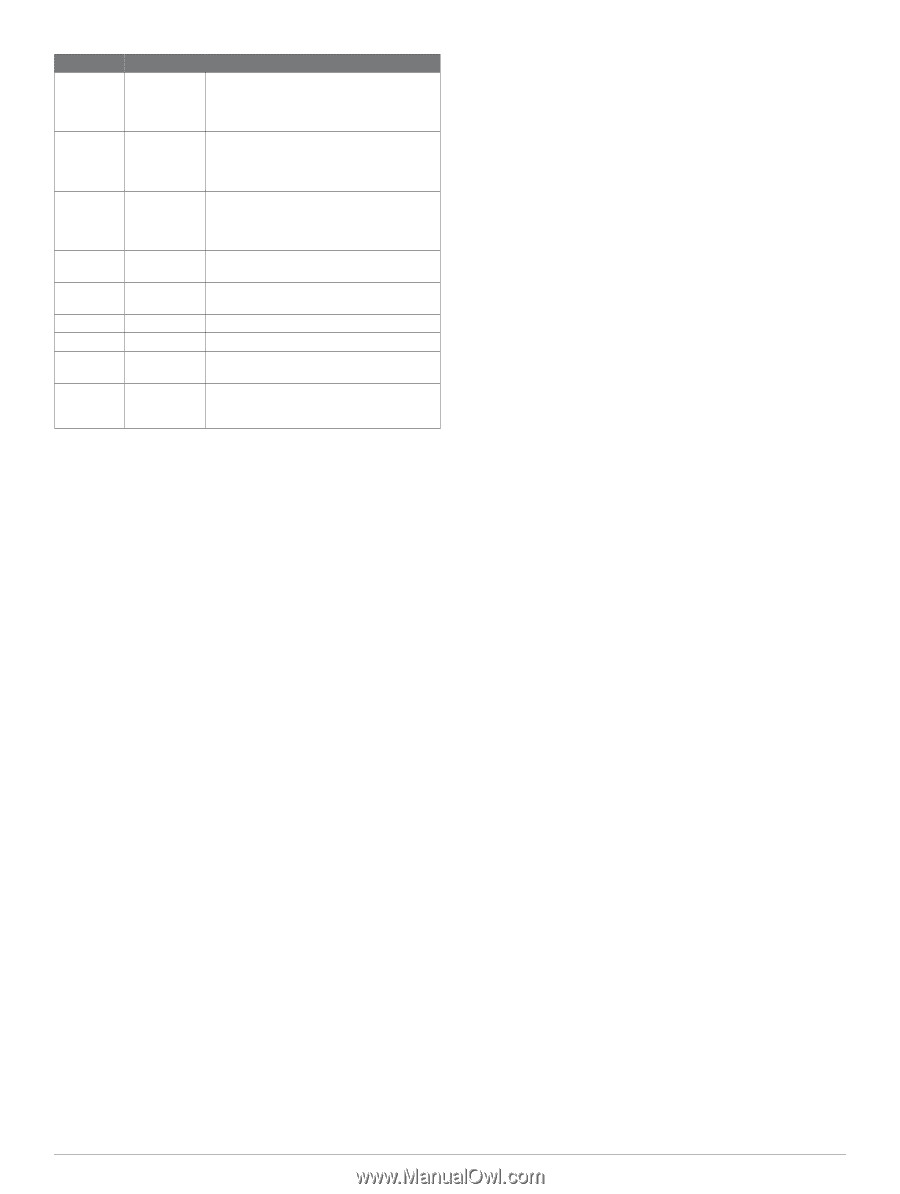
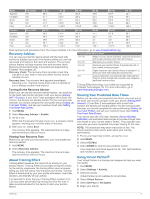
Alert Name Alert Type Description Distance Event, recurring You can set an interval, a custom distance from your final destination, or a custom distance if you go off-course from a track or route. Elevation Event, range, You can set minimum and maximum recurring elevation values. You can also set the device to alert you when you ascend or descend a specified amount. Heart Rate Range You can set minimum and maximum heart rate values or select zone changes. See About Heart Rate Zones and Heart Rate Zone Calculations. Nav. Arrival Event You can set alerts for reaching waypoints and the final destination of a track or route. Pace Range You can set minimum and maximum pace values. Power Range You can set the high or low power level. Proximity Recurring See Setting a Proximity Alarm. Speed Range You can set minimum and maximum speed values. Time Event, recurring You can set an interval, a custom time until sunset, or a custom time from your estimated time of arrival. Setting an Alert 1 Hold MENU. 2 Select Settings > Activity. 3 Select an activity. NOTE: This feature is not available for all activities. 4 Select Alerts. 5 Select the alert name. 6 If necessary, select the type of alert. 7 Select a zone, enter the minimum and maximum values, or enter a custom value for the alert. 8 If necessary, turn on the alert. For event and recurring alerts, a message appears each time you reach the alert value. For range alerts, a message appears each time you exceed or drop below the specified range (minimum and maximum values). Setting a Proximity Alarm Proximity alarms alert you when you are within a specified range of a particular location. 1 Hold MENU. 2 Select Settings > Activity. 3 Select an activity. NOTE: This feature is not available for all activities. 4 Select Alerts > Proximity > Edit > Create New. 5 Select a location. 6 Enter a radius. 7 Select Done. Using Auto Pause You can use Auto Pause to pause the timer automatically when you stop moving. This feature is helpful if your activity includes stop lights or other places where you need to or stop. NOTE: History is not recorded while the timer is stopped or paused. 1 Hold MENU. 2 Select Settings > Activity. 3 Select an activity. NOTE: This feature is not available for all activities. 4 Select Auto Pause. Auto Lap® Marking Laps by Distance You can use Auto Lap to mark a lap at a specific distance automatically. This feature is helpful for comparing your performance over different parts of an activity (for example, every 1 mile or 5 kilometers). 1 Hold MENU. 2 Select Settings > Activity. 3 Select an activity. NOTE: This feature is not available for all activities. 4 Select Auto Lap. 5 Select a distance. Each time you complete a lap, a message appears that displays the time for that lap. The device also beeps or vibrates if audible tones are turned on (General Settings). If necessary, you can customize the data pages to display additional lap data (Customizing the Data Pages). UltraTrac The UltraTrac feature is a GPS setting that records track points and sensor data less frequently. Enabling the UltraTrac feature increases battery life but decreases the quality of recorded activities. You should use the UltraTrac feature for activities that demand longer battery life and for which frequent sensor data updates are less important. The default interval between track points is one point per minute. You can adjust the interval. 3D Speed and Distance You can set 3D speed and distance to calculate your speed or distance using both your elevation change and your horizontal movement over ground. You can use it during activities such as skiing, climbing, navigating, hiking, running, or biking. Sensors Settings • You can calibrate and configure the internal compass (Compass Settings). • You can calibrate and configure the internal barometric altimeter (Altimeter Settings). • You can pair and configure ANT + sensors (ANT + Sensors). Compass Settings Hold MENU, and select Settings > Sensors > Compass. Display: Sets the directional heading on the compass to degrees or milli-radians. North Ref. : Sets the north reference of the compass (Setting the North Reference). Mode: Sets the compass to use either a combination of GPS and the electronic sensor data when moving (Auto) or GPS data only (Off). Calibrate: Allows you to manually calibrate the compass sensor (Calibrating the Compass). Setting the North Reference You can set the directional reference used in calculating heading information. 1 Hold MENU. 2 Select Settings > Sensors > Compass > North Ref. . 3 Select an option: • To set geographic north as the heading reference, select True. • To set the magnetic declination for your location automatically, select Magnetic. • To set grid north (000º) as the heading reference, select Grid. 12 Customizing Your Device
-
 1
1 -
2
-
3
-
4
-
5
-
6
-
7
-
8
-
9
-
10
-
 11
11 -
 12
12 -
 13
13 -
 14
14 -
 15
15 -
 16
16 -
 17
17 -
 18
18 -
 19
19 -
 20
20 -
 21
21 -
22
-
23
-
24
-
25
-
26
 |
 |