Garmin fenix 2 Owner's Manual - Page 5
Charging the Device, Viewing the Data s, Starting an Activity, Stopping an Activity, Support - updates
 |
View all Garmin fenix 2 manuals
Add to My Manuals
Save this manual to your list of manuals |
Page 5 highlights
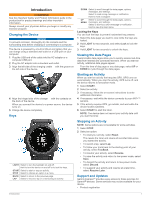
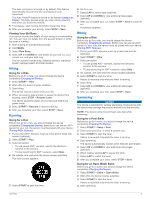
Introduction WARNING See the Important Safety and Product Information guide in the product box for product warnings and other important information. Always consult your physician before you begin or modify any exercise program. Charging the Device NOTICE To prevent corrosion, thoroughly dry the contacts and the surrounding area before charging or connecting to a computer. The device is powered by a built-in lithium-ion battery that you can charge using a standard wall outlet or a USB port on your computer. 1 Plug the USB end of the cable into the AC adapter or a computer USB port. 2 Plug the AC adapter into a standard wall outlet. 3 Align the left side of the charging cradle with the groove on À the left side of the device. DOWN Select to scroll through the data pages, options, Ã messages, and settings. Select to read a long message or notification. Hold to mark a waypoint. UP Ä MENU Select to scroll through the data pages, options, messages, and settings. Select to dismiss a short message or notification. Hold to view the main menu. Locking the Keys You can lock the keys to prevent inadvertent key presses. 1 Select the data page you want to view while the keys are locked. 2 Hold LIGHT for two seconds, and select Lock to lock the keys. 3 Hold LIGHT for two seconds to unlock the keys. Viewing the Data Pages Customizable data pages allow you to quickly access real-time data from internal and connected sensors. When you start an activity, additional data pages appear. From the time of day page or any data page, select UP or DOWN to cycle through the data pages. 4 Align the hinged side of the charger with the contacts on Á the back of the device. When you connect the device to a power source, the device turns on. 5 Charge the device completely. Keys Starting an Activity When you start an activity that requires GPS, GPS turns on automatically. When you stop the activity, GPS turns off, and the device returns to low-power mode. 1 Select START. 2 Select an activity. 3 If necessary, follow the on-screen instructions to enter additional information. 4 If necessary, wait while the device connects to your ANT +™ sensors. 5 If the activity requires GPS, go outside, and wait while the device locates satellites. 6 Select START to start the timer. NOTE: The device does not record your activity data until you start the timer. LIGHT Select to turn the backlight on and off. À Hold to turn the device on and off or to lock the keys. START Select to start or stop an activity. Á STOP Select to choose an option in a menu. BACK Select to return to the previous page. Â LAP Select to record a lap or a rest during an activity. Stopping an Activity NOTE: Some options are not available for some activities. 1 Select STOP. 2 Select an option: • To reset your activity, select Reset. This resets the timer and clears all recorded data since you started the activity. • To record a lap, select Lap. • To follow your track back to the starting point of your activity, select TracBack. • To resume your activity, select Resume. • To save the activity and return to low-power mode, select Save. • To discard the activity and return to low-power mode, select Discard. • To suspend your activity and resume at a later time, select Resume Later. Support and Updates Garmin Express™ provides easy access to these services for Garmin® devices. Some services may not be available for your device. • Product registration Introduction 1
-
 1
1 -
 2
2 -
 3
3 -
 4
4 -
 5
5 -
 6
6 -
 7
7 -
 8
8 -
 9
9 -
 10
10 -
 11
11 -
12
-
13
-
14
-
15
-
16
-
17
-
18
-
19
-
20
-
21
-
22
-
23
-
24
-
25
-
26
 |
 |