Garmin fenix 2 Owner's Manual - Page 9
Hiking, Running, Biking, Swimming - ratings
 |
View all Garmin fenix 2 manuals
Add to My Manuals
Save this manual to your list of manuals |
Page 9 highlights
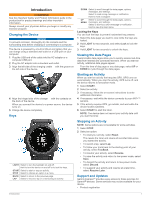
The auto run feature is turned on by default. This feature automatically records new ski runs based on your movement. The Auto Pause® feature is turned on by default (Using Auto Pause). The timer pauses when you stop moving downhill and when you board the chairlift. 5 If necessary, start moving downhill to restart the timer. 6 After you complete your activity, select STOP > Save. Viewing Your Ski Runs Your device records the details of each skiing or snowboarding run. You can view run details from the paused screen or while the timer is running. 1 Start a skiing or snowboarding activity. 2 Hold MENU. 3 Select View Runs. 4 Select UP and DOWN to view details of your last run, your current run, and your total runs. The run screens include time, distance traveled, maximum speed, average speed, and total descent. Hiking Going for a Hike Before you go for a hike, you should charge the device completely (Charging the Device). 1 Select START > Hike. 2 Wait while the device locates satellites. 3 Start hiking. The device records a track while you hike. 4 When you want to take a break or pause the device from tracking, select STOP > Resume Later. The device saves the status of your hike and enters low power mode. 5 Select START > Resume to resume tracking. 6 After you complete your hike, select STOP > Save. Running Going for a Run Before you go for a run, you should charge the device completely (Charging the Device). Before you can use an ANT + sensor for your run, the sensor must be paired with your device (Pairing ANT + Sensors). 1 Put on your ANT + sensors, such as a foot pod or heart rate monitor (optional). 2 Select START > Run. 3 Select an option: • To use paired ANT + sensors, wait for the device to connect to the sensors. • To skip searching for ANT + sensors, select Skip. 4 Go outside, and wait while the device locates satellites. The timer screen appears. 5 Select START to start the timer. 6 Go for a run. 7 Select LAP to record laps (optional). 8 Select UP and DOWN to view additional data pages (optional). 9 After you complete your run, select STOP > Save to save the run. A summary appears. Biking Going for a Ride Before you go for a ride, you should charge the device completely (Charging the Device). Before you can use an ANT + sensor for your ride, the sensor must be paired with your device (Pairing ANT + Sensors). 1 Put on your ANT + sensors, such as a heart rate monitor (optional). 2 Select START > Bike. 3 Select an option: • To use paired ANT + sensors, wait for the device to connect to the sensors. • To skip searching for ANT + sensors, select Skip. 4 Go outside, and wait while the device locates satellites. 5 Select START to start the timer. History is recorded only while the timer is running. 6 Start riding. 7 Select UP and DOWN to view additional data pages (optional). 8 After you complete your ride, select STOP > Save. Swimming NOTICE The device is intended for surface swimming. Scuba diving with the device may damage the product and will void the warranty. NOTE: The device cannot record heart rate data while swimming. Going for a Pool Swim Before you go for a swim, you should charge the device completely (Charging the Device). 1 Select START > Swim > Pool. 2 Select your pool size, or enter a custom size. 3 Select START to start the timer. History is recorded only while the timer is running. 4 Start swimming. The device automatically records swim intervals and lengths. 5 Select UP and DOWN to view additional data pages (optional). 6 When resting, select LAP to pause the timer. 7 Select LAP to restart the timer. 8 After you complete your swim, select STOP > Save. Going for an Open Water Swim Before you go for a swim, you should charge the device completely (Charging the Device). 1 Select START > Swim > Open Water. 2 Wait while the device locates satellites. 3 Select START to start the timer. History is recorded only while the timer is running. 4 Start swimming. Activities 5
-
 1
1 -
2
-
3
-
 4
4 -
 5
5 -
 6
6 -
 7
7 -
 8
8 -
 9
9 -
 10
10 -
 11
11 -
 12
12 -
 13
13 -
 14
14 -
15
-
16
-
17
-
18
-
19
-
20
-
21
-
22
-
23
-
24
-
25
-
26
 |
 |