Garmin fenix 2 Owner's Manual - Page 18
Resetting the Device to Factory Settings, Pairing ANT+ Sensors, tempe, Putting On the Heart Rate - bundle
 |
View all Garmin fenix 2 manuals
Add to My Manuals
Save this manual to your list of manuals |
Page 18 highlights
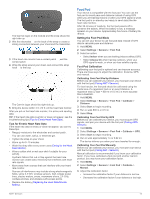
WAAS: Sets the device to use Wide Area Augmentation System (WAAS) GPS signals. For information about WAAS, go to www.garmin.com/ aboutGPS / waas .html. Hot Keys: Allows you to customize the hold function of the DOWN key. USB Mode: Sets the device to use mass storage mode or Garmin mode when connected to a computer. Map: Allows you to change the appearance of the map. Pos. Format: Sets the position format, datum, and spheroid used to calculate your GPS coordinates. Menu: Allows you to customize the items that appear in the main menu. Reset: Allows you to reset user data and settings. About: Displays device, software, and license information. Customizing the Hot Key You can customize the hold function of the DOWN key. By default, holding DOWN marks a waypoint. 1 Hold MENU. 2 Select Settings > System > Hot Keys > Hold Down. 3 Select a function. Map Settings To open the map settings, hold MENU, and select Settings > System > Map. Orientation: sets how the map is shown on the page. North Up sets how the map shows north at the top of the page. Track Up shows your current direction of travel toward the top of the page. Auto Zoom: Automatically selects the appropriate zoom level for optimal use on your map. When Off is selected, you must zoom in or out manually. Points: Sets the zoom level for points on the map. Track Log: Allows you to show or hide tracks on the map. Go To Line: Allows you to select how the course appears on the map. Map Colors: Allows you to select whether land or water is highlighted on the map. Position Format Settings NOTE: Do not change the position format or the map datum coordinate system unless you are using a map or chart that specifies a different position format. Hold MENU, and select Settings > System > Pos. Format. Format: Sets the position format in which a given location reading appears. Datum: Sets the coordinate system on which the map is structured. Spheroid: Shows the coordinate system the device is using. The default coordinate system is WGS 84. Customizing the Main Menu You can add, delete, or move items in the main menu. 1 Hold MENU. 2 Select Settings > System > Menu. 3 Select a menu item. 4 Select an option: • Select Move Up or Move Down to change the location of the item in the list. • Select Remove to delete an item from the list. • Select Insert to add an item to the list. Resetting the Device to Factory Settings You can restore all of the device settings to the factory default values. 1 Hold MENU. 2 Select Settings > System > Reset > All Settings. ANT + Sensors The device is compatible with these optional, wireless ANT + accessories. • Heart rate monitor, such as HRM - Run (Putting On the Heart Rate Monitor) • Bike speed and cadence sensor (Using an Optional Bike Cadence Sensor) • Foot pod (Foot Pod) • Power sensor, such as Vector • tempe wireless temperature sensor (tempe) For information about compatibility and purchasing additional sensors, go to http: / / buy .garmin .com. Pairing ANT + Sensors Before you can pair ANT + sensors, Bluetooth wireless technology must be turned off (Pairing Your Smartphone with Your fēnix 2 Device). The first time you connect a sensor to your device using ANT + wireless technology, you must pair the device and sensor. Once paired, the device connects to the sensor automatically when you start an activity and the sensor is active and within range. NOTE: If a heart rate monitor was bundled with your device, the included heart rate monitor is already paired with your device. 1 If you are pairing a heart rate monitor, put on the heart rate monitor (Putting On the Heart Rate Monitor). The heart rate monitor does not send or receive data until you put it on. 2 Bring the device within 3 m (10 ft. ) of the sensor. NOTE: Stay 10 m (33 ft. ) away from other ANT + sensors while pairing. 3 Hold MENU. 4 Select Settings > Sensors. 5 Select your sensor. 6 Select New Search. When the sensor is paired with your device, the sensor status changes from Searching to Connected. Sensor data appears in the data page loop or a custom data field. tempe The tempe is an ANT + wireless temperature sensor. You can attach the sensor to a secure strap or loop where it is exposed to ambient air, and therefore, provides a consistent source of accurate temperature data. You must pair the tempe with your device to display temperature data from the tempe. Putting On the Heart Rate Monitor NOTE: If you do not have a heart rate monitor, you can skip this task. You should wear the heart rate monitor directly on your skin, just below your breastplate. It should be snug enough to stay in place during your activity. 1 Snap the heart rate monitor module onto the strap. À 14 ANT+ Sensors
-
 1
1 -
2
-
3
-
4
-
5
-
6
-
7
-
8
-
9
-
10
-
11
-
12
-
 13
13 -
 14
14 -
 15
15 -
 16
16 -
 17
17 -
 18
18 -
 19
19 -
 20
20 -
 21
21 -
 22
22 -
 23
23 -
24
-
25
-
26
 |
 |
