| Section |
Page |
| Contents |
3 |
| Checking Out Your Gateway Computer |
9 |
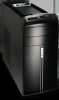
| Front |
10 |
| Back |
12 |
| Identifying your model |
14 |
| Gateway model number |
14 |
| Gateway serial number |
14 |
| Microsoft Certificate of Authenticity |
14 |
| Finding your specifications |
15 |
| Accessories |
16 |
| Home networking kit |
16 |
| Imaging equipment |
16 |
| Printers |
16 |
| Storage Devices |
17 |
| Memory |
17 |
| Uninterruptible power supplies |
17 |
| Getting Started |
19 |
| Working safely |
20 |
| Reducing eye strain |
20 |
| Setting up your computer desk and chair |
21 |
| Setting up your computer and computer accessories |
21 |
| Sitting at your computer |
22 |
| Avoiding discomfort and injury from repetitive strain |
22 |
| Protecting from power source problems |
23 |
| Starting your computer |
24 |
| To start your computer: |
24 |
| Turning off your computer |
25 |
| To turn off your computer: |
25 |
| Restarting (rebooting) your computer |
26 |
| To close unresponsive programs and restart your computer: |
26 |
| Multifunction keyboard |
27 |
| Special-function buttons |
28 |
| Mouse |
30 |
| Using the mouse |
31 |
| Installing a printer, scanner, or other peripheral device |
32 |
| Getting Help |
33 |
| Help and Support |
34 |
| To start Help and Support: |
34 |
| Searching for a topic |
34 |
| Online help |
35 |
| Gateway Web site |
36 |
| Using eSupport |
36 |
| Support Home |
37 |
| Downloads |
37 |
| Contact Us |
37 |
| Account Info |
37 |
| PC Tools |
37 |
| Windows Basics |
39 |
| About the Windows environment |
40 |
| Using the desktop |
41 |
| Using the Start menu |
42 |
| To use the Start menu: |
42 |
| Adding icons to the desktop |
43 |
| To add icons to the desktop: |
43 |
| Identifying window items |
44 |
| Working with files and folders |
46 |
| Viewing drives |
46 |
| To view the drives on your computer: |
46 |
| To see the files and folders on a drive: |
47 |
| Creating folders |
47 |
| To create a folder: |
48 |
| Copying and moving files and folders |
49 |
| To copy a file or folder to another folder: |
49 |
| To move a file or folder to another folder: |
50 |
| Deleting files and folders |
51 |
| To delete files or folders: |
51 |
| To recover files or folders from the Recycle Bin: |
51 |
| To empty the Recycle Bin: |
52 |
| Browsing for files and folders |
52 |
| To browse for a file: |
53 |
| Searching for files |
54 |
| Using the Windows Search utility |
55 |
| To find files and folders using the Search utility: |
55 |
| Using advanced search options |
56 |
| Working with documents |
57 |
| Creating a new document |
57 |
| To create a new document: |
57 |
| Saving a document |
58 |
| To save a document: |
58 |
| Opening a document |
59 |
| To open a document: |
59 |
| Printing a document |
60 |
| To print a document: |
60 |
| Shortcuts |
61 |
| Using the Internet |
63 |
| Learning about the Internet |
64 |
| Setting up an Internet account |
65 |
| To set up an Internet account with America Online: |
65 |
| Accessing your Internet account |
66 |
| To connect to your America Online Internet account: |
66 |
| To disconnect from your America Online Internet account: |
66 |
| Using the World�Wide�Web |
67 |
| Connecting to a Web�site |
68 |
| To connect to a Web site: |
68 |
| Downloading files |
69 |
| To download files or programs from a Web site: |
69 |
| Using e-mail |
70 |
| Sending e-mail |
70 |
| To send e-mail using America Online: |
70 |
| Checking your e-mail |
71 |
| To check your e-mail using America Online: |
71 |
| Sending and Receiving Faxes |
73 |
| Installing and configuring Fax |
74 |
| Installing Fax |
74 |
| To install Fax: |
74 |
| Configuring Fax |
75 |
| To configure Microsoft Fax: |
75 |
| Sending a simple fax |
77 |
| To send a simple fax: |
77 |
| Setting up your cover page template |
79 |
| To set up your fax cover page template: |
79 |
| Faxing from programs |
80 |
| To fax a document directly from most programs: |
80 |
| Faxing a scanned document |
80 |
| To fax a document that you have scanned: |
80 |
| Receiving and viewing a fax |
81 |
| To receive and view a fax: |
81 |
| Canceling a fax |
81 |
| To cancel a fax that has not been sent: |
81 |
| Automatically retry sending a fax |
82 |
| To automatically retry sending a fax: |
82 |
| Automatically cancelling a fax |
83 |
| To automatically cancel a failed fax: |
83 |
| Using Multimedia |
85 |
| Adjusting the volume |
86 |
| To adjust the overall volume level using hardware controls: |
86 |
| To adjust specific volume levels: |
86 |
| Recording and playing audio |
88 |
| To make an audio recording: |
88 |
| To play an audio recording in Sound Recorder: |
89 |
| Playing audio and video files with the Windows�Media�Player |
90 |
| To play a file using the Windows�Media�Player: |
90 |
| Using the CD or DVD drive |
92 |
| Identifying drive types |
92 |
| Inserting a CD or DVD |
93 |
| To insert a CD or DVD: |
93 |
| Listening to CDs |
94 |
| To play a CD: |
94 |
| Using MUSICMATCH |
96 |
| Playing CDs |
96 |
| To play a music�CD: |
96 |
| Creating MP3 music files |
98 |
| To create MP3 files: |
98 |
| Editing track information |
99 |
| To edit track information: |
99 |
| Building a music library |
101 |
| Changing the music library display settings |
102 |
| To change the music library display settings: |
102 |
| Listening to Internet radio |
103 |
| To listen to an Internet radio station: |
103 |
| Using advanced features |
103 |
| Playing a DVD |
103 |
| To play a DVD: |
104 |
| Creating CDs and DVDs |
105 |
| Copying a CD or DVD |
106 |
| To copy a music CD, data CD, or data DVD: |
106 |
| Creating a data CD or DVD |
110 |
| To create a data CD or DVD: |
110 |
| Copying music tracks |
113 |
| To copy music CD tracks to your hard drive: |
113 |
| Creating a music CD |
116 |
| To create a music CD: |
116 |
| Advanced features |
120 |
| Connecting a digital camera |
121 |
| To connect a digital camera: |
121 |
| Connecting a digital video camera |
122 |
| To connect a digital video camera: |
122 |
| Creating video DVDs |
122 |
| To create a video DVD: |
123 |
| Using the optional diskette drive |
124 |
| To use a diskette: |
124 |
| Using the optional media card reader |
125 |
| Media card types |
125 |
| Using a media card |
126 |
| To insert a media card: |
126 |
| To remove a media card: |
126 |
| Customizing Your Computer |
127 |
| Adjusting the screen and desktop settings |
128 |
| Adjusting the color depth |
128 |
| To change the color depth: |
128 |
| Adjusting the screen resolution |
130 |
| To adjust the screen resolution: |
130 |
| Changing the colors on your Windows desktop |
131 |
| To change desktop colors: |
131 |
| Changing the desktop background |
133 |
| To change the desktop background: |
133 |
| Selecting a screen saver |
134 |
| To select a screen saver: |
134 |
| Changing the mouse settings |
136 |
| To change your mouse settings: |
136 |
| Adding and modifying user accounts |
137 |
| User account tips |
137 |
| To add, delete, or modify user accounts: |
137 |
| To switch user accounts: |
138 |
| Power management |
139 |
| Using power saving modes |
139 |
| Changing power settings |
140 |
| Changing the power scheme |
140 |
| To change the power scheme: |
140 |
| Changing advanced power settings |
141 |
| To change advanced power management settings: |
141 |
| Activating and using Hibernate mode |
142 |
| To activate Hibernate mode: |
142 |
| To use Hibernate mode: |
144 |
| Setting up an uninterruptible power supply |
144 |
| To install an uninterruptible power supply (UPS): |
144 |
| Networking Your Computer |
147 |
| Benefits of networking |
148 |
| Sharing a single Internet connection |
148 |
| Sharing drives |
148 |
| Sharing peripheral devices |
149 |
| Streaming audio and video files |
149 |
| Playing multi-player games |
149 |
| Selecting a network connection |
150 |
| Wired Ethernet network |
150 |
| Wireless Ethernet network |
150 |
| Using a wired Ethernet network |
151 |
| Ethernet, Fast Ethernet, or Gigabit Ethernet |
151 |
| Example wired Ethernet network |
152 |
| Equipment you need for a wired Ethernet network |
153 |
| Using a wireless Ethernet network |
154 |
| Wireless Ethernet speed and frequency |
154 |
| Example access point wireless Ethernet network |
156 |
| Equipment you need for an access point wireless Ethernet network |
157 |
| Example peer-to-peer wireless Ethernet network |
158 |
| Equipment you need for a peer-to-peer wireless Ethernet network |
159 |
| For more information |
159 |
| Using your computer on a network |
160 |
| Installing and configuring your computer for Ethernet networking |
160 |
| Moving from Your Old Computer |
161 |
| Using the Windows�XP Files and Settings Transfer Wizard |
162 |
| To open the Files and Settings Transfer Wizard: |
162 |
| Transferring files |
163 |
| Finding your files |
163 |
| To find files in the My Documents folder: |
163 |
| To find files using Find or Search: |
164 |
| Transferring Internet settings |
165 |
| Setting up your ISP |
165 |
| To use the Internet Connection Wizard: |
165 |
| Transferring your e-mail and address book |
166 |
| Transferring your Internet shortcuts |
166 |
| Installing your old printer or scanner |
166 |
| Installing a USB printer or scanner |
166 |
| Installing a parallel port printer |
167 |
| To install your old printer: |
167 |
| Installing your old programs |
168 |
| Maintaining Your Computer |
169 |
| Caring for your computer |
170 |
| Protecting your computer from viruses |
172 |
| To scan for viruses: |
173 |
| To remove a virus: |
174 |
| To update Norton AntiVirus: |
174 |
| Managing hard drive space |
175 |
| Checking hard drive space |
175 |
| To check hard drive space: |
175 |
| Using Disk Cleanup |
176 |
| To use the Windows Disk Cleanup program: |
176 |
| Checking the hard drive for errors |
177 |
| To check the hard drive for errors: |
177 |
| Defragmenting the hard drive |
179 |
| To defragment the hard drive: |
179 |
| Backing up files |
181 |
| Using the Scheduled Task Wizard |
181 |
| To start the Scheduled Task Wizard: |
181 |
| Cleaning your computer |
183 |
| Cleaning the exterior |
183 |
| Cleaning the keyboard |
184 |
| Cleaning the computer screen |
184 |
| Cleaning the mouse |
185 |
| Restoring Software |
187 |
| Using the Restoration CDs |
188 |
| Reinstalling device drivers |
189 |
| To reinstall device drivers: |
189 |
| Updating device drivers |
191 |
| To update device drivers: |
191 |
| Reinstalling programs |
192 |
| To reinstall programs from the Applications CD(s): |
192 |
| To reinstall other programs from a CD: |
193 |
| Reinstalling Windows |
194 |
| To reinstall Windows�XP and the device drivers: |
194 |
| Upgrading Your Computer |
197 |
| Selecting a place to work |
198 |
| Gathering the tools you need |
198 |
| Preventing static electricity discharge |
199 |
| Opening the case |
200 |
| Removing the side panel |
200 |
| To remove the side panel: |
200 |
| Removing the front bezel |
203 |
| To remove the front bezel: |
203 |
| Closing the case |
204 |
| Replacing the side panel |
204 |
| To replace the side panel: |
204 |
| Replacing the front bezel |
205 |
| To replace the front bezel: |
205 |
| Adding or replacing a CD, DVD, or diskette drive |
206 |
| To add or replace a CD, DVD, or diskette drive: |
206 |
| Replacing the hard drive |
211 |
| To replace the hard drive: |
211 |
| Adding or replacing add-in cards |
214 |
| To replace, add, or reseat an add-in card: |
214 |
| Installing memory |
216 |
| To install or replace DIMM memory: |
216 |
| Replacing the system battery |
220 |
| To replace the battery: |
220 |
| Replacing the power supply |
222 |
| To replace the power supply: |
222 |
| Replacing the system board |
224 |
| To replace the system board: |
224 |
| Troubleshooting |
227 |
| Safety guidelines |
228 |
| First steps |
228 |
| Software support tools |
229 |
| Troubleshooting |
230 |
| Add-in cards |
230 |
| The computer does not recognize an add-in card |
230 |
| CD, DVD, or recordable drives |
230 |
| The computer does not recognize a disc or the CD, DVD, or recordable drive |
230 |
| Audio CD does not produce sound |
231 |
| A DVD movie will not play |
231 |
| Cleaning CDs and DVDs |
232 |
| Computer |
232 |
| The computer will not start |
232 |
| File management |
233 |
| A file was accidentally deleted |
233 |
| To restore files that were deleted: |
233 |
| Hard drive |
233 |
| You see an “Insufficient disk space” error message |
233 |
| You see a “Data error” message |
234 |
| The hard drive cannot be accessed, or you see a “General failure reading drive C” error message |
234 |
| The computer does not recognize an IDE drive |
234 |
| Internet |
234 |
| You cannot connect to the Internet |
234 |
| You see an “Unable to locate host” message and are unable to browse the Internet |
235 |
| Connecting to a Web site takes too long |
235 |
| People are sending you e-mail messages, but you have not received any mail |
235 |
| Keyboard |
236 |
| The keyboard does not work |
236 |
| A keyboard character keeps repeating or you see a “keyboard stuck” or “key failure” error message |
236 |
| Liquid spilled in the keyboard |
236 |
| Memory |
236 |
| You see a “memory error” message during startup |
236 |
| You see a “Not enough memory” error message |
236 |
| Modem |
237 |
| Your modem does not dial or does not connect |
237 |
| To check the dialing properties: |
237 |
| You cannot connect to the Internet |
238 |
| Your 56K modem does not connect at 56K |
238 |
| To access the Gateway dial-up server: |
239 |
| Your fax communications program only sends and receives faxes at 14,400�bps even though you have ... |
239 |
| The modem is not recognized by the computer |
239 |
| To run modem diagnostics: |
240 |
| The modem is noisy when it dials and connects |
240 |
| To turn down the modem volume: |
241 |
| Monitor |
241 |
| The screen resolution is not correct |
241 |
| The computer is running but there is no picture |
241 |
| The color is not uniform |
242 |
| Why is there a horizontal line or wire visible across the monitor screen? |
242 |
| The text on the display is dim or difficult to read |
242 |
| Mouse |
243 |
| The mouse does not work |
243 |
| The mouse works erratically |
243 |
| Power |
243 |
| My system is turned on but nothing is getting power |
243 |
| Printer |
244 |
| Printer will not turn on |
244 |
| Printer is on but will not print |
244 |
| To set a default printer: |
244 |
| You see a “Printer queue is full” error message |
244 |
| To make sure that the printer is not set to work offline: |
245 |
| You see a “Printer is out of paper” error message |
245 |
| Sound |
245 |
| You are not getting sound from the speakers |
245 |
| Using the BIOS Setup utility |
246 |
| To open BIOS Setup utility: |
246 |
| Telephone support |
248 |
| Before calling Gateway Technical Support |
248 |
| Telephone support |
249 |
| Automated troubleshooting system |
249 |
| Telephone numbers |
249 |
| Tutoring and training |
250 |
| Self-help |
250 |
| Tutoring |
250 |
| Training |
251 |
| Safety, Regulatory, and Legal Information |
253 |
| Important safety information |
253 |
| Regulatory compliance statements |
255 |
| Notices |
261 |
| Index |
263 |
| A |
263 |
| B |
263 |
| C |
263 |
| D |
265 |
| E |
266 |
| F |
267 |
| G |
267 |
| H |
267 |
| I |
268 |
| J |
269 |
| K |
269 |
| L |
269 |
| M |
269 |
| N |
270 |
| O |
271 |
| P |
271 |
| R |
272 |
| S |
272 |
| T |
274 |
| U |
275 |
| V |
275 |
| W |
275 |
 1
1 221
221 222
222 223
223 224
224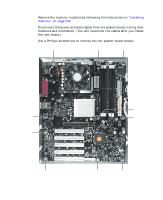 225
225 226
226 227
227 228
228 229
229 230
230 231
231

