HP 5590 HP Scanjet 5590 digital flatbed scanner - User's Manual - Page 19
run the cleaning cloth through the ADF, clean the ADF window - power cord
 |
UPC - 829160198705
View all HP 5590 manuals
Add to My Manuals
Save this manual to your list of manuals |
Page 19 highlights
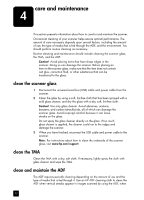
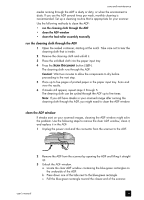
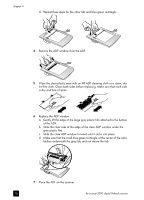
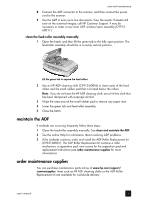
care and maintenance media running through the ADF is dusty or dirty, or when the environment is dusty. If you use the ADF several times per week, monthly cleaning is recommended. Set up a cleaning routine that is appropriate for your scanner. Use the following methods to clean the ADF: • run the cleaning cloth through the ADF • clean the ADF window • clean the feed-roller assembly manually run the cleaning cloth through the ADF 1 Open the sealed container, starting at the notch. Take care not to tear the cleaning cloth that is inside. 2 Remove the cleaning cloth and unfold it. 3 Place the unfolded cloth into the paper input tray. 4 Press the SCAN DOCUMENT button ( ). The cleaning cloth runs through the ADF. Caution! Wait two minutes to allow the components to dry before proceeding to the next step. 5 Place up to five pages of printed paper in the paper input tray. Scan and view the results. 6 If streaks still appear, repeat steps 3 through 5. The cleaning cloth can be cycled through the ADF up to five times. Note: If you still have streaks in your scanned image after running the cleaning cloth through the ADF, you might need to clean the ADF window. clean the ADF window If streaks exist on your scanned images, cleaning the ADF window might solve the problem. Use the following steps to remove the clear ADF window, clean it, and replace it in the ADF. 1 Unplug the power cord and the connector from the scanner to the ADF. 3 2 Remove the ADF from the scanner by opening the ADF and lifting it straight up. 3 Unlock the ADF window. a. Locate the clear ADF window containing the blue-green rectangles on the underside of the ADF. b. Press down one of the tabs next to the blue-green rectangle. c. Pull the blue-green rectangle toward the closest end of the scanner. user's manual 14
-
 1
1 -
2
-
3
-
4
-
5
-
6
-
7
-
8
-
9
-
10
-
11
-
12
-
13
-
 14
14 -
 15
15 -
 16
16 -
 17
17 -
 18
18 -
 19
19 -
 20
20 -
 21
21 -
 22
22 -
 23
23 -
 24
24 -
25
-
26
-
27
-
28
-
29
-
30
-
31
-
32
 |
 |