HP 5590 HP Scanjet 5590 digital flatbed scanner - User's Manual - Page 9
scan pictures, preview a scanned image, the HP Photo & Imaging Gallery. - adf
 |
UPC - 829160198705
View all HP 5590 manuals
Add to My Manuals
Save this manual to your list of manuals |
Page 9 highlights
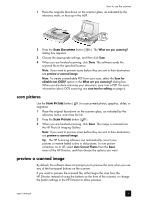
how to use the scanner 1 Place the originals face-down on the scanner glass, as indicated by the reference mark, or face-up in the ADF. 2 Press the SCAN DOCUMENT button ( dialog box appears. ). The What are you scanning? 3 Choose the appropriate settings, and then click Scan. 4 When you are finished scanning, click Done. The software sends the scanned file to the specified location. Note: If you want to preview scans before they are sent to their destination, see preview a scanned image. Note: To create a searchable PDF from your scan, select the Scan for editable text (OCR)? option in the What are you scanning? dialog box. When you are done scanning your document, save it as a PDF. For more information about OCR scanning, see scan text for editing on page 6. scan pictures Use the SCAN PICTURE button ( negatives. ) to scan printed photos, graphics, slides, or 1 Place the original face-down on the scanner glass, as indicated by the reference marks, and close the lid. 2 Press the SCAN PICTURE button ( ). 3 When you are finished scanning, click Done. The image is scanned into the HP Photo & Imaging Gallery. Note: If you want to preview scans before they are sent to their destination, see preview a scanned image. Tip: The HP Scanning software can automatically correct your pictures or restore faded colors in old pictures. To turn picture correction on or off, select Auto Correct Photos from the Basic menu of the HP Director, and then choose the options you want. preview a scanned image By default, the software does not prompt you to preview the scan when you use any of the front-panel buttons on the scanner. If you want to preview the scanned file, either begin the scan from the HP Director instead of using the buttons on the front of the scanner, or change the button settings in the HP Director to allow previews. user's manual 4
-
 1
1 -
2
-
3
-
 4
4 -
 5
5 -
 6
6 -
 7
7 -
 8
8 -
 9
9 -
 10
10 -
 11
11 -
 12
12 -
 13
13 -
 14
14 -
15
-
16
-
17
-
18
-
19
-
20
-
21
-
22
-
23
-
24
-
25
-
26
-
27
-
28
-
29
-
30
-
31
-
32
 |
 |