HP Color LaserJet Professional CP5220 HP Color LaserJet Professional CP5220 Se - Page 109
Interpret control-panel and status-alert messages, Load tray X press [OK]
 |
View all HP Color LaserJet Professional CP5220 manuals
Add to My Manuals
Save this manual to your list of manuals |
Page 109 highlights
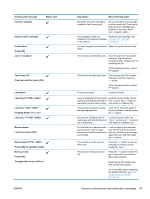
Control-panel message Incorrect supplies Status alert Install cartridge Invalid driver Press [OK] Jam in Jam in tray Clear jam and then press [OK] Load paper Load tray # Load tray 1 plain Cleaning Mode [OK] to start Load tray 1 Manual duplex Load tray X press [OK] Manual feed Press [OK] for available media Memory is low Press [OK] Try again later or turn off & on ENWW Description Recommended action More than one print cartridge is installed in the incorrect slot. Be sure that each print cartridge is in the correct slot. From front to back, the print cartridges are installed in this order: black, cyan, magenta, yellow. The cartridge is either not Install the print cartridge. See installed or not correctly installed Change print cartridges in the product. on page 81. You are using an incorrect printer Select the correct printer driver. driver. The product has detected a jam. Clear the jam from the location indicated. The job should continue to print. If it does not, try reprinting the job. If the message persists, contact HP support. The product has detected a jam. Clear the jam from the location indicated, and then press the OK button. If the message persists, contact HP support. All trays are empty. Load print media. A tray is configured for the media Load the correct media into the type and size that the print job is tray, or press the OK button to requesting, but that tray is empty. use media in a different tray. The product is ready to process the cleaning operation. Load Tray 1 with plain paper in the size indicated, and then press the OK button. No trays are configured for the Load the correct media into media type and size that the print Tray 1, or press the OK button to job is requesting. use media in a different tray. The first side of a manual duplex job has printed, and the page needs to be loaded to process the second side. Load the page in the indicated tray with the side to be printed face up, and the top of the page away from you, and then press the OK button. The product is set for manual feed mode. Press the OK button to clear the message or load the correct media into Tray 1. The product memory is almost full. Press the OK button to finish the job, or press the cancel button to cancel the job. Break the job into smaller jobs that contain fewer pages. For information about increasing the product memory, see Install memory and font DIMMs on page 84. Interpret control-panel and status-alert messages 97
-
 1
1 -
2
-
3
-
4
-
5
-
6
-
7
-
8
-
9
-
10
-
11
-
12
-
13
-
14
-
15
-
16
-
17
-
18
-
19
-
20
-
21
-
22
-
23
-
24
-
25
-
26
-
27
-
28
-
29
-
30
-
31
-
32
-
33
-
34
-
35
-
36
-
37
-
38
-
39
-
40
-
41
-
42
-
43
-
44
-
45
-
46
-
47
-
48
-
49
-
50
-
51
-
52
-
53
-
54
-
55
-
56
-
57
-
58
-
59
-
60
-
61
-
62
-
63
-
64
-
65
-
66
-
67
-
68
-
69
-
70
-
71
-
72
-
73
-
74
-
75
-
76
-
77
-
78
-
79
-
80
-
81
-
82
-
83
-
84
-
85
-
86
-
87
-
88
-
89
-
90
-
91
-
92
-
93
-
94
-
95
-
96
-
97
-
98
-
99
-
100
-
101
-
102
-
103
-
 104
104 -
 105
105 -
 106
106 -
 107
107 -
 108
108 -
 109
109 -
 110
110 -
 111
111 -
 112
112 -
 113
113 -
 114
114 -
115
-
116
-
117
-
118
-
119
-
120
-
121
-
122
-
123
-
124
-
125
-
126
-
127
-
128
-
129
-
130
-
131
-
132
-
133
-
134
-
135
-
136
-
137
-
138
-
139
-
140
-
141
-
142
-
143
-
144
-
145
-
146
-
147
-
148
-
149
-
150
-
151
-
152
-
153
-
154
-
155
-
156
-
157
-
158
-
159
-
160
-
161
-
162
-
163
-
164
-
165
-
166
-
167
-
168
 |
 |
