HP Deskjet 9800 HP Deskjet 9800 - Getting Started Guide - Page 5
Schritt 4: Installieren der optionalen Duplex-Einheit
 |
View all HP Deskjet 9800 manuals
Add to My Manuals
Save this manual to your list of manuals |
Page 5 highlights
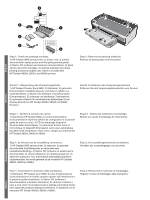
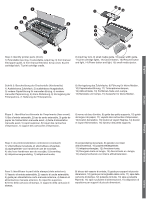
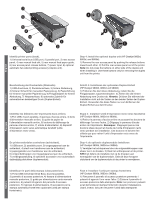
8 Identify printer parts (back). 1) Universal serial bus (USB) port, 2) parallel port, 3) rear access panel, 4) rear manual feed slot, 5) rear manual feed paper guide, 6) rear access panel release buttons, 7) power input, 8) optional automatic two-sided printing accessory (duplex unit). Step 4: Install the optional duplex unit (HP Deskjet 9800d, 9803d, and 9808d). 1) Remove the rear access panel by pushing the release buttons toward each other. 2) Pull the rear access panel out of the printer. Note: Do not press the buttons on either side of the duplex unit when installing it. Use these buttons only for removing the duplex unit from the printer. English Deutscn Français Beschreibung der Druckerteile (Rückseite) 1) USB-Anschluss, 2) Parallelanschluss, 3) hintere Abdeckung, 4) hinterer Schacht für manuellen Papiereinzug, 5) Papierführung für hinteren manuellen Papiereinzug, 6) Freigabetasten für hintere Abdeckung, 7) Netzanschluss, 8) optionales Zubehör für automatischen beidseitigen Druck (Duplex-Einheit). Schritt 4: Installieren der optionalen Duplex-Einheit (HP Deskjet 9800d, 9803d und 9808d) 1) Entfernen Sie die hintere Abdeckung, indem Sie die Freigabetasten zusammendrücken. 2) Ziehen Sie die hintere Abdeckung vom Drucker ab. Hinweis: Drücken Sie während der Installation nicht auf die Tasten an den beiden Seiten der DuplexEinheit. Verwenden Sie diese Tasten nur zum Entfernen der Duplex-Einheit aus dem Drucker. Identifiez les éléments de l'imprimante (face arrière). 1) Port USB, 2) port parallèle, 3) panneau d'accès arrière, 4) fente d'alimentation manuelle arrière, 5) guide de papier de l'alimentation manuelle arrière, 6) boutons de déblocage du panneau d'accès arrière, 7) entrée d'alimentation, 8) dispositif d'impression recto verso automatique facultatif (unité d'impression recto verso). De printeronderdelen controleren (achterkant). 1) USB-poort, 2) parallelle poort, 3) toegangspaneel aan de achterkant, 4) sleuf voor handinvoer aan de achterkant, 5) papiergeleider voor handinvoer aan de achterkant, 6) ontgrendelknoppen voor toegangspaneel aan de achterkant, 7) voedingsaansluiting, 8) optionele accessoire voor automatisch dubbelzijdig afdrukken (duplexmodule). Etape 4 : Installez l'unité d'impression recto verso facultative (HP Deskjet 9800d, 9803d et 9808d). 1) Retirez le panneau d'accès arrière en poussant les boutons de déblocage l'un vers l'autre. 2) Dégagez le panneau d'accès arrière de l'imprimante. Remarque : N'appuyez pas sur les boutons situés de part et d'autre de l'unité d'impression recto verso pendant son installation. Ces boutons ne doivent être utilisés que pour retirer l'unité d'impression recto verso de l'imprimante. Stap 4: de optionele duplexmodule installeren (HP Deskjet 9800d, 9803d en 9808d). 1) Verwijder het achterpaneel door de ontgrendelknoppen naar elkaar toe in te drukken. 2) Haal het achterpaneel uit de printer. N.B.Druk tijdens de installatie niet op de knoppen aan weerszijden van de duplexmodule. Gebruik deze knoppen uitsluitend om de duplexmodule uit de printer te verwijderen. Nederlands Italiano Identificare le parti della stampa (vista posteriore). 1) Porta USB (Universal Serial Bus), 2) porta parallela, 3) pannello di accesso posteriore, 4) fessura di alimentazione manuale posteriore, 5) guida per alimentazione carta manuale posteriore, 6) pulsanti di sgancio del pannello di accesso posteriore, 7) ingresso di alimentazione, 8) accessorio per la stampa automatica fronte/retro opzionale (unità per stampa fronte/retro). Fase 4: Installare l'unità per stampa fronte/retro (HP Deskjet 9800d, 9803d e 9808d). 1) Rimuovere il pannello di accesso posteriore premendo i pulsanti di sgancio l'uno verso l'altro. 2) Estrarre il pannello di accesso posteriore dalla stampante. Nota: non premere i pulsanti ai lati dell'unità per stampa fronte/retro durante l'installazione. Usarli, invece, solo per rimuovere l'unità dalla stampante.
-
 1
1 -
 2
2 -
 3
3 -
 4
4 -
 5
5 -
 6
6 -
 7
7 -
 8
8 -
 9
9 -
 10
10 -
 11
11 -
12
-
13
-
14
-
15
-
16
-
17
-
18
-
19
-
20
-
21
-
22
-
23
-
24
-
25
-
26
-
27
-
28
-
29
-
30
-
31
-
32
-
33
-
34
-
35
-
36
-
37
-
38
-
39
 |
 |
