HP Deskjet 9800 HP Deskjet 9800 - Getting Started Guide - Page 6
Schritt 5: Anschließen des Netzkabels
 |
View all HP Deskjet 9800 manuals
Add to My Manuals
Save this manual to your list of manuals |
Page 6 highlights
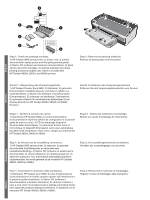
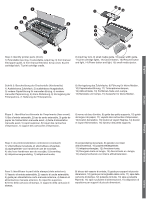
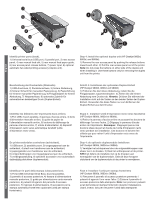
3) Insert the duplex unit straight into the back of the printer until both sides snap into place. Step 5: Connect the power cord. 1) Connect the power cord to the printer. 2) Plug in the power cord to the power supply. Note: Only connect the printer to the computer (through the USB or parallel cable) after you have completed the software installation or when prompted to do so during installation. 3) Führen Sie die Duplex-Einheit gerade in die Rückseite des Druckers ein, bis beide Seiten einrasten. Schritt 5: Anschließen des Netzkabels 1) Schließen Sie das Netzkabel an den Drucker an. 2) Stecken Sie das Netzkabel in die Steckdose. Hinweis: Verbinden Sie den Drucker erst dann (über das USB- oder Parallelkabel) mit dem Computer, nachdem Sie die Installation der Software abgeschlossen haben oder wenn Sie während der Installation dazu aufgefordert werden. 3) Insérez l'unité d'impression recto verso dans la partie arrière de l'imprimante jusqu'à ce qu'elle s'enclenche. Etape 5 : Branchez le cordon d'alimentation. 1) Branchez le cordon d'alimentation sur l'imprimante. 2) Branchez le cordon d'alimentation au secteur. Remarque : Ne connecter l'imprimante à l'ordinateur (via le câble USB ou parallèle) qu'après avoir terminé d'installer le logiciel ou lorsque le système invite à le faire au cours de l'installation. 3) Plaats de duplexmodule recht in de achterkant van de printer totdat beide zijden op hun plaats vastklikken. Stap 5: de voedingskabel aansluiten. 1) Sluit de voedingskabel aan op de printer. 2) Sluit de voedingskabel aan op de voedingseenheid. N.B. Sluit de printer pas aan op de computer (met de USB-kabel of parallelle printerkabel) nadat u de software hebt geïnstalleerd of tijdens de installatie hiervan, op het moment dat de computer u dit vraagt. 3) Inserire l'unità per stampa fronte/retro nel retro della stampante, fino a quando entrambi i lati non scattano in posizione. Fase 5: Collegare il cavo di alimentazione. 1) Collegare il cavo di alimentazione alla stampante. 2) Inserire il cavo di alimentazione nella presa di corrente. Nota: collegare la stampante al computer (mediante il cavo USB o parallelo) solo dopo aver completato l'installazione del software oppure quando richiesto durante l'installazione.
-
 1
1 -
 2
2 -
 3
3 -
 4
4 -
 5
5 -
 6
6 -
 7
7 -
 8
8 -
 9
9 -
 10
10 -
 11
11 -
 12
12 -
13
-
14
-
15
-
16
-
17
-
18
-
19
-
20
-
21
-
22
-
23
-
24
-
25
-
26
-
27
-
28
-
29
-
30
-
31
-
32
-
33
-
34
-
35
-
36
-
37
-
38
-
39
 |
 |
