HP LE1901w HP LE1901w/LE1901wm and LE2201w LCD Monitors User Guide - Page 14
Turning on the Monitor, Mounting the Monitor Panel - power button lockout
 |
UPC - 884420692393
View all HP LE1901w manuals
Add to My Manuals
Save this manual to your list of manuals |
Page 14 highlights
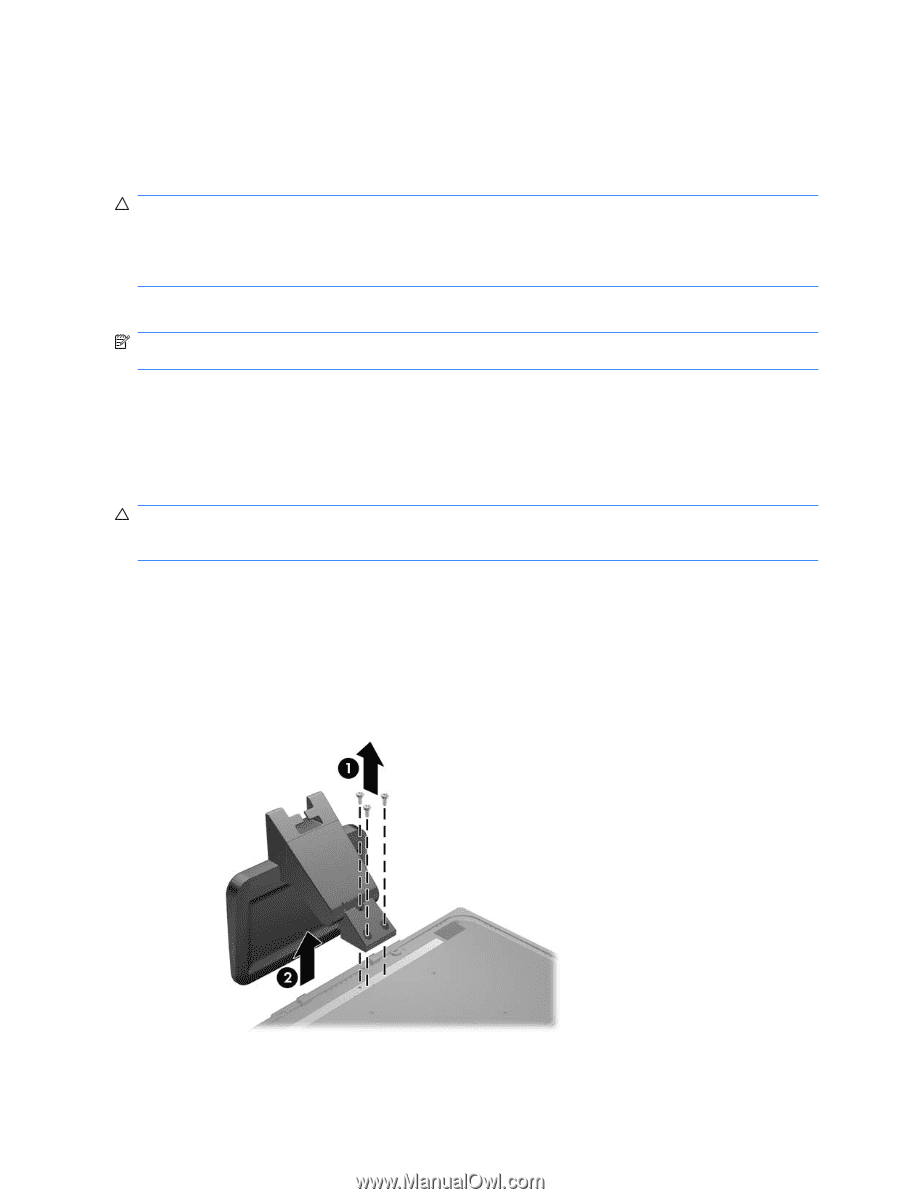
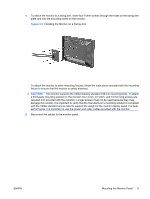
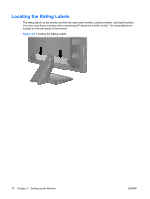
Turning on the Monitor 1. Press the power button on the computer to turn it on. 2. Press the power button on the front of the monitor to turn it on. CAUTION: Burn-in image damage may occur on monitors that display the same static image on screen for a prolonged period of time.* To avoid burn-in image damage on the monitor screen, you should always activate a screen saver application or turn off the monitor when it is not in use for a prolonged period of time. Image retention is a condition that may occur on all LCD screens. Monitors with a "burned-in image" are not covered under the HP warranty. * A prolonged period of time is 12 consecutive hours of non-use. NOTE: If pressing the power button has no effect, the Power Button Lockout feature may be enabled. To disable this feature, press and hold the monitor power button for 10 seconds. Mounting the Monitor Panel You can remove the monitor panel from the pedestal base to install the panel on a wall, a swing arm, or other mounting fixture. Four threaded mounting holes are provided on the monitor back panel to be used for mounting purposes. CAUTION: Before beginning to disassemble the monitor, be sure the monitor is turned off and the power and signal cables are both disconnected. If the monitor has a connected audio cable, disconnect it. 1. Disconnect and remove the signal and power cables from the back of the monitor. 2. Lay the monitor face down on a flat surface. 3. Remove the three screws on the back of the monitor that connect the monitor panel to the pedestal base (1) and slide the pedestal base from the monitor panel (2). Figure 3-4 Removing the Pedestal Base 8 Chapter 3 Setting Up the Monitor ENWW
-
 1
1 -
2
-
3
-
4
-
5
-
6
-
7
-
8
-
 9
9 -
 10
10 -
 11
11 -
 12
12 -
 13
13 -
 14
14 -
 15
15 -
 16
16 -
 17
17 -
 18
18 -
 19
19 -
20
-
21
-
22
-
23
-
24
-
25
-
26
-
27
-
28
-
29
-
30
-
31
-
32
-
33
-
34
-
35
-
36
-
37
-
38
-
39
-
40
-
41
-
42
-
43
-
44
-
45
 |
 |