HP Pavilion 11-k000 Maintenance and Service Guide - Page 55
Phillips PM2.5×4.0 screws
 |
View all HP Pavilion 11-k000 manuals
Add to My Manuals
Save this manual to your list of manuals |
Page 55 highlights
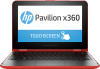
2. Remove the Phillips PM2.5×3.0 screw from the WLAN module (1). CAUTION: To avoid damaging the WLAN module, do not remove the module from the system board socket until AFTER you removing the system board from the computer. 3. Remove the five Phillips PM2.5×4.0 screws (2) that secure the system board to the computer. 4. Loosen the captive screw in the upper right corner of the system board (3). Component replacement procedures 47
-
 1
1 -
2
-
3
-
4
-
5
-
6
-
7
-
8
-
9
-
10
-
11
-
12
-
13
-
14
-
15
-
16
-
17
-
18
-
19
-
20
-
21
-
22
-
23
-
24
-
25
-
26
-
27
-
28
-
29
-
30
-
31
-
32
-
33
-
34
-
35
-
36
-
37
-
38
-
39
-
40
-
41
-
42
-
43
-
44
-
45
-
46
-
47
-
48
-
49
-
 50
50 -
 51
51 -
 52
52 -
 53
53 -
 54
54 -
 55
55 -
 56
56 -
 57
57 -
 58
58 -
 59
59 -
 60
60 -
61
-
62
-
63
-
64
-
65
-
66
-
67
-
68
-
69
-
70
-
71
-
72
-
73
-
74
-
75
-
76
-
77
-
78
-
79
-
80
-
81
-
82
-
83
-
84
-
85
-
86
-
87
-
88
-
89
-
90
-
91
-
92
-
93
-
94
-
95
-
96
-
97
-
98
-
99
-
100
-
101
-
102
-
103
-
104
-
105
-
106
-
107
-
108
 |
 |

2.
Remove the Phillips PM2.5×3.0 screw from the WLAN module
(1)
.
CAUTION:
To avoid damaging the WLAN module, do not remove the module from the system board
socket until AFTER you removing the system board from the computer.
3.
Remove the
five
Phillips PM2.5×4.0 screws
(2)
that secure the system board to the computer.
4.
Loosen the captive screw in the upper right corner of the system board
(3)
.
Component replacement procedures
47