HP Photosmart C4700 User Guide - Page 91
Solution 2: Clean the print cartridge contacts, CAUTION
 |
View all HP Photosmart C4700 manuals
Add to My Manuals
Save this manual to your list of manuals |
Page 91 highlights
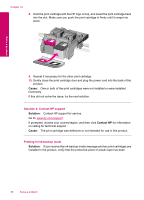
5. Reinsert the print cartridge by sliding it forward into the slot on the right. Then push the print cartridge forward until it clicks into the socket. Solve a problem 6. Repeat steps 1 and 2 for the tri-color print cartridge on the left side. Cause: The indicated print cartridge were installed incorrectly. If this did not solve the issue, try the next solution. Solution 2: Clean the print cartridge contacts Solution: Clean the print cartridge contacts. Make sure you have the following materials available: • Dry foam rubber swabs, lint-free cloth, or any soft material that will not come apart or leave fibers. TIP: Coffee filters are lint-free and work well for cleaning print cartridges. • Distilled, filtered, or bottled water (tap water might contain contaminants that can damage the print cartridges). CAUTION: Do not use platen cleaners or alcohol to clean the print cartridge contacts. These can damage the print cartridge or the product. To clean the print cartridge contacts 1. Turn on the product and open the print cartridge door. The print carriage moves to the far right side of the product. Errors 89
-
 1
1 -
2
-
3
-
4
-
5
-
6
-
7
-
8
-
9
-
10
-
11
-
12
-
13
-
14
-
15
-
16
-
17
-
18
-
19
-
20
-
21
-
22
-
23
-
24
-
25
-
26
-
27
-
28
-
29
-
30
-
31
-
32
-
33
-
34
-
35
-
36
-
37
-
38
-
39
-
40
-
41
-
42
-
43
-
44
-
45
-
46
-
47
-
48
-
49
-
50
-
51
-
52
-
53
-
54
-
55
-
56
-
57
-
58
-
59
-
60
-
61
-
62
-
63
-
64
-
65
-
66
-
67
-
68
-
69
-
70
-
71
-
72
-
73
-
74
-
75
-
76
-
77
-
78
-
79
-
80
-
81
-
82
-
83
-
84
-
85
-
 86
86 -
 87
87 -
 88
88 -
 89
89 -
 90
90 -
 91
91 -
 92
92 -
 93
93 -
 94
94 -
 95
95 -
 96
96 -
97
-
98
-
99
-
100
-
101
-
102
-
103
-
104
-
105
-
106
-
107
-
108
-
109
-
110
-
111
-
112
-
113
-
114
-
115
-
116
-
117
-
118
-
119
-
120
 |
 |
