HP Pro Tower 200 G9 Desktop PC Maintenance and Service Guide - Page 28
If you are removing a PCI or PCI Express ×1 card, hold the card at each end
 |
View all HP Pro Tower 200 G9 Desktop PC manuals
Add to My Manuals
Save this manual to your list of manuals |
Page 28 highlights
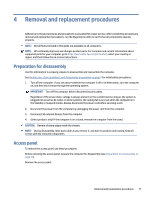
2. Remove the Torx screw that secures the expansion card release latch (1), and then rotate the release latch downward to the open position (2). NOTE: Computer appearance might vary. 3. Before installing an expansion card, remove the expansion slot cover or the existing expansion card. NOTE: Before removing an installed expansion card, disconnect any cables that are attached to the expansion card. a. If you are installing an expansion card in a vacant PCI socket, remove the appropriate expansion slot cover on the back of the chassis. b. If you are removing a PCI or PCI Express ×1 card, hold the card at each end, and carefully rock it back and forth until the connectors pull free from the socket. Pull the expansion card straight up from the socket. NOTE: PCI Express ×1 card shown. Internal components may vary. Expansion card 21
-
 1
1 -
2
-
3
-
4
-
5
-
6
-
7
-
8
-
9
-
10
-
11
-
12
-
13
-
14
-
15
-
16
-
17
-
18
-
19
-
20
-
21
-
22
-
 23
23 -
 24
24 -
 25
25 -
 26
26 -
 27
27 -
 28
28 -
 29
29 -
 30
30 -
 31
31 -
 32
32 -
 33
33 -
34
-
35
-
36
-
37
-
38
-
39
-
40
-
41
-
42
-
43
-
44
-
45
-
46
-
47
-
48
-
49
-
50
-
51
-
52
-
53
-
54
-
55
-
56
-
57
-
58
-
59
-
60
-
61
-
62
-
63
-
64
-
65
-
66
-
67
-
68
-
69
-
70
-
71
-
72
-
73
-
74
-
75
-
76
-
77
-
78
-
79
-
80
-
81
-
82
-
83
-
84
-
85
-
86
-
87
-
88
-
89
-
90
-
91
-
92
-
93
-
94
-
95
-
96
-
97
-
98
-
99
-
100
-
101
-
102
-
103
-
104
-
105
-
106
-
107
-
108
-
109
-
110
-
111
-
112
-
113
-
114
-
115
-
116
 |
 |
