HP Pro Tower 200 G9 Desktop PC Maintenance and Service Guide - Page 39
Solid-state drive, Battery
 |
View all HP Pro Tower 200 G9 Desktop PC manuals
Add to My Manuals
Save this manual to your list of manuals |
Page 39 highlights
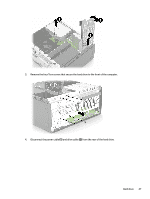
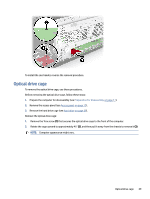
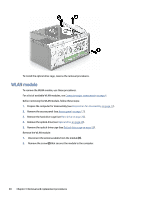
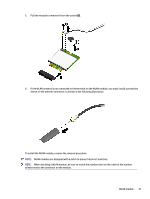
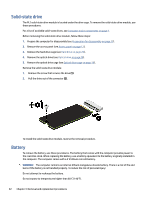
Solid-state drive The M.2 solid-state drive module is located under the drive cage. To remove the solid-state drive module, use these procedures. For a list of available solid-state drives, see Computer major components on page 4. Before removing the solid-state drive module, follow these steps: 1. Prepare the computer for disassembly (see Preparation for disassembly on page 17). 2. Remove the access panel (see Access panel on page 17). 3. Remove the hard drive cage (see Hard drive on page 26). 4. Remove the optical drive (see Optical drive on page 24). 5. Remove the optical drive cage (see Optical drive cage on page 29). Remove the solid-state drive module: 1. Remove the screw that secures the drive (1). 2. Pull the drive out of the connector (2). To install the solid-state drive module, reverse the removal procedure. Battery To remove the battery, use these procedures. The battery that comes with the computer provides power to the real-time clock. When replacing the battery, use a battery equivalent to the battery originally installed in the computer. The computer comes with a 3 V lithium coin cell battery. WARNING! The computer contains an internal lithium manganese dioxide battery. There is a risk of fire and burns if the battery is not handled properly. To reduce the risk of personal injury: Do not attempt to recharge the battery. Do not expose to temperatures higher than 60°C (140°F). 32 Chapter 4 Removal and replacement procedures
-
 1
1 -
2
-
3
-
4
-
5
-
6
-
7
-
8
-
9
-
10
-
11
-
12
-
13
-
14
-
15
-
16
-
17
-
18
-
19
-
20
-
21
-
22
-
23
-
24
-
25
-
26
-
27
-
28
-
29
-
30
-
31
-
32
-
33
-
 34
34 -
 35
35 -
 36
36 -
 37
37 -
 38
38 -
 39
39 -
 40
40 -
 41
41 -
 42
42 -
 43
43 -
 44
44 -
45
-
46
-
47
-
48
-
49
-
50
-
51
-
52
-
53
-
54
-
55
-
56
-
57
-
58
-
59
-
60
-
61
-
62
-
63
-
64
-
65
-
66
-
67
-
68
-
69
-
70
-
71
-
72
-
73
-
74
-
75
-
76
-
77
-
78
-
79
-
80
-
81
-
82
-
83
-
84
-
85
-
86
-
87
-
88
-
89
-
90
-
91
-
92
-
93
-
94
-
95
-
96
-
97
-
98
-
99
-
100
-
101
-
102
-
103
-
104
-
105
-
106
-
107
-
108
-
109
-
110
-
111
-
112
-
113
-
114
-
115
-
116
 |
 |
