HP ProBook 5330m HP ProBook 5330m Notebook PC - Maintenance and Service Guide - Page 80
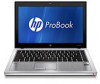
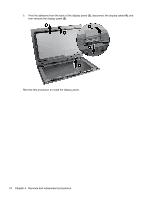
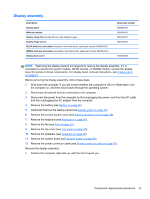
Display panel, of the bezel from the inside edge until it disengages from the display back cover.
 |
View all HP ProBook 5330m manuals
Add to My Manuals
Save this manual to your list of manuals |
Page 80 highlights
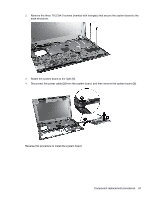
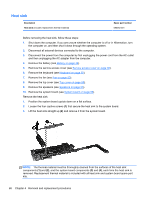
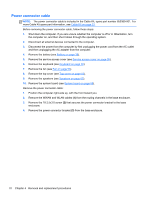
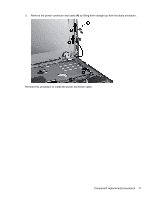
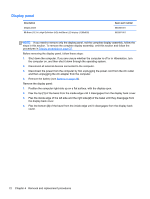
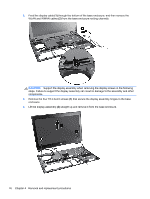
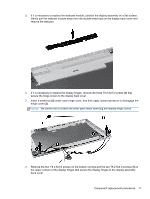
Display panel Description Display bezel 33.8 cm (13.3 in) High-Definition (HD) AntiGlare LED display (1280x800) Spare part number 650368-001 650397-001 NOTE: If you need to remove only the display panel, not the complete display assembly, follow the steps in this section. To remove the complete display assembly, omit this section and follow the procedures in Display assembly on page 75. Before removing the display panel, follow these steps: 1. Shut down the computer. If you are unsure whether the computer is off or in Hibernation, turn the computer on, and then shut it down through the operating system. 2. Disconnect all external devices connected to the computer. 3. Disconnect the power from the computer by first unplugging the power cord from the AC outlet and then unplugging the AC adapter from the computer. 4. Remove the battery (see Battery on page 36). Remove the display panel: 1. Position the computer right-side up on a flat surface, with the display open. 2. Flex the top (1) of the bezel from the inside edge until it disengages from the display back cover. 3. Flex the inside edge of the left side and the right side (2) of the bezel until they disengage from the display back cover. 4. Flex the bottom (3) of the bezel from the inside edge until it disengages from the display back cover. 72 Chapter 4 Removal and replacement procedures
-
 1
1 -
2
-
3
-
4
-
5
-
6
-
7
-
8
-
9
-
10
-
11
-
12
-
13
-
14
-
15
-
16
-
17
-
18
-
19
-
20
-
21
-
22
-
23
-
24
-
25
-
26
-
27
-
28
-
29
-
30
-
31
-
32
-
33
-
34
-
35
-
36
-
37
-
38
-
39
-
40
-
41
-
42
-
43
-
44
-
45
-
46
-
47
-
48
-
49
-
50
-
51
-
52
-
53
-
54
-
55
-
56
-
57
-
58
-
59
-
60
-
61
-
62
-
63
-
64
-
65
-
66
-
67
-
68
-
69
-
70
-
71
-
72
-
73
-
74
-
 75
75 -
 76
76 -
 77
77 -
 78
78 -
 79
79 -
 80
80 -
 81
81 -
 82
82 -
 83
83 -
 84
84 -
 85
85 -
86
-
87
-
88
-
89
-
90
-
91
-
92
-
93
-
94
-
95
-
96
-
97
-
98
-
99
-
100
-
101
-
102
-
103
-
104
-
105
-
106
-
107
-
108
-
109
-
110
-
111
-
112
-
113
-
114
-
115
-
116
-
117
-
118
-
119
-
120
-
121
-
122
-
123
-
124
-
125
-
126
-
127
-
128
-
129
 |
 |