HP RP7 Hardware Reference Guide HP RP7 Retail System Model 7800 - Page 10
Front Panel Controls, Using the On-Screen Display Menu
 |
View all HP RP7 manuals
Add to My Manuals
Save this manual to your list of manuals |
Page 10 highlights
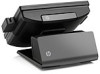
Front Panel Controls Control 1 2 3 4 5 6 Menu Function Opens the On-Screen Display (OSD) main menu. - (Minus) + (Plus) OK Power LED Power Button If the OSD menu is on, tap to navigate backward through the OSD menu and decrease adjustment levels. If the OSD menu is on, tap to navigate forward through the OSD menu and increase adjustment levels. If the OSD menu is on, tap to select a menu item. Green = Fully powered. Flashing Green = Sleep mode Red = PC error condition (refer to Interpreting POST Diagnostic Front Panel LEDs and Audible Codes on page 65 for more information). Off = Power is off Powers the system on and off, and sets the system to hibernate or sleep mode. Using the On-Screen Display Menu Use the On-Screen Display (OSD) to adjust the screen image based on your viewing preferences. To access the OSD, do the following: 1. If the system is not already on, press the Power button to turn on the unit. 2. To activate the OSD function, tap in the front bezel area just to the left of the power icon. 3. To access the OSD Menu, tap the Menu icon on the monitor's front panel. 4. To navigate through the OSD Menu, tap the + (Plus) icon on the monitor's front panel to scroll up, or the - (Minus) icon to scroll in reverse. 4 Chapter 1 Product Features
-
 1
1 -
2
-
3
-
4
-
 5
5 -
 6
6 -
 7
7 -
 8
8 -
 9
9 -
 10
10 -
 11
11 -
 12
12 -
 13
13 -
 14
14 -
 15
15 -
16
-
17
-
18
-
19
-
20
-
21
-
22
-
23
-
24
-
25
-
26
-
27
-
28
-
29
-
30
-
31
-
32
-
33
-
34
-
35
-
36
-
37
-
38
-
39
-
40
-
41
-
42
-
43
-
44
-
45
-
46
-
47
-
48
-
49
-
50
-
51
-
52
-
53
-
54
-
55
-
56
-
57
-
58
-
59
-
60
-
61
-
62
-
63
-
64
-
65
-
66
-
67
-
68
-
69
-
70
-
71
-
72
-
73
-
74
-
75
-
76
-
77
 |
 |
