HP RP7 Hardware Reference Guide HP RP7 Retail System Model 7800 - Page 65
If you want to secure the USB port, remove the security screw from the inside of the rear I/O
 |
View all HP RP7 manuals
Add to My Manuals
Save this manual to your list of manuals |
Page 65 highlights
6. Insert the top of the USB security cover into the I/O panel at an angle with the bottom of the cover slightly raised (1), then rotate the bottom down so that the cover snaps in place (2). NOTE: If the USB device has a cable, place the cable in the channel on the side of the security cover. 7. If you want to secure the USB port, remove the security screw from the inside of the rear I/O panel and install the screw in the screw hole on the side of the USB security cover. NOTE: You must use a T-10 tamper-resistant Torx screwdriver available from HP to install the security screw. Using the USB Security Cover 59
-
 1
1 -
2
-
3
-
4
-
5
-
6
-
7
-
8
-
9
-
10
-
11
-
12
-
13
-
14
-
15
-
16
-
17
-
18
-
19
-
20
-
21
-
22
-
23
-
24
-
25
-
26
-
27
-
28
-
29
-
30
-
31
-
32
-
33
-
34
-
35
-
36
-
37
-
38
-
39
-
40
-
41
-
42
-
43
-
44
-
45
-
46
-
47
-
48
-
49
-
50
-
51
-
52
-
53
-
54
-
55
-
56
-
57
-
58
-
59
-
 60
60 -
 61
61 -
 62
62 -
 63
63 -
 64
64 -
 65
65 -
 66
66 -
 67
67 -
 68
68 -
 69
69 -
 70
70 -
71
-
72
-
73
-
74
-
75
-
76
-
77
 |
 |

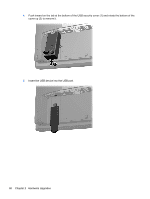
6.
Insert the top of the USB security cover into the I/O panel at an angle with the bottom of the
cover slightly raised (1), then rotate the bottom down so that the cover snaps in place (2).
NOTE:
If the USB device has a cable, place the cable in the channel on the side of the security
cover.
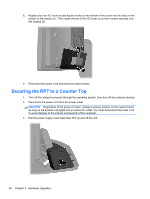
7.
If you want to secure the USB port, remove the security screw from the inside of the rear I/O
panel and install the screw in the screw hole on the side of the USB security cover.
NOTE:
You must use a T-10 tamper-resistant Torx screwdriver available from HP to install the
security screw.
Using the USB Security Cover
59