HP RP7 Hardware Reference Guide HP RP7 Retail System Model 7800 - Page 36
out the front of the base 1, then though the cable retainer 2. Connect the extension cable - vfd
 |
View all HP RP7 manuals
Add to My Manuals
Save this manual to your list of manuals |
Page 36 highlights
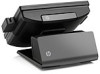
5. Remove the decorative panel on the rear of the unit by gently prying the panel away from the base at the tab locations on the top and sides of the panel as indicated below (1). Then pull the top of the panel away from the base (2) and push straight down on the panel to release the bottom tabs (3). 6. Route the VFD extension cable that was included with the VFD through the rear of the base and out the front of the base (1), then though the cable retainer (2). Connect the extension cable to the I/O cable included with the VFD (3) and connect the I/O cable to the 12V USB port on the RP7. 30 Chapter 2 Hardware Upgrades
-
 1
1 -
2
-
3
-
4
-
5
-
6
-
7
-
8
-
9
-
10
-
11
-
12
-
13
-
14
-
15
-
16
-
17
-
18
-
19
-
20
-
21
-
22
-
23
-
24
-
25
-
26
-
27
-
28
-
29
-
30
-
 31
31 -
 32
32 -
 33
33 -
 34
34 -
 35
35 -
 36
36 -
 37
37 -
 38
38 -
 39
39 -
 40
40 -
 41
41 -
42
-
43
-
44
-
45
-
46
-
47
-
48
-
49
-
50
-
51
-
52
-
53
-
54
-
55
-
56
-
57
-
58
-
59
-
60
-
61
-
62
-
63
-
64
-
65
-
66
-
67
-
68
-
69
-
70
-
71
-
72
-
73
-
74
-
75
-
76
-
77
 |
 |

5.
Remove the decorative panel on the rear of the unit by gently prying the panel away from the
base at the tab locations on the top and sides of the panel as indicated below (1). Then pull the
top of the panel away from the base (2) and push straight down on the panel to release the
bottom tabs (3).
6.
Route the VFD extension cable that was included with the VFD through the rear of the base and
out the front of the base (1), then though the cable retainer (2). Connect the extension cable to
the I/O cable included with the VFD (3) and connect the I/O cable to the 12V USB port on the
RP7.
30
Chapter 2
Hardware Upgrades