HP RP7 Hardware Reference Guide HP RP7 Retail System Model 7800 - Page 60
the five screws that were previously removed 2.
 |
View all HP RP7 manuals
Add to My Manuals
Save this manual to your list of manuals |
Page 60 highlights
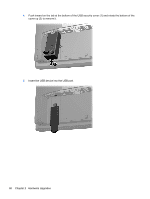
12. Insert the new battery. Ensure that the positive side of the new battery is oriented in the same direction as the battery that was removed. 13. Place the metal plate on the back of the display head (1) and secure it to the display head with the five screws that were previously removed (2). 54 Chapter 2 Hardware Upgrades
-
 1
1 -
2
-
3
-
4
-
5
-
6
-
7
-
8
-
9
-
10
-
11
-
12
-
13
-
14
-
15
-
16
-
17
-
18
-
19
-
20
-
21
-
22
-
23
-
24
-
25
-
26
-
27
-
28
-
29
-
30
-
31
-
32
-
33
-
34
-
35
-
36
-
37
-
38
-
39
-
40
-
41
-
42
-
43
-
44
-
45
-
46
-
47
-
48
-
49
-
50
-
51
-
52
-
53
-
54
-
 55
55 -
 56
56 -
 57
57 -
 58
58 -
 59
59 -
 60
60 -
 61
61 -
 62
62 -
 63
63 -
 64
64 -
 65
65 -
66
-
67
-
68
-
69
-
70
-
71
-
72
-
73
-
74
-
75
-
76
-
77
 |
 |

12.
Insert the new battery. Ensure that the positive side of the new battery is oriented in the same
direction as the battery that was removed.
13.
Place the metal plate on the back of the display head (1) and secure it to the display head with
the five screws that were previously removed (2).
54
Chapter 2
Hardware Upgrades