Hoover U5491 Manual
Hoover U5491 Manual
 |
UPC - 073502029114
View all Hoover U5491 manuals
Add to My Manuals
Save this manual to your list of manuals |
Hoover U5491 manual content summary:
- Hoover U5491 | Manual - Page 1
ID100223-R5 Guide d'utilisation Instructions d'utilisation et d'entretien www.hoover.com www.hoover.com IMPORTANT : LIRE CES INSTRUCTIONS ATTENTIVEMENT AVANT Technology Limited. Tous droits réservés. #56511C66 ID100223-R5 Owner's Manual Operating and Servicing Instructions Español - página E1 - Hoover U5491 | Manual - Page 2
3 Cleaner Assembly...5 How To Use...6 Vacuum Description 6 Cleaning Tools...9 Maintenance...11 Filter Bag...11 Filters...12 Headlight...13 Belt...13 Agitator Brushroll 14 Edge Groomers 15 Clearing Blockages 15 Lubrication...15 Troubleshooting Guide 16 Service...16 Warranty...17 Merci d'avoir - Hoover U5491 | Manual - Page 3
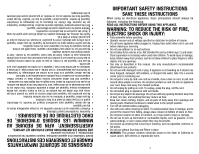
INSTRUCTIONS BEFORE USING THIS APPLIANCE. WARNING: TO REDUCE THE RISK OF FIRE, ELECTRIC SHOCK OR INJURY: • Fully assemble before operating. • Operate vacuum manual. it to a service center prior parts of body away from openings and moving parts. Brushroll continues to rotate when in the upright bag and - Hoover U5491 | Manual - Page 4
the electrical outlet. 2. Check fullness of filter bag; change if needed. 3. Inspect and remove servicing. CAUTION: TO REDUCE THE RISK OF DAMAGE: • Brushroll continues to turn while product is turned on and handle is in upright malformations congénitales ou d'autres troubles de la reproduction. ! AVIS - Hoover U5491 | Manual - Page 5
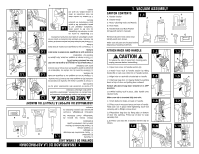
disposing of packing materials. D Remove all parts from carton and identify each item shown. E. Handle Bolts and Nuts Packet (in bag with owner's manual) D. Hose Rack C E C. Hose, Cleaning Tools and Wands B. Cleaner Body Carton contents A. Handle Section 1.1 A B 1. Vacuum ASSEMBLY 5 - Hoover U5491 | Manual - Page 6
Glisser le tuyau dans la pièce B et le tourner afin de le verrouiller en place. 1.13 Placer le tuyau sur le support et insérer son extrémité dans le tube pour tuyau D ou E (selon le modèle). 1.11 A B over rack and into hose tube (D) or (E) (depening on your model). 1.11 A B 1.13 1.12 B D E 6 - Hoover U5491 | Manual - Page 7
clip (B) vacuuming, position out of the way while 2.3 B To help keep the cord Cord clip 23. Hose Rack 22. Cord Clip 21. Bag Door below lower le pince-cordon (B) situé sur le support à tuyau, à l'arrière de l'aspirateur. 19. Check Bag Indicator 18. 'Dirt FINDER' Display* Sensitivity - Hoover U5491 | Manual - Page 8
alerts the user to With red and green lights (A), the 'DirtFINDER' 2.7 Embedded DirtFINDER™ (Available on select models only) The handle of your cleaner has three positions; upright for storage and when using cleaning tools; operating position for general operation on carpet and floors; low for - Hoover U5491 | Manual - Page 9
of the nozzle to remove dirt in carpet near baseboards and furniture. Guide either side of nozzle parallel to edge of carpet or furniture. The Stair Cleaning 2.12 Lift vacuum by Stair Cleaning Handle and position on stairs. Clean forward to back. Never leave the vacuum standing on stairs when - Hoover U5491 | Manual - Page 10
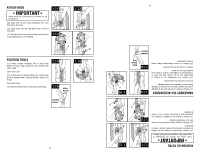
on select models only. C A B 3.2 Select Proper Tool A Removing hose When using cleaning tools, cleaner handle should be in the upright position. for reaching hard to clean areas. The vacuum is ready for tool use when handle is in upright position. IMPORTANT Brushroll continues to turn while - Hoover U5491 | Manual - Page 11
HOOVER® bags with your vacuum. When purchasing a new bag, ask for HOOVER® HEPA Filtration Type Y disposable filter bags. Filter bag When to Replace Check filter bag from time to time. It is recommended that you change the filter bag ée à un représentant de service autorisé. Sac filtre Quand le - Hoover U5491 | Manual - Page 12
Reposition bag door. What to Buy Use only genuine HOOVER® Final Filter with your vacuum. When purchasing a new Final Filter, ask for Hoover® Part No. CAUTION ! To reduce the risk of injury from moving parts, unplug vacuum before servicing. Do not operate cleaner without either the secondary or - Hoover U5491 | Manual - Page 13
(Available on select models only) ! WARNING ! To reduce the risk of electric shock, unplug vacuum before cleaning or servicing. Removing Lens 4.7 Using Buy This cleaner uses a 12 volt, wedge base type 912 bulb, Hoover® part No. 27313-101. 4.8 4.9 Check Agitator Shield Because your cleaner picks - Hoover U5491 | Manual - Page 14
parts, unplug vacuum before servicing. 4.16 The Agitator Brushroll: How to Replace HOOVER® Part No. 38528-033. vacuum. When purchasing a new Belt, ask for Use only genuine HOOVER E D as shown noting the placement of its belt guide (E). while replacing the belt or the agitator, reposition it - Hoover U5491 | Manual - Page 15
is equipped with two ball bearings that should be lubricated periodically by an Authorized Hoover Warranty Service Dealer (Depot). Clearing blockages ! CAUTION ! To reduce the risk of injury from moving parts, unplug vacuum before servicing. Low suction or pick up may be due to a blockage in the - Hoover U5491 | Manual - Page 16
5. TROUBLESHOOTING If a minor problem occurs, it usually can be solved quite easily when the cause is found by using the checklist below. Any other servicing should be done by an authorized service representative. ! WARNING ! To reduce risk of personal injury - unplug vacuum before servicing. 16 - Hoover U5491 | Manual - Page 17
17 WHAT THIS WARRANTY COVERS When used and maintained in normal household use and in accordance with the Owner's Manual, your HOOVER® product is warranted against original defects in material and workmanship for a full one year from date of purchase (the "Warranty Period"). During the Warranty - Hoover U5491 | Manual - Page 18
MANUAL DEL PROPIETARIO Instrucciones de Funcionamiento y Servicio www.hoover.com IMPORTANTE: LEA ATENTAMENTE ANTES DE ENSAMBLAR Y USAR. ¿Tiene alguna pregunta o inquietud? Para obtener asistencia, llame al Servicio de atención al cliente al 18009449200, de - Hoover U5491 | Manual - Page 19
el uso y el mantenimiento de su producto HOOVER® se realicen en condiciones de uso doméstico normales y según el Manual del usuario, el producto estará garantizado contra TIPO O NATURALEZA CON RESPECTO AL PROPIETARIO O A CUALQUIER PARTE QUE REALICE UN RECLAMO A TRAVÉS DEL PROPIETARIO, YA SEA - Hoover U5491 | Manual - Page 20
O Hoover® Canada, Edmonton: 18129-111 Ave., Edmonton, AB T5W 2P2, Teléfono: 1-800-263-6376, de lunes a viernes, de 8 a.m. a 7 p.m., hora del Este. Siempre identifique su aspiradora por el número de modelo completo al solicitar información o realizar pedidos de piezas. (Etiqueta situada en la parte - Hoover U5491 | Manual - Page 21
add lubricant to motor bearings. The agitator is equipped with two ball bearings that should be lubricated periodically by an Authorized Hoover Warranty Service Dealer (Depot). E15 • Desenchufe el aparato antes de conectar el accesorio de mano turboaccionado. • No aspire ningún objeto que se est - Hoover U5491 | Manual - Page 22
las 3 muescas y el clip, como se muestra. E5 4.12 Con las letras en la parte de afuera de la correa y con la correa en la posición que se muestra en el . Qué comprar Utilice únicamente escobillas del agitador genuinas de HOOVER® con su aspiradora. Al comprar una escobillas del agitador nueva, - Hoover U5491 | Manual - Page 23
tipo 912. Pieza No. 27313101 de HOOVER. 4.8 4.9 correa: Cuándo reemplazarla La correa de su aspiradora Hoover hace posible que el agitador gire y mango en la posición baja y voltee la aspiradora de manera que la parte inferior quede hacia arriba. 4.10 Quite los 4 tornillos con un destornillador - Hoover U5491 | Manual - Page 24
el cordón en el clip para cordón (B), que se encuentra en la parte posterior de la aspiradora, en el soporte de la manguera. E7 Bolsa de filtro final genuinas de HOOVER® con su aspiradora. Al comprar una correa nueva, solicite el ffiltro final pieza n.° 40110-004 de HOOVER®. que el aire - Hoover U5491 | Manual - Page 25
de filtro desechables genuinas de Hoover® para filtración de filtro desechables tipo Y con filtración HEPA de HOOVER® genuinas. E11 Traslado de más limpieza. Detecta cuando se está retirando una mayor cantidad de partículas de suciedad, en especial, suciedad incrustada. se está aspirando - Hoover U5491 | Manual - Page 26
alfombra y mueva la aspiradora hacia el otro extremo o borde. Antes de llegar al borde, empuje el mango hacia abajo. Esto levantará la boquilla (parte delantera de la aspiradora), como se muestra, e impedirá que la alfombra se pegue a la aspiradora. Continúe levantando la boquilla para que, cuando
-
 1
1 -
 2
2 -
 3
3 -
 4
4 -
 5
5 -
 6
6 -
 7
7 -
8
-
9
-
10
-
11
-
12
-
13
-
14
-
15
-
16
-
17
-
18
-
19
-
20
-
21
-
22
-
23
-
24
-
25
-
26
 |
 |
www.hoover.com
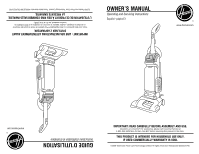
OWNER’S MANUAL
Operating and Servicing Instructions
©2009 Techtronic Floor Care Technology Limited. All rights reserved. #56511C66 ID100223-R5
IMPORTANT: READ CAREFULLY BEFORE ASSEMBLY AND USE.
Questions or concerns? For assistance, please call Customer Service at
1-800-944-9200 Mon-Fri 8am-7pm EST before returning this product to the store.
THIS PRODUCT IS INTENDED FOR HOUSEHOLD USE ONLY.
IF USED COMMERCIALLY WARRANTY IS VOID.
IMPORTANT : LIRE CES INSTRUCTIONS ATTENTIVEMENT AVANT
D’UTILISER L’ASPIRATEUR.
Vous avez des questions ou des inquiétudes? Pour obtenir de l’aide et avant de retourner
ce produit au magasin, veuillez appeler le service à la clientèle au 1 800 9449200 du
lundi au vendredi, de 8 h à 19 h (HNE).
www.hoover.com
GUIDE D’UTILISATION
Instructions d’utilisation et d’entretien
©2009 Techtronic Floor Care Technology Limited. Tous droits réservés. #56511C66 ID100223-R5
L’UTILISATION DE CE PRODUIT À DES FINS COMMERCIALES INVALIDE
LA PRÉSENTE GARANTIE.
Español - página E1