Husqvarna AUTOMOWER 450XH EPOS Owner Manual - Page 14
Installation tools, Installation of the charging station, To install the charging station
 |
View all Husqvarna AUTOMOWER 450XH EPOS manuals
Add to My Manuals
Save this manual to your list of manuals |
Page 14 highlights
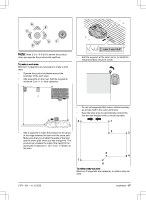
1. Install the reference station. Refer to the Operator's manual for the reference station. 2. Install the charging station. Refer to To install the charging station on page 14. 3. Install the Automower® Connect app on your mobile device. Refer to To install the Automower® Connect app on page 15. 4. Do a pairing operation of the product and the Automower® Connect app. Do the basic settings in the start up sequence in the Automower® Connect app. Refer to To install the Automower® Connect app on page 15. 5. Make a map with work areas, stay-out zones, transport paths and maintenance points. Refer to To install objects on the map on page 16. 6. Use Automower® Connect app to do settings for the product. Refer to Settings on page 18. 3.8.2 Installation tools • Hex key, 8 mm. Included in the carton. 3.8.3 Installation of the charging station Read and understand the instructions about the charging station. Refer to To examine where to put the charging station on page 11. CAUTION: Do not make new holes in the charging station plate. min 30 cm / 12" 5. Connect the power supply cable to a 100-240V power outlet. 6. Put the low-voltage cable in the ground outside the work area. Use stakes or bury the cable. 7. Put the product in the charging station to charge the product. 3.8.3.2 To do a visual check of the charging station 1. Make sure that the indicator LED lamp on the charging station has a green light. CAUTION: Do not put your feet on the baseplate of the charging station. WARNING: Make sure that the plugs of the low-voltage cable and the power supply unit are clean and dry before you connect them. When you connect the power supply, only use a power outlet that is connected to a residual-current device (RCD). 3.8.3.1 To install the charging station 1. Put the charging station in the selected area. 2. Attach the charging station to the ground with the supplied screws. 3. Connect the low-voltage cable to the charging station. 4. Put the power supply at a minimum height of 30 cm / 12 in. Refer to To examine where to put the power supply on page 12. 2. If the indicator LED lamp does not have a green light, do a check of the installation. Refer to To install the charging station on page 14 and LED indicator lamp on the charging station on page 33. 3.8.4 Installation of the reference station Install the reference station according to the instructions in the Operator's manual for the reference station. 3.8.5 Automower® Connect Automower® Connect is a free app for your mobile device. Use the app for installation, settings and operation of your product. You can also find more information for example about alarm and statistics in the Automower® Connect app. The app gives 2 modes of connectivity: Longrange cellular connectivity and Short-range Bluetooth® connectivity. • Dashboard that shows the current status of the product and the battery state of charge. • Account shows an overview of the account settings and the unit format can be set. 14 - Installation 1970 - 001 - 10.10.2022
-
 1
1 -
2
-
3
-
4
-
5
-
6
-
7
-
8
-
 9
9 -
 10
10 -
 11
11 -
 12
12 -
 13
13 -
 14
14 -
 15
15 -
 16
16 -
 17
17 -
 18
18 -
 19
19 -
20
-
21
-
22
-
23
-
24
-
25
-
26
-
27
-
28
-
29
-
30
-
31
-
32
-
33
-
34
-
35
-
36
-
37
-
38
-
39
-
40
-
41
-
42
-
43
-
44
 |
 |
