Husqvarna MADSAW Owner Manual - Page 10
To assemble the bar and chain, To assemble the shaft
 |
View all Husqvarna MADSAW manuals
Add to My Manuals
Save this manual to your list of manuals |
Page 10 highlights
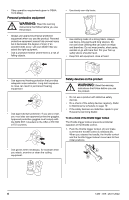
5. Tension the chain by turning the chain tensioning screw clockwise using the combination spanner. The chain should be tensioned until it does not B sag from the underside of the bar. A 1. Loosen the screw on the cutting head. (A) 2. Fit the cutting head on the shaft so that the screw (A) is aligned with the hole in the shaft as shown. 3. Finger tighten the screw (A). Make sure that screw (A) fits into the hole in the shaft. 4. Tighten screw (A). 5. Tighten screw (B). To assemble the bar and chain 1. Unscrew the bar nut and remove the protective cover. 2. Fit the bar over the bar bolt. Place the bar in its rearmost position. Place the chain over the drive sprocket and in the groove on the bar. Begin on the top side of the bar. 3. Make sure that the edges of the cutting links are facing forward on the top edge of the guide bar. 6. The chain is correctly tensioned when it does not sag from the underside of the bar, but can still be turned easily by hand. Hold up the bar tip and tighten the bar nuts with the combination spanner. 7. When fitting a new chain, the chain tension has to be checked frequently until the chain is run-in. Check the chain tension regularly. A correctly tensioned chain ensures good cutting performance and long life. To assemble the shaft 1. Turn the knob to loosen the coupling. 4. Fit the cover and locate the chain adjuster pin (A) in the hole in the bar. Check that the drive links of the chain fit correctly on the drive sprocket (B) and that the chain is in the groove in the bar (C). Tighten the bar nut finger-tight. B A 10 1480 - 009 - 26.01.2022
-
 1
1 -
2
-
3
-
4
-
 5
5 -
 6
6 -
 7
7 -
 8
8 -
 9
9 -
 10
10 -
 11
11 -
 12
12 -
 13
13 -
 14
14 -
 15
15 -
16
-
17
-
18
-
19
-
20
-
21
-
22
-
23
-
24
-
25
-
26
-
27
-
28
-
29
-
30
-
31
-
32
-
33
-
34
-
35
-
36
-
37
-
38
-
39
-
40
-
41
-
42
-
43
-
44
-
45
-
46
-
47
-
48
-
49
-
50
-
51
-
52
-
53
-
54
-
55
-
56
-
57
-
58
-
59
-
60
-
61
-
62
-
63
-
64
-
65
-
66
-
67
-
68
-
69
-
70
-
71
-
72
-
73
-
74
-
75
-
76
-
77
-
78
-
79
-
80
-
81
-
82
-
83
-
84
 |
 |
