IBM 8862 User Manual - Page 21
Installing, memory, modules
 |
UPC - 000435172679
View all IBM 8862 manuals
Add to My Manuals
Save this manual to your list of manuals |
Page 21 highlights
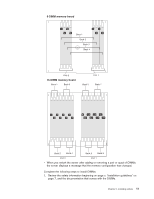
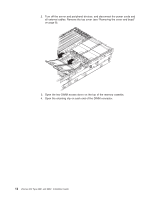
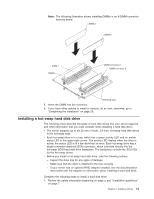
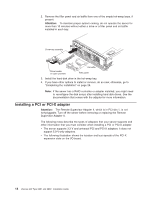
2. Lift the cover-release latch. The cover slides to the rear approximately 13 mm (0.5 in.). Top cover Cover release latch Bezel xSeries 365 3. Lift the cover off the server. 4. Press on the bezel retention tabs and pull the top of the bezel slightly away from the server. 5. Pull the bezel up to release the two tabs at the bottom edge of the bezel. Attention: For proper cooling and airflow, replace the top cover before turning on the server. Operating the server for more than 2 minutes with the top cover removed might damage server components. Installing memory modules The following notes describe the types of dual inline memory modules (DIMMs) that your server supports and other information that you must consider when installing DIMMs: v Your server supports 2.5 V, 184-pin, error correcting code (ECC), double-data rate (DDR) SDRAM, PC2100 registered DIMMs with Chipkill memory protection. v DIMMs can be removed and replaced through the access doors on the top of the memory cassette. v You can increase the amount of memory in the server by replacing the DIMMs with higher-capacity DIMMs or installing additional pairs of DIMMs in open sockets. The server supports 512 MB, 1 GB, and 2 GB DIMMs. See the ServerProven list at http://www.ibm.com/pc/compat/ for an updated list of memory modules supported by the server. v For a server with an 8-DIMM-connector memory cassette, you can increase the memory capabilities of your server by upgrading to the 16-connector memory cassette. The 16-connector memory cassette supports memory mirroring and Memory ProteXion. See the ServerProven list at http://www.ibm.com/pc/compat/ for a list of memory cassettes supported by the server. v Your server uses interleaved DIMMs, which require that you install the DIMMs in specific configurations: - In the 8-DIMM-connector memory cassette, install DIMMs in pairs. Each pair must be of the same type, capacity, and speed. The DIMM connectors are arranged in two groups of four rows each; the server comes with one pair of DIMMs installed in DIMM connectors 1 and 5 in the memory cassette. - In the 16-DIMM-connector memory cassette, the DIMM connectors are arranged in two groups of eight rows each. In non-mirrored mode, install Chapter 2. Installing options 9
-
 1
1 -
2
-
3
-
4
-
5
-
6
-
7
-
8
-
9
-
10
-
11
-
12
-
13
-
14
-
15
-
 16
16 -
 17
17 -
 18
18 -
 19
19 -
 20
20 -
 21
21 -
 22
22 -
 23
23 -
 24
24 -
 25
25 -
 26
26 -
27
-
28
-
29
-
30
-
31
-
32
-
33
-
34
-
35
-
36
-
37
-
38
-
39
-
40
-
41
-
42
-
43
-
44
-
45
-
46
-
47
-
48
-
49
-
50
-
51
-
52
-
53
-
54
-
55
-
56
-
57
-
58
-
59
-
60
-
61
-
62
-
63
-
64
-
65
-
66
-
67
-
68
-
69
-
70
-
71
-
72
-
73
-
74
-
75
-
76
-
77
-
78
-
79
-
80
-
81
-
82
-
83
-
84
-
85
-
86
-
87
-
88
-
89
-
90
-
91
-
92
-
93
-
94
-
95
-
96
-
97
-
98
-
99
-
100
-
101
-
102
-
103
-
104
 |
 |
