IBM 8862 User Manual - Page 26
Installing, PCI-X, adapter
 |
UPC - 000435172679
View all IBM 8862 manuals
Add to My Manuals
Save this manual to your list of manuals |
Page 26 highlights
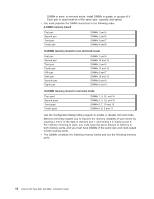
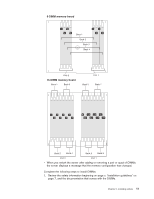
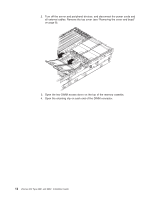
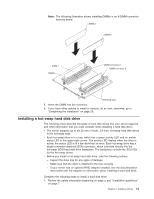
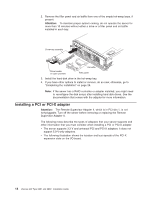
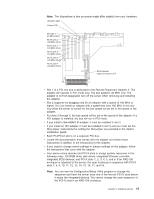
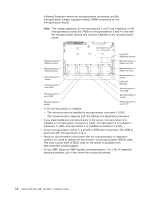
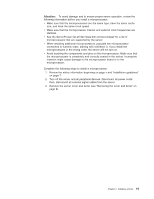
2. Remove the filler panel and air baffle from one of the empty hot-swap bays, if present. Attention: To maintain proper system cooling, do not operate the server for more than 10 minutes without either a drive or a filler panel and air baffle installed in each bay. Drive-tray assembly Drive handle (in open position) Air baffle Filler panel 3. Install the hard disk drive in the hot-swap bay. 4. If you have other options to install or remove, do so now; otherwise, go to "Completing the installation" on page 26. Note: If the server has a RAID controller or adapter installed, you might need to reconfigure the disk arrays after installing hard disk drives. See the documentation that comes with the adapter for more information. Installing a PCI or PCI-X adapter Attention: The Remote Supervisor Adapter II, which is in PCI slot 1, is not hot-pluggable. Turn off the server before removing or replacing the Remote Supervisor Adapter II. The following notes describe the types of adapters that your server supports and other information that you must consider when installing a PCI or PCI-X adapter: v The server supports 3.3 V and universal PCI and PCI-X adapters; it does not support 5.0-V-only adapters. v The following illustration shows the location and bus speeds of the PCI-X expansion slots on the I/O board. 14 xSeries 365 Type 8861 and 8862: Installation Guide
-
 1
1 -
2
-
3
-
4
-
5
-
6
-
7
-
8
-
9
-
10
-
11
-
12
-
13
-
14
-
15
-
16
-
17
-
18
-
19
-
20
-
 21
21 -
 22
22 -
 23
23 -
 24
24 -
 25
25 -
 26
26 -
 27
27 -
 28
28 -
 29
29 -
 30
30 -
 31
31 -
32
-
33
-
34
-
35
-
36
-
37
-
38
-
39
-
40
-
41
-
42
-
43
-
44
-
45
-
46
-
47
-
48
-
49
-
50
-
51
-
52
-
53
-
54
-
55
-
56
-
57
-
58
-
59
-
60
-
61
-
62
-
63
-
64
-
65
-
66
-
67
-
68
-
69
-
70
-
71
-
72
-
73
-
74
-
75
-
76
-
77
-
78
-
79
-
80
-
81
-
82
-
83
-
84
-
85
-
86
-
87
-
88
-
89
-
90
-
91
-
92
-
93
-
94
-
95
-
96
-
97
-
98
-
99
-
100
-
101
-
102
-
103
-
104
 |
 |
