IBM 8862 User Manual - Page 39
Connecting, cables
 |
UPC - 000435172679
View all IBM 8862 manuals
Add to My Manuals
Save this manual to your list of manuals |
Page 39 highlights
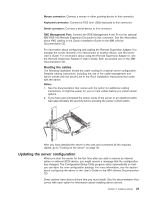
server configuration. See "Updating the server configuration" on page 29 and the User's Guide for more information. 7. If you disconnected any power cords or external cables from the server, reconnect the external cables first. If you are adding any new peripheral devices (see "Connecting the cables" for details), you can connect the external cables for those devices. Then, connect the power cords to properly grounded electrical outlets. Connecting the cables This section provides basic information about attaching peripheral devices such as a monitor, keyboard, and pointing device to the server and connecting the server to additional servers. Note: You can connect a USB keyboard to the server using one of the USB connectors. After installing a USB keyboard, you might need to use the Configuration/Setup Utility program to enable keyboardless operation and prevent POST error message 301 from being displayed during startup. For detailed information about the USB keyboard and how to connect it to your server, see the documentation that comes with the keyboard. Input/output connectors Your server has the following input/output (I/O) connectors: v Serial (one, rear) v Gigabit Ethernet (two, rear) v Keyboard (one, rear) v Mouse (one, rear) v USB (two, rear; one, front - on operator information panel) v RXE expansion (one, rear) v RXE management (one, rear) v SCSI (one, rear) The Remote Supervisor Adapter II has the following connectors: v Remote Supervisor Adapter II Ethernet (one, rear) v Remote Supervisor Adapter II video (one, rear) v Remote Supervisor Adapter II ASM (one, rear) v Remote Supervisor Adapter II USB (reserved) The following illustration shows the USB connector on the operator information panel on the front of the server. USB connector Chapter 2. Installing options 27
-
 1
1 -
2
-
3
-
4
-
5
-
6
-
7
-
8
-
9
-
10
-
11
-
12
-
13
-
14
-
15
-
16
-
17
-
18
-
19
-
20
-
21
-
22
-
23
-
24
-
25
-
26
-
27
-
28
-
29
-
30
-
31
-
32
-
33
-
 34
34 -
 35
35 -
 36
36 -
 37
37 -
 38
38 -
 39
39 -
 40
40 -
 41
41 -
 42
42 -
 43
43 -
 44
44 -
45
-
46
-
47
-
48
-
49
-
50
-
51
-
52
-
53
-
54
-
55
-
56
-
57
-
58
-
59
-
60
-
61
-
62
-
63
-
64
-
65
-
66
-
67
-
68
-
69
-
70
-
71
-
72
-
73
-
74
-
75
-
76
-
77
-
78
-
79
-
80
-
81
-
82
-
83
-
84
-
85
-
86
-
87
-
88
-
89
-
90
-
91
-
92
-
93
-
94
-
95
-
96
-
97
-
98
-
99
-
100
-
101
-
102
-
103
-
104
 |
 |
