IBM 8862 User Manual - Page 29
Installing, microprocessor
 |
UPC - 000435172679
View all IBM 8862 manuals
Add to My Manuals
Save this manual to your list of manuals |
Page 29 highlights
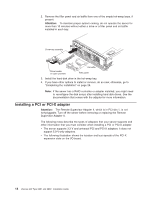
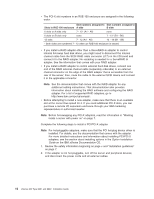
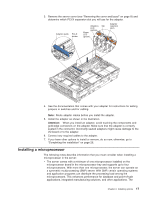
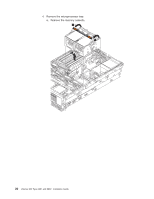
3. Remove the server cover (see "Removing the cover and bezel" on page 8) and determine which PCI-X expansion slot you will use for the adapter. Adapter guide PCI-X divider Attention Tab LED (yellow) Power LED (green) Adapter retention latch 4. See the documentation that comes with your adapter for instructions for setting jumpers or switches and for cabling. Note: Route adapter cables before you install the adapter. 5. Install the adapter as shown in the illustration. Attention: When you install an adapter, avoid touching the components and gold-edge connectors on the adapter. Make sure that the adapter is correctly seated in the connector. Incorrectly seated adapters might cause damage to the I/O board or to the adapter. 6. Connect any required cables to the adapter. 7. If you have other options to install or remove, do so now; otherwise, go to "Completing the installation" on page 26. Installing a microprocessor The following notes describe information that you must consider when installing a microprocessor in the server: v The server comes with a minimum of one microprocessor installed on the microprocessor board in the microprocessor tray and supports up to four microprocessors. With more than one microprocessor, the server can operate as a symmetric multiprocessing (SMP) server. With SMP, certain operating systems and application programs can distribute the processing load among the microprocessors. This enhances performance for database and point-of-sale applications, integrated manufacturing solutions, and other applications. The Chapter 2. Installing options 17
-
 1
1 -
2
-
3
-
4
-
5
-
6
-
7
-
8
-
9
-
10
-
11
-
12
-
13
-
14
-
15
-
16
-
17
-
18
-
19
-
20
-
21
-
22
-
23
-
 24
24 -
 25
25 -
 26
26 -
 27
27 -
 28
28 -
 29
29 -
 30
30 -
 31
31 -
 32
32 -
 33
33 -
 34
34 -
35
-
36
-
37
-
38
-
39
-
40
-
41
-
42
-
43
-
44
-
45
-
46
-
47
-
48
-
49
-
50
-
51
-
52
-
53
-
54
-
55
-
56
-
57
-
58
-
59
-
60
-
61
-
62
-
63
-
64
-
65
-
66
-
67
-
68
-
69
-
70
-
71
-
72
-
73
-
74
-
75
-
76
-
77
-
78
-
79
-
80
-
81
-
82
-
83
-
84
-
85
-
86
-
87
-
88
-
89
-
90
-
91
-
92
-
93
-
94
-
95
-
96
-
97
-
98
-
99
-
100
-
101
-
102
-
103
-
104
 |
 |
