IBM 8862 User Manual - Page 38
Completing, installation, Installing, cover, bezel
 |
UPC - 000435172679
View all IBM 8862 manuals
Add to My Manuals
Save this manual to your list of manuals |
Page 38 highlights
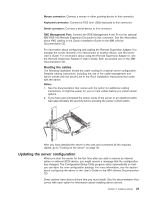
4. Raise the power supply handle to the open position. 5. Place the power supply into the power bay in the chassis and fully close the locking handle. Note: The power supplies are numbered from left to right (1 to 2) as viewed from the rear of the server. Power supplies must be installed in the following sequence: power supply 1, then power supply 2. 6. Connect one end of the power cord for the new power supply into the connector on the back of the power supply; route the power cord through the cable-management arm and connect the other end of the power cord into a properly grounded electrical outlet. 7. Make sure that the ac power LED on the rear of the power supply and the ac power LED on the top of the power supply are lit, indicating that the power supply is operating correctly. If the server is turned on, make sure that the dc power LED on the top of the power supply is lit also. 8. Continue with "Completing the installation." Completing the installation This section describes how to complete the installation. Installing the cover and bezel Complete the following steps to install the server cover and bezel: 1. Position the internal cables so that they do not interfere with the cover installation. 2. Move the cover-release latch to the open (up) position. 3. Position the cover on top of the server and press down on the cover-release latch. The cover slides forward into position. Top cover Cover release latch Bezel xSeries 365 4. Insert the tabs on the bottom of the bezel into the matching holes on the server chassis. 5. Push the top of the bezel toward the server until the two tabs at the top of the sides of the bezel snap into place. 6. Install the server in the rack. See the Rack Installation Instructions that come with the server for details. Note: Depending on the options that you installed, after cabling the server, you might need to run the Configuration/Setup Utility program to update the 26 xSeries 365 Type 8861 and 8862: Installation Guide
-
 1
1 -
2
-
3
-
4
-
5
-
6
-
7
-
8
-
9
-
10
-
11
-
12
-
13
-
14
-
15
-
16
-
17
-
18
-
19
-
20
-
21
-
22
-
23
-
24
-
25
-
26
-
27
-
28
-
29
-
30
-
31
-
32
-
 33
33 -
 34
34 -
 35
35 -
 36
36 -
 37
37 -
 38
38 -
 39
39 -
 40
40 -
 41
41 -
 42
42 -
 43
43 -
44
-
45
-
46
-
47
-
48
-
49
-
50
-
51
-
52
-
53
-
54
-
55
-
56
-
57
-
58
-
59
-
60
-
61
-
62
-
63
-
64
-
65
-
66
-
67
-
68
-
69
-
70
-
71
-
72
-
73
-
74
-
75
-
76
-
77
-
78
-
79
-
80
-
81
-
82
-
83
-
84
-
85
-
86
-
87
-
88
-
89
-
90
-
91
-
92
-
93
-
94
-
95
-
96
-
97
-
98
-
99
-
100
-
101
-
102
-
103
-
104
 |
 |
