IBM 8862 User Manual - Page 24
peripheral
 |
UPC - 000435172679
View all IBM 8862 manuals
Add to My Manuals
Save this manual to your list of manuals |
Page 24 highlights
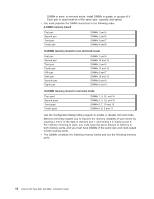
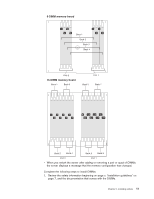
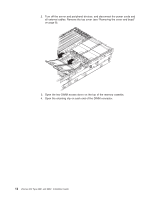
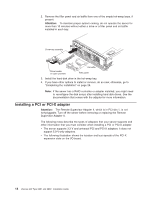
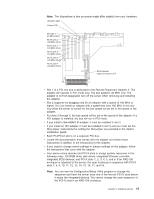
2. Turn off the server and peripheral devices, and disconnect the power cords and all external cables. Remove the top cover (see "Removing the cover and bezel" on page 8). DCAC PS2 PS1 3. Open the two DIMM access doors on the top of the memory cassette. 4. Open the retaining clip on each end of the DIMM connector. 12 xSeries 365 Type 8861 and 8862: Installation Guide
-
 1
1 -
2
-
3
-
4
-
5
-
6
-
7
-
8
-
9
-
10
-
11
-
12
-
13
-
14
-
15
-
16
-
17
-
18
-
 19
19 -
 20
20 -
 21
21 -
 22
22 -
 23
23 -
 24
24 -
 25
25 -
 26
26 -
 27
27 -
 28
28 -
 29
29 -
30
-
31
-
32
-
33
-
34
-
35
-
36
-
37
-
38
-
39
-
40
-
41
-
42
-
43
-
44
-
45
-
46
-
47
-
48
-
49
-
50
-
51
-
52
-
53
-
54
-
55
-
56
-
57
-
58
-
59
-
60
-
61
-
62
-
63
-
64
-
65
-
66
-
67
-
68
-
69
-
70
-
71
-
72
-
73
-
74
-
75
-
76
-
77
-
78
-
79
-
80
-
81
-
82
-
83
-
84
-
85
-
86
-
87
-
88
-
89
-
90
-
91
-
92
-
93
-
94
-
95
-
96
-
97
-
98
-
99
-
100
-
101
-
102
-
103
-
104
 |
 |

2.
Turn
off
the
server
and
peripheral
devices,
and
disconnect
the
power
cords
and
all
external
cables.
Remove
the
top
cover
(see
“Removing
the
cover
and
bezel”
on
page
8).
AC
DC
PS2
PS1
3.
Open
the
two
DIMM
access
doors
on
the
top
of
the
memory
cassette.
4.
Open
the
retaining
clip
on
each
end
of
the
DIMM
connector.
12
xSeries
365
Type
8861
and
8862:
Installation
Guide