Invacare TER Owners Manual - Page 59
Suspension
 |
View all Invacare TER manuals
Add to My Manuals
Save this manual to your list of manuals |
Page 59 highlights
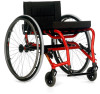
SECTION 8-SUSPENSION SECTION 8-SUSPENSION ƽ WARNING After ANY adjustments, repair or service and before use, make sure all attaching hardware is tightened securely - otherwise injury or damage may occur. NOTE: The following procedures are for wheelchairs with the suspension option ONLY. Elastomers and Suspension NOTE: The performance of the wheelchair will be affected if elastomers are not the same on both sides of the wheelchair. Replacing Rear Elastomers NOTE: For this procedure, refer to FIGURE 8.1 on page 59. 1. Use an allen wrench to hold the outer allen screw. 2. While holding the outer allen screw in position, remove the inner allen screw from the pivot pin. 3. Use the allen wrench to push the pivot pin with outer allen screw out of the mounting hole. 4. Remove the existing elastomer. 5. Position the new elastomer between the recess in the axle bracket and the recess in the suspension base. 6. Compress and hold the elastomer between the axle bracket and the suspension base. 7. Insert the pivot pin into the mounting hole. 8. Install the outer allen screw into the pivot pin. 9. Use an allen wrench to hold the outer allen screw in position. 10. While holding the outer allen screw, install the inner allen screw into the pivot pin. Tighten securely. Outside of Wheelchair Frame Suspension Base Outer Allen Screw Recess Elstaomer Part No 1122172 Pivot Pin Inner Allen Screw Axle Bracket Mounting Holes Recess Inside of Wheelchair Frame FIGURE 8.1 Replacing Rear Elastomers 59 Everyday Series Wheelchairs/Sport Series Wheelchairs
-
 1
1 -
2
-
3
-
4
-
5
-
6
-
7
-
8
-
9
-
10
-
11
-
12
-
13
-
14
-
15
-
16
-
17
-
18
-
19
-
20
-
21
-
22
-
23
-
24
-
25
-
26
-
27
-
28
-
29
-
30
-
31
-
32
-
33
-
34
-
35
-
36
-
37
-
38
-
39
-
40
-
41
-
42
-
43
-
44
-
45
-
46
-
47
-
48
-
49
-
50
-
51
-
52
-
53
-
 54
54 -
 55
55 -
 56
56 -
 57
57 -
 58
58 -
 59
59 -
 60
60 -
 61
61 -
 62
62 -
 63
63 -
 64
64
 |
 |
