JVC KW-AVX820 Instructions - Page 13
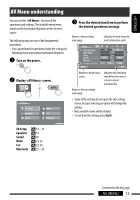
AV MENU, AV Menu understanding, Turn on the power., Display <AV Menu> screen.
 |
UPC - 046838036569
View all JVC KW-AVX820 manuals
Add to My Manuals
Save this manual to your list of manuals |
Page 13 highlights
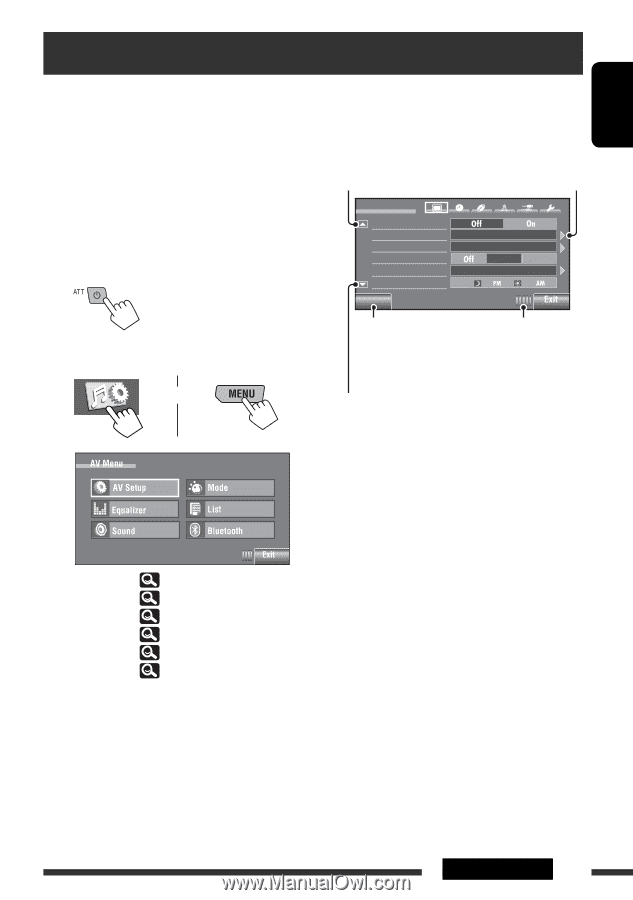
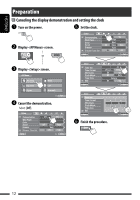
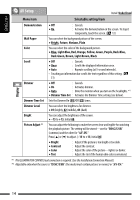
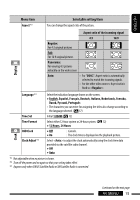
ENGLISH AV Menu understanding You can use the for most of the operations and settings. The available menu items shown on the touch panel depends on the selected source. The following steps are one of the fundamental procedures. • You can perform the operations/make the settings by following these steps unless mentioned otherwise. ~ Turn on the power. Ÿ Display screen. or ! Press the desired icon/item to perform the desired operations/settings. Moves to the preceding menu page Indicates the next hierarchy level/setting item exists. Setup Demonstration Wall Paper Color Scroll Dimmer Dimmer Time Set Back Bright Blue Once Auto Auto 6 7 Returns to the previous screen. Indicates the remaining time before the current screen is erased automatically. Moves to the succeeding menu page • Some of the settings do not open the sub-setting screen, but just selecting an option will change the setting. • Non-available items will be shaded. • To exit from the setting, press [Exit]. AV Setup : Equalizer : Sound : Mode : List : Bluetooth : 14 - 19 19 20 21, 22 23, 24 25 - 28 Continued on the next page AV MENU 13
-
 1
1 -
2
-
3
-
4
-
5
-
6
-
7
-
 8
8 -
 9
9 -
 10
10 -
 11
11 -
 12
12 -
 13
13 -
 14
14 -
 15
15 -
 16
16 -
 17
17 -
 18
18 -
19
-
20
-
21
-
22
-
23
-
24
-
25
-
26
-
27
-
28
-
29
-
30
-
31
-
32
-
33
-
34
-
35
-
36
-
37
-
38
-
39
-
40
-
41
-
42
-
43
-
44
-
45
-
46
-
47
-
48
-
49
-
50
-
51
-
52
-
53
-
54
-
55
-
56
-
57
-
58
-
59
-
60
-
61
-
62
-
63
-
64
-
65
-
66
-
67
-
68
-
69
-
70
-
71
-
72
-
73
-
74
-
75
-
76
-
77
-
78
-
79
-
80
-
81
-
82
-
83
-
84
-
85
-
86
-
87
-
88
-
89
-
90
-
91
-
92
-
93
-
94
-
95
-
96
-
97
-
98
-
99
-
100
-
101
-
102
-
103
-
104
-
105
-
106
-
107
-
108
-
109
-
110
-
111
-
112
-
113
-
114
-
115
-
116
-
117
-
118
-
119
-
120
-
121
-
122
-
123
-
124
-
125
-
126
-
127
-
128
-
129
-
130
-
131
-
132
-
133
-
134
-
135
-
136
-
137
-
138
-
139
-
140
-
141
-
142
-
143
-
144
-
145
-
146
-
147
-
148
-
149
-
150
-
151
-
152
-
153
-
154
-
155
-
156
-
157
-
158
-
159
-
160
-
161
-
162
-
163
-
164
-
165
-
166
-
167
-
168
-
169
-
170
-
171
-
172
-
173
-
174
-
175
-
176
-
177
-
178
-
179
-
180
-
181
-
182
-
183
-
184
-
185
-
186
-
187
-
188
-
189
-
190
-
191
-
192
-
193
-
194
-
195
-
196
-
197
-
198
-
199
-
200
-
201
-
202
-
203
-
204
-
205
-
206
-
207
 |
 |