JVC SR-VS20U 76 pg User's Manual on the SR-VS20U (1776KB, PDF)
JVC SR-VS20U - Dual Format S-vhs/minidv Recorder Manual
 |
View all JVC SR-VS20U manuals
Add to My Manuals
Save this manual to your list of manuals |
JVC SR-VS20U manual content summary:
- JVC SR-VS20U | 76 pg User's Manual on the SR-VS20U (1776KB, PDF) - Page 1
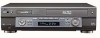
Mini DV/S-VHS VIDEO CASSETTE RECORDER SR-VS20U VCR TV CABLE/DBS A.MONITOR POWER PROG A/B TV/VCR CHECK DISPLAY T 1 4 W 2 5 ENTER/OSD 3 2 6 DBS DAILY(M-F) WEEKLY 7 8 9 C. RESET AUX CANCEL 0 TIMER 4 START STOP DATE CH EXPRESS PROGRAMMING 1 PROG SP/LP SP/EP DV S-VHS PLAY REW - JVC SR-VS20U | 76 pg User's Manual on the SR-VS20U (1776KB, PDF) - Page 2
alert the user to the presence of important operating and maintenance (servicing) instructions in the or modifications not approved by JVC could void user's authority to operate the equipment. Failure to this VCR. Ⅲ Cassettes marked "Mini DV" can be used with the DV deck of this VCR. The DV deck can play - JVC SR-VS20U | 76 pg User's Manual on the SR-VS20U (1776KB, PDF) - Page 3
servicing. ATTENTION: Follow and obey all warnings and instructions marked on your product and its operating instructions. For your safety, please read all the safety and operating instructions with regard to proper grounding of the mast and supporting structure, grounding of the lead-in wire to an - JVC SR-VS20U | 76 pg User's Manual on the SR-VS20U (1776KB, PDF) - Page 4
or other hazards. 4. Safety Check Upon completion of any service or repairs to this product, ask the service technician to perform safety checks to determine that the product is in safe operating condition. HOW TO USE THIS INSTRUCTION MANUAL ● All major sections and subsections are listed in the - JVC SR-VS20U | 76 pg User's Manual on the SR-VS20U (1776KB, PDF) - Page 5
Playback 21 Simple Recording 22 VHS deck 22 DV deck 23 P LAYBACK AND RECORDING (On the Remote Control) ... 25 Manual Tracking 26 Index Search 26 Superimpose 27 JVC VCRs 67 TROUBLESHOOTING 68 Power 68 Tape Transport 68 Playback 68 Recording 68 Timer Recording 69 Other Problems - JVC SR-VS20U | 76 pg User's Manual on the SR-VS20U (1776KB, PDF) - Page 6
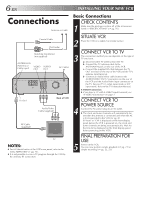
listed in "SPECIFICATIONS" (੬ pg. 76). SITUATE VCR 2 Place the VCR on a stable, horizontal surface. 3 CONNECT VCR TO TV to the TV Instruction Manual. S-VIDEO Connection ● If you have a TV with S-VIDEO input terminals, see "S-VIDEO Connection" on page 7. 4 CONNECT VCR TO POWER SOURCE Connect - JVC SR-VS20U | 76 pg User's Manual on the SR-VS20U (1776KB, PDF) - Page 7
to the TV as explained in step 3 of "Basic Connections" (੬ pg. 6). b- Connect the S-Video cable between the S-VIDEO OUT 2 jack on the rear of the VCR and the S-VIDEO IN jack on the TV. Antenna or Cable Coaxial Cable Flat Feeder Matching Transformer (not supplied) ANTENNA IN (Antenna or Cable input - JVC SR-VS20U | 76 pg User's Manual on the SR-VS20U (1776KB, PDF) - Page 8
/Auto Tuner Set ATTENTION If you use a cable box, Plug & Play will not function; set the clock and tuner channels manually. (੬ pg.10 - 14) IMPORTANT ● Don't press any buttons on the VCR or remote while Plug & Play is in progress. ● If you perform Plug & Play successfully, there's no need to perform - JVC SR-VS20U | 76 pg User's Manual on the SR-VS20U (1776KB, PDF) - Page 9
4 W 2 5 3 2 6 7 8 9 0 4 1 DV S-VHS 3 MENU OK EN 9 This VCR offers you the choice to view on-screen messages in English, Spanish or # to select the desired language. INITIAL SET CLOCK SET =LANGUAGE ENGLISH GUIDE CHANNEL SET CABLE BOX SET DBS RECEIVER SET SELECT WITH (5,∞) AND (OK - JVC SR-VS20U | 76 pg User's Manual on the SR-VS20U (1776KB, PDF) - Page 10
the Initial Set INITIAL SET screen to "CLOCK SET" by pressing %fi, then press OK or #. =CLOCK SET LANGUAGE ENGLISH GUIDE CHANNEL SET CABLE BOX SET ● "CABLE BOX USERS SET CLOCK MANUALLY" appears on the screen DBS RECEIVER SET SELECT WITH (5,∞) AND (OK) PRESS (MENU) TO END for about 5 seconds - JVC SR-VS20U | 76 pg User's Manual on the SR-VS20U (1776KB, PDF) - Page 11
6 7 8 9 0 4 1 DV S-VHS 3 MENU OK EN 11 Semi-Auto You can change the Host Channel/D.S.T. /Time Zone setting manually. 5 SET AUTO CLOCK TO ON At have three choices: a- Select "AUTO" and the adjustment to your VCR's clock will be made according to the incoming signal from the host channel - JVC SR-VS20U | 76 pg User's Manual on the SR-VS20U (1776KB, PDF) - Page 12
TV system. If you selected "AUTO" for the host channel in step 6, be sure to select the correct time zone manually. RETURN TO NORMAL SCREEN 9 Press MENU. IMPORTANT Turn the VCR off after performing the Semi-Auto Clock Set procedure. "Auto" will appear on the front display panel when the clock is - JVC SR-VS20U | 76 pg User's Manual on the SR-VS20U (1776KB, PDF) - Page 13
4 W 2 5 3 2 6 7 8 9 0 4 1 DV S-VHS 3 MENU OK INFORMATION The VCR detects the band (TV or CATV) and selects the correct band automatically then press OK or #. TUNER SET BAND CATV =AUTO CHANNEL SET MANUAL CHANNEL SET ● Receivable channels in your area are automatically assigned to - JVC SR-VS20U | 76 pg User's Manual on the SR-VS20U (1776KB, PDF) - Page 14
NUMBER T 1 4 W 2 5 3 2 6 7 8 9 0 4 1 DV S-VHS 3 MENU OK INITIAL SETTINGS (cont.) Add Or Delete A Channel ACCESS MAIN MENU SCREEN 1 Press MENU. ACCESS TUNER SET SCREEN 2 Move the highlight bar (arrow) to "TUNER SET" by pressing %fi, then press OK or #. 3 ACCESS MANUAL CHANNEL SET - JVC SR-VS20U | 76 pg User's Manual on the SR-VS20U (1776KB, PDF) - Page 15
NOTE: When connecting your cable box refer to its instruction manual. CONNECT CONTROLLER TO VCR 4 Connect to the CABLE BOX connector on your VCR. About Your Cable Box This VCR has two separate methods to control your Cable Box. ● The VCR's Wireless Remote Control Unit can control your Cable Box - JVC SR-VS20U | 76 pg User's Manual on the SR-VS20U (1776KB, PDF) - Page 16
DV S-VHS 3 MENU OK INITIAL SETTINGS (cont.) Set Cable Box Output Channel & Cable Box Brand TURN ON CABLE BOX 1 Select a channel other than channel 9 on your cable box. TURN ON THE VCR OK or #. INITIAL SET CLOCK SET LANGUAGE ENGLISH GUIDE CHANNEL SET =CABLE BOX SET DBS RECEIVER SET - JVC SR-VS20U | 76 pg User's Manual on the SR-VS20U (1776KB, PDF) - Page 17
2 6 7 8 9 0 4 1 DV S-VHS 3 MENU ACCESS CABLE BOX BRAND the VCR's clock has not been set (with AUTO CLOCK set to ON), if you press OK in step 7, "CABLE BOX USERS SET CLOCK MANUALLY" will If you are unable to set the Controller, please contact JVC toll free at 1-800-537-5722. CABLE BOX BRAND - JVC SR-VS20U | 76 pg User's Manual on the SR-VS20U (1776KB, PDF) - Page 18
to the ANTENNA IN connector on the rear of your VCR. Set the VCR's tuner to the same channel as the DBS receiver's RF output. (See page 19 also.) NOTE: When connecting your DBS receiver refer to its instruction manual. CONNECT CONTROLLER TO VCR 4 Connect to the CABLE BOX connector on your - JVC SR-VS20U | 76 pg User's Manual on the SR-VS20U (1776KB, PDF) - Page 19
DV S-VHS 3 MENU OK EN 19 Set DBS Receiver Output Channel & DBS Receiver Brand TURN ON DBS RECEIVER 1 Select a channel other than channel 55, 100 or 205 on your DBS receiver. TURN ON THE VCR or #. INITIAL SET CLOCK SET LANGUAGE ENGLISH GUIDE CHANNEL SET CABLE BOX SET =DBS RECEIVER SET - JVC SR-VS20U | 76 pg User's Manual on the SR-VS20U (1776KB, PDF) - Page 20
7 8 9 0 4 1 DV S-VHS 3 OK INITIAL SETTINGS screen for about 5 seconds, then it returns to the normal screen. JVC [ 100 ECHOSTAR [ 100 PRIMESTAR [ 55 SONY [ 205 RCA [ before the scheduled start of timer recording. ● The VCR can only change the satellite channel through the Controller - JVC SR-VS20U | 76 pg User's Manual on the SR-VS20U (1776KB, PDF) - Page 21
on automatically. The counter is automatically reset to "0:00:00". DV deck First turn on the VCR and load the cassette. If the VCR is turned off, the VCR's power does not come on when a Mini DV cassette is inserted. ● VHS deck If the cassette's record safety tab has been removed, playback begins - JVC SR-VS20U | 76 pg User's Manual on the SR-VS20U (1776KB, PDF) - Page 22
REC and press PLAY on the remote control, or press REC on the VCR's front panel. The VHS record indicator ( ) lights. Video Calibration takes on the VHS deck to remove the cassette. NOTE: It is not possible to record a TV program on both the VHS deck and the DV deck simultaneously. In addition - JVC SR-VS20U | 76 pg User's Manual on the SR-VS20U (1776KB, PDF) - Page 23
PLAY REC DV STOP PAUSE CH DV record indicator NUMBER T 1 4 W 2 5 3 2 6 7 8 9 0 4 DV ENTER CH SP/LP 1 PLAY REC DV S-VHS PAUSE 3 STOP EN 23 DV Deck LOAD A CASSETTE 1 Insert a Mini DV cassette with the erase protection switch set to "REC". SELECT DV DECK 2 Press DV. SELECT - JVC SR-VS20U | 76 pg User's Manual on the SR-VS20U (1776KB, PDF) - Page 24
Playback PAUSE DURING PLAYBACK 1 Press PAUSE. PLAY PAUSE PLAY 1 REW DV S-VHS FF PAUSE JOG SHUTTLE ACTIVATE FRAME-BY- FRAME PLAYBACK 2 frame playback or ™ repeatedly for reverse frame-by-frame playback. (VHS deck only) To resume normal playback, press PLAY. Slow Motion/Reverse Slow Motion - JVC SR-VS20U | 76 pg User's Manual on the SR-VS20U (1776KB, PDF) - Page 25
use. Refer to the SHUTTLE ring illustration below as you read the procedures. NOTE: When using the JOG dial during playback on the DV deck, turn the JOG dial slowly. Still rsey Remsvleoortwsioen mSoltoiown Pla Fsoerwaarcrdh y 3 JOG JOG/SHUTTLE SHUTTLE Shuttle Ring Modes Forward search Normal - JVC SR-VS20U | 76 pg User's Manual on the SR-VS20U (1776KB, PDF) - Page 26
26 EN REW PLAYBACK AND RECORDING FEATURES (cont.) T 1 4 W 2 5 3 2 6 7 8 9 0 4 CH 1 DV S-VHS FF 3 OK Manual Tracking (VHS deck only) Once playback begins, the VCR's automatic tracking function is engaged. If tracking noise appears in the picture, you can override this and make the - JVC SR-VS20U | 76 pg User's Manual on the SR-VS20U (1776KB, PDF) - Page 27
mode setting. The superimposed indication on the TV screen tells you what the VCR is doing. 1 7 2 CH 125 THU 12:00 AM RECORD PAUSE DV indicator 6- Audio mode indications 7- "Cassette Loaded" mark When a cassette is loaded, the mark is displayed for 5 seconds. It blinks when the VCR - JVC SR-VS20U | 76 pg User's Manual on the SR-VS20U (1776KB, PDF) - Page 28
set to "ON". If the Auto Timer is set to "ON", the VCR directly goes into the Timer-Standby mode at the same time when the It may take a few seconds for the Tape Position Indicator to be displayed. Time Code (DV Deck) During recording, a time code is recorded on the tape. This time code is used - JVC SR-VS20U | 76 pg User's Manual on the SR-VS20U (1776KB, PDF) - Page 29
T 1 4 W 2 5 3 2 6 7 8 9 0 4 1 DV S-VHS 3 MENU OK EN 29 Picture Control (VHS deck only) This feature helps you to adjust the playback picture quality according to your preference. *The default setting is "AUTO." ACCESS MAIN MENU SCREEN 1 Press - JVC SR-VS20U | 76 pg User's Manual on the SR-VS20U (1776KB, PDF) - Page 30
AND RECORDING FEATURES (cont.) T 1 4 W 2 5 3 2 6 7 8 9 0 4 1 DV S-VHS 3 OK Video Stabilizer (VHS deck only) By activating the Video Stabilizer you can correct vertical vibrations in the picture when playing back unstable EP recordings that were made on another VCR. When this function is - JVC SR-VS20U | 76 pg User's Manual on the SR-VS20U (1776KB, PDF) - Page 31
to "OFF" before starting. EN 31 Digital TBC/NR (VHS deck only) Your VCR is equipped with the Digital TBC (Time Base Corrector) that removes on a camcorder. ... playing back a tape repeatedly used. ... using this VCR as the player for editing. ACCESS MAIN MENU SCREEN 1 Press MENU. ACCESS VHS - JVC SR-VS20U | 76 pg User's Manual on the SR-VS20U (1776KB, PDF) - Page 32
2 5 3 2 6 7 8 9 0 4 Select The Soundtrack (VHS deck) The VHS deck can record two soundtracks simultaneously (Normal and Hi-Fi) and play back the by pressing %fi, then press OK or #. MAIN MENU MODE SET = VHS MODE SET DV MODE SET TUNER SET INITIAL SET PRESS (5,∞), THEN (OK) PRESS (MENU) TO END - JVC SR-VS20U | 76 pg User's Manual on the SR-VS20U (1776KB, PDF) - Page 33
to "12BIT" at the original recording on a Mini DV tape, if you wish to perform Audio Dubbing later. 12BIT Mode Setting (Audio-dubbed Mini DV Tape) ACCESS MAIN MENU SCREEN 1 Press MENU. 2 ACCESS DV MODE SET SCREEN Move the highlight bar (arrow) to "DV MODE SET" by pressing %fi, then press OK or - JVC SR-VS20U | 76 pg User's Manual on the SR-VS20U (1776KB, PDF) - Page 34
Video Calibration (VHS deck only) Turn on *The default setting is "ON". Preparation TURN ON THE VCR 1 Press POWER. ACCESS MAIN MENU SCREEN 2 Press MENU. MODE SET DV MODE SET TUNER SET INITIAL SET PRESS (5,∞), THEN (OK) PRESS (MENU) TO END POWER T 1 4 W 2 5 3 2 6 7 8 9 0 4 1 DV S-VHS - JVC SR-VS20U | 76 pg User's Manual on the SR-VS20U (1776KB, PDF) - Page 35
REC PAUSE T 1 4 W 2 5 3 2 6 7 8 9 0 4 PLAY 1 REC DV S-VHS PAUSE 3 Playback The VCR assesses the quality of the tape once you start playback. Perform steps 1 - 3 on page 21 ("Simple Playback") before continuing. START PLAYBACK 1 Press PLAY. ● The VCR adjusts the playback picture - JVC SR-VS20U | 76 pg User's Manual on the SR-VS20U (1776KB, PDF) - Page 36
T 1 4 W 2 5 3 2 6 7 8 9 0 4 DISPLAY PLAY 1 DV S-VHS FF PAUSE 3 MENU OK Record One Program While Watching Another ENGAGE TV MODE 1 During Tape Remaining Time (VHS deck only) DISPLAY COUNTER INFORMATION 1 Press DISPLAY. All indications corresponding to the VCR's current status are - JVC SR-VS20U | 76 pg User's Manual on the SR-VS20U (1776KB, PDF) - Page 37
broadcasts. When the channel is changed on the VCR ... ● The "STEREO" indication appears on and Normal audio tracks. EN 37 Retake (VHS deck only) You can cut out unnecessary parts of hole with adhesive tape. Record safety tab ● Mini DV To prevent accidental recording on a recorded cassette, set - JVC SR-VS20U | 76 pg User's Manual on the SR-VS20U (1776KB, PDF) - Page 38
FEATURES (cont.) S-VHS ET 1 DV S-VHS 3 MENU OK S-VHS (Super VHS), S-VHS ET and VHS (VHS deck only) Your VCR can record in S-VHS, S-VHS S-VHS ET it is possible to record and play back with SVHS picture quality on VHS cassettes with this VCR. For details, refer to page 39. To record in S-VHS - JVC SR-VS20U | 76 pg User's Manual on the SR-VS20U (1776KB, PDF) - Page 39
equipped with S-VHS ET. * It is recommended to specifically label S-VHS ET recordings so you can easily distinguish them from regular VHS recordings. ● S-VHS ET recordings can also be played back on an SVHS VCR or a VHS VCR equipped with SQPB (S-VHS QUASI PLAYBACK) function. However, there may be - JVC SR-VS20U | 76 pg User's Manual on the SR-VS20U (1776KB, PDF) - Page 40
in most TV listing.) SELECT DECK 1 Press S-VHS or DV. LOAD A CASSETTE 2 Insert a VHS (or S-VHS) cassette with the record safety tab intact, or a Mini DV cassette with the erase protection switch set to "REC". ● The VCR's power comes on automatically. 3 ACCESS VCR PLUS+ SCREEN Press PROG. on - JVC SR-VS20U | 76 pg User's Manual on the SR-VS20U (1776KB, PDF) - Page 41
PlusCode number is received on the VCR or cable box using the NUMBER keys, CH +/- or %fi, then press OK. ● The Guide Channel Set screen appears only when for about 5 seconds and the VCR Plus+ screen reappears. SET TAPE SPEED 7 Press SP/EP (SP/LP for the DV deck). RETURN TO NORMAL SCREEN 8 - JVC SR-VS20U | 76 pg User's Manual on the SR-VS20U (1776KB, PDF) - Page 42
+Timer Recording operates correctly it is necessary to set the VCR Plus+ "Guide Channel Set " for each station. Please read the following information carefully. VCR Plus+ Guide Channel Matching VCR Plus+ programming system assigns a VCR Plus+ "Guide Channel" to broadcast and cable TV channels. These - JVC SR-VS20U | 76 pg User's Manual on the SR-VS20U (1776KB, PDF) - Page 43
+/-, %fi or the (Ex.) When inputting the appropriate NUMBER keys Guide Channel number to input the VCR Plus+ 6 for WNJU(Ind.) Guide Channel number as shown in the TV listing. GUIDE CHANNEL SET Then press OK or #. GUIDE CH : 6 VCR CH : - - - ● If you receive your channels with a cable box - JVC SR-VS20U | 76 pg User's Manual on the SR-VS20U (1776KB, PDF) - Page 44
Mini DV cassette with the erase protection switch set to "REC". ● The VCR comes on, and the counter is reset, automatically. ● Select the recording deck by pressing S-VHS or DV. ACCESS VCR see "ATTENTION FOR DBS RECEIVER USERS" on next page. ● Holding down CH +/- rapidly scans through the channels. - JVC SR-VS20U | 76 pg User's Manual on the SR-VS20U (1776KB, PDF) - Page 45
0 4 NUMBER "9" TIMER PROG. 1 DV S-VHS SP/EP 3 OK ATTENTION FOR DBS RECEIVER USERS If you are using a DBS receiver TAPE SPEED 8 Press SP/EP (SP/LP for the DV deck) to set the tape speed. RETURN TO NORMAL SCREEN After timer recording is completed, the VCR's power goes off automatically. ● - JVC SR-VS20U | 76 pg User's Manual on the SR-VS20U (1776KB, PDF) - Page 46
46 EN POWER PROG. CHECK T W 1 2 3 2 4 5 6 STOP+/- DATE+/- 7 8 9 CANCEL 0 4 START+/- 1 DV S-VHS SP/EP POWER TIMER CH+/- 3 OK TIMER RECORDING (cont.) Check, Cancel And Revise Programs DISENGAGE TIMER 1 Press TIMER, then press POWER. 2 ACCESS PROGRAM CHECK - JVC SR-VS20U | 76 pg User's Manual on the SR-VS20U (1776KB, PDF) - Page 47
to the right. Without doing anything for about 1 minute, the VCR will finish the timer programing. 3 CANCEL OR CHANGE PROGRAMME SETTING To the programme you have just VHS made and "DV" are blinking, PR START STOP CH DATE there is a conflicting programme on the DV deck. 1 8:00P 11:00 12 12/24 2 - JVC SR-VS20U | 76 pg User's Manual on the SR-VS20U (1776KB, PDF) - Page 48
SP→EP Timer (VHS deck only) If, when recording in SP mode, there is not enough tape to record the entire program, the VCR automatically switches to EP case, make sure the mode is not engaged, then set the tape speed manually during timer programming. ● In order to ensure that the recording fits on - JVC SR-VS20U | 76 pg User's Manual on the SR-VS20U (1776KB, PDF) - Page 49
to 6 hours (VHS) or to 120 minutes (DV) (selectable in 30-min. increments) and shuts the VCR off after recording is finished. START RECORDING 1 Press REC play a tape on one deck while using the other deck for Instant Timer Recording. However, remember that the deck will turn itself off when - JVC SR-VS20U | 76 pg User's Manual on the SR-VS20U (1776KB, PDF) - Page 50
VHS 3 EDITING Dubbing An Entire Cassette Because this VCR includes both a VHS deck and a DV deck, you can easily use it for dubbing without connecting any other equipment. LOAD CASSETTES 1 Insert a VHS (or S-VHS) cassette and a Mini DV cassette. SELECT DUBBING DIRECTION 2 Press → when you - JVC SR-VS20U | 76 pg User's Manual on the SR-VS20U (1776KB, PDF) - Page 51
during the operation or dubbing is not recorded. q When dubbing from the VHS deck to the DV deck, also set "SOUND MODE" to the appropriate mode (੬ pg. 33). When dubbing from the DV deck to the VHS deck: q When dubbing a Mini DV tape that was produced by audio dubbing, you need to set "12BIT MODE - JVC SR-VS20U | 76 pg User's Manual on the SR-VS20U (1776KB, PDF) - Page 52
cassette. Random Assemble Editing is possible only when dubbing from the DV deck to the VHS deck. LOAD CASSETTES 1 Insert a VHS (or S-VHS) cassette and a Mini DV cassette. SELECT DV DECK 2 Press DV. ACCESS R.A. EDIT SCREEN 3 Press R.A. EDIT. R.A. EDIT screen will appear. 4 SELECT PROGRAMME - JVC SR-VS20U | 76 pg User's Manual on the SR-VS20U (1776KB, PDF) - Page 53
DV deck enters the Pause mode, and the VHS deck enters its RecordPause mode. 11 STOP EDITING Press STOP. The VHS deck stops recording. Press DV, then press STOP. The DV deck stops each programme. When dubbing from another Mini DV cassette, swap the Mini DV cassettes first, and then press START. - JVC SR-VS20U | 76 pg User's Manual on the SR-VS20U (1776KB, PDF) - Page 54
to the VCR's DV IN/OUT connector. LOAD A CASSETTE Insert the cassette to be recorded on into the recorder. SELECT RECORDING DECK 3 Press S-VHS or DV. DV IN/OUT PAUSE connector DV Cable VC-VDV204U (not provided) Player DV Camcorder DV OUT/IN Mini-Plug Cable (not provided) (JVC camcorder only - JVC SR-VS20U | 76 pg User's Manual on the SR-VS20U (1776KB, PDF) - Page 55
DV S-VHS NUMBER "0" 0 4 1DV DV FOR PICTURE CONTROL SET MODE (VHS DECK ONLY) Follow the "Picture Control" VCR to its record mode. ● If you are using a Master Edit Control-equipped JVC camcorder, it can put the recorder automatically into Record mode. (Refer to camcorder's instruction manual - JVC SR-VS20U | 76 pg User's Manual on the SR-VS20U (1776KB, PDF) - Page 56
into the player and the cassette to be recorded on into the recorder. SELECT DECK 3 Press S-VHS or DV. ● When using your VCR as the source player, set "OUTPUT1" to "VHS" or "DV", depending on the deck being selected (੬ pg. 57). Advantages Of S-VHS Editing S-VHS allows you make high resolution - JVC SR-VS20U | 76 pg User's Manual on the SR-VS20U (1776KB, PDF) - Page 57
3 Press CH +/- or %fi to move the highlight bar (arrow) to "OUTPUT1". 4 Press OK or # to select "AUTO", "VHS" or "DV". a-AUTO : The VCR outputs the signals from the deck being used automatically. The superimposed indication is also output. MODE SET REAR AUX INPUT = OUTPUT1 2ND AUDIO RECORD AUTO - JVC SR-VS20U | 76 pg User's Manual on the SR-VS20U (1776KB, PDF) - Page 58
an audio component to the AUDIO IN L + R connectors on the VCR's front panel. *When connecting monaural equipment, use only the VCR's AUDIO IN L connector. SELECT RECORDING DECK 2 Press S-VHS or DV. ● When using the DV deck as the recording deck, press ← so that the audio signals from the AUDIO - JVC SR-VS20U | 76 pg User's Manual on the SR-VS20U (1776KB, PDF) - Page 59
and the VCR enters the Play mode. Check the counter reading before dubbing. (VHS deck only) ● Audio dubbing is also possible using the rear AUDIO IN connectors. ● Audio dubbing cannot be performed on a VHS/S-VHS cassette that has had its record safety tab removed, or on a Mini DV cassette that has - JVC SR-VS20U | 76 pg User's Manual on the SR-VS20U (1776KB, PDF) - Page 60
VCR NUMBER 1 "04" T W 2 5 3 2 6 7 8 9 0 4 1DV DV S-VHS CH S-VHS PAUSE 3 JOG JOG/SHUTTLE SHUTTLE NOTE: Insert Editing is not possible with a Mini DV ੬ pg. 55). LOCATE END POINT (VHS DECK ONLY) 4 Load the recording cassette into your VCR, and play it back to determine the edit- - JVC SR-VS20U | 76 pg User's Manual on the SR-VS20U (1776KB, PDF) - Page 61
mode at the edit-in point. ENGAGE INSERT EDITING 7 Press INSERT. ● Your VCR enters the Insert-Pause mode. ( , and light up on the front display the other deck. ● Insert Editing cannot be performed on a VHS/S-VHS cassette that has had its record safety tab removed, or on a Mini DV cassette that - JVC SR-VS20U | 76 pg User's Manual on the SR-VS20U (1776KB, PDF) - Page 62
" (੬ pg. 57). ● For details of making a title, refer to the instruction manual for the video titler. PREPARE RECORDING DECK 3 Insert a cassette for recording and press DV or S-VHS for the recording deck. To set recording deck's input mode, press NUMBER key "0" and /or CH to select "L-1". ● Set - JVC SR-VS20U | 76 pg User's Manual on the SR-VS20U (1776KB, PDF) - Page 63
the GV-DT1/GV-DT3 Digital Printer (sold separately) to the DV IN/OUT connector. MAKE CONNECTIONS 1 Connect the printer's DV IN connector to the recorder's DV IN/OUT connector. SELECT DECK 2 Press DV. ● When you use the VHS deck Press ← beside the DUB button. The dubbing direction (← S-VHS - JVC SR-VS20U | 76 pg User's Manual on the SR-VS20U (1776KB, PDF) - Page 64
64 EN MONITOR AUDIO VCR/TV/CABLE/DBS POWER TV/VCR NUMBER T 1 4 7 W 2 5 8 3 2 6 9 ENTER 0 4 1 DV S-VHS STOP TV VOL - TV CH - 3 TV CH + TV VOL + TV BRAND NAME JVC MAGNAVOX MITSUBISHI PANASONIC RCA SHARP SONY TOSHIBA ZENITH HITACHI SAMSUNG SANYO SEARS BRAND CODE 01 02 03 04, 11 05 06 - JVC SR-VS20U | 76 pg User's Manual on the SR-VS20U (1776KB, PDF) - Page 65
VCR/TV/CABLE/DBS NUMBER POWER T W 1 4 2 5 3 2 6 ENTER 7 8 9 0 4 1 DV S-VHS STOP TV CH - 3 TV CH + CABLE BOX BRAND NAME ARCHER CABLETENNA CABLEVIEW CITIZEN CURTIS DIAMOND EASTERN GC BRAND GEMINI GENERAL INSTRUMENTS HAMLIN JASCO JERROLD - JVC SR-VS20U | 76 pg User's Manual on the SR-VS20U (1776KB, PDF) - Page 66
66 EN VCR/TV/CABLE/DBS NUMBER POWER T 1 4 W 2 5 3 2 6 7 8 9 0 4 ENTER 1 DV S-VHS STOP TV CH - 3 TV CH + DBS BRAND NAME JVC (DISH Network) ECHOSTAR (DISH Network) PRIMESTAR SONY (DSS) RCA (DSS) BRAND CODE 51 51 50 41 40 (Ex.) To set remote control to JVC 51: POWER 5 1 STOP - JVC SR-VS20U | 76 pg User's Manual on the SR-VS20U (1776KB, PDF) - Page 67
A/B NUMBER "1" POWER T 1 W 2 3 NUMBER "2" 2 4 5 6 7 8 9 0 4 1 STOP DV S-VHS 3 EN 67 Control Two JVC VCRs The remote control is capable of controlling two JVC VCRs independently; one set to respond to your remote control's A code control signals and another set to respond to B code - JVC SR-VS20U | 76 pg User's Manual on the SR-VS20U (1776KB, PDF) - Page 68
68 EN TROUBLESHOOTING Before requesting service for a problem, use this chart and see if you can repair the trouble yourself. Small problems are often easily corrected, and this can save you the trouble of sending your VCR off for repair. POWER SYMPTOM 1. The power won't come on. 2. The clock - JVC SR-VS20U | 76 pg User's Manual on the SR-VS20U (1776KB, PDF) - Page 69
not work when the VCR's input mode is set to "F-1" for recording on the DV deck, because the recorder is waiting for the signals through DV IN/OUT (i.Link) perform the set-up procedures. Make sure you have compensated for Guide Channel and VCR or cable box channel number mismatches (੬ pg. 42). Set - JVC SR-VS20U | 76 pg User's Manual on the SR-VS20U (1776KB, PDF) - Page 70
TROUBLESHOOTING VCR Plus+ system doesn't work properly. 11. "PROGRAM FULL" is displayed on the screen. OTHER PROBLEMS programs on the VHS or DV deck's timer memory are used. Manual setting procedure (੬ pg. 12). Turn off the VCR or the connected appliance once, then turn it on again. ATTENTION This VCR - JVC SR-VS20U | 76 pg User's Manual on the SR-VS20U (1776KB, PDF) - Page 71
(DV deck). ○ ○ ○ ○ ○ ○ ○ ○ ○ ○ ○ ○ ○ ○ ○ ○ ○ ○ ○ ○ ○ ○ ○ ○ ○ ○ ○ ○ Q. What happens if the tape runs out during recording? A. The VCR automatically rewinds it to the beginning. TIMER RECORDING Q. REC and ‰ remain lit on the front display panel. Is there a problem - JVC SR-VS20U | 76 pg User's Manual on the SR-VS20U (1776KB, PDF) - Page 72
EJECT VIDEO (M) L -AUDIO- R F- 1 S-VIDEO PAUSE $ % ^ &*( ) q w ert y u i o 1 Power On/Off Button (੬ pg. 9) 2 Remote Control Sensor 3 DV EJECT Button (੬ pg. 21) 4 Mini DV Cassette Loading Slot 5 DV Button (੬ pg. 21) 6 STOP Button (੬ pg. 21) 7 PLAY Button (੬ pg. 21) 8 PAUSE Button (੬ pg. 22 - JVC SR-VS20U | 76 pg User's Manual on the SR-VS20U (1776KB, PDF) - Page 73
INSERT PAUSE: 6 7 2 Tape Speed Indicators (੬ pg. 22, 23) 3 Timer Mode Indicator (੬ pg. 41, 45) 4 Tape Remaining Time Indicator (VHS deck only) (੬ pg. 36) 5 S-VHS Indicator (VHS deck only) (੬ pg. 38, 39) 6 "Cassette Loaded" Mark 7 Channel Display ["L-1" and "F-1" for AUX mode] Counter Display (VHS - JVC SR-VS20U | 76 pg User's Manual on the SR-VS20U (1776KB, PDF) - Page 74
CABLE/DBS A.MONITOR POWER PROG A/B TV/VCR CHECK DISPLAY T 1 4 W 2 5 ENTER/OSD 3 2 6 DBS DAILY(M-F) WEEKLY 7 8 9 C. RESET AUX CANCEL 0 TIMER 4 START STOP DATE CH EXPRESS PROGRAMMING 1 PROG SP/LP SP/EP DV S-VHS PLAY REW FF REC STOP TV CH + PAUSE TV VOL - TV VOL + MENU - JVC SR-VS20U | 76 pg User's Manual on the SR-VS20U (1776KB, PDF) - Page 75
Program 46 Cassette Adapter 21 Changing VCR Plus+® Setting 42 Check Program 46 Frame-by-Frame Playback 24 G Guide Channel Setting 43 H Host Menu 9 Manual Channel Setting 14 Manual Clock Setting 12 Manual Tracking 26 Sound Mode Selection 33 Specifications 76 Still Picture Playback 24 - JVC SR-VS20U | 76 pg User's Manual on the SR-VS20U (1776KB, PDF) - Page 76
SR-VS20U SPECIFICATIONS GENERAL Power requirement : DV DECK VIDEO/AUDIO Signal system : NTSC-type colour signal, 525 lines/60 fields Recording system : Digital Component Recording Format : DV format (SD mode) Cassette : Mini DV in accordance with the instruction manual, may cause harmful
-
 1
1 -
 2
2 -
 3
3 -
 4
4 -
 5
5 -
 6
6 -
 7
7 -
8
-
9
-
10
-
11
-
12
-
13
-
14
-
15
-
16
-
17
-
18
-
19
-
20
-
21
-
22
-
23
-
24
-
25
-
26
-
27
-
28
-
29
-
30
-
31
-
32
-
33
-
34
-
35
-
36
-
37
-
38
-
39
-
40
-
41
-
42
-
43
-
44
-
45
-
46
-
47
-
48
-
49
-
50
-
51
-
52
-
53
-
54
-
55
-
56
-
57
-
58
-
59
-
60
-
61
-
62
-
63
-
64
-
65
-
66
-
67
-
68
-
69
-
70
-
71
-
72
-
73
-
74
-
75
-
76
 |
 |

SR-VS20U
Mini DV/S-VHS
VIDEO CASSETTE RECORDER
INSTRUCTIONS
LPT0589-001A
For Customer Use:
Enter below the Model No. and
Serial No. which are located on the
rear of cabinet. Retain this
information for future reference.
Model No.
Serial No.
1
2
3
4
5
6
7
8
9
0
2
4
1
3
T
W
DV
S-VHS
POWER
TV/VCR
A/B
DISPLAY
ENTER/OSD
A.MONITOR
VCR
TV CABLE/DBS
CANCEL
TIMER
START
STOP
DATE
CH
C. RESET
DBS
DAILY(M-F)
AUX
WEEKLY
PROG
EXPRESS PROGRAMMING
PROG
CHECK
SP/LP
SP/EP
PLAY
REW
REC
STOP
PAUSE
FF
TV CH +
TV CH —
TV
VOL
+
TV
VOL
—
M
E
N
U
O
K
JOG/
SHUTTLE
T
I
D
E
.
A
.
R
T
U
O
/
N
I
T
R
A
T
S
DV IN/OUT
S-VHS
DV
A.DUB
INSERT
CH
DUB
DV
S-VHS
START
R.A.EDIT
IN/OUT
S-VHS ET
PULL - OPEN
REC
PAUSE
PLAY
STOP
EJECT
EJECT
POWER