JVC TK-C1460U Instruction Manual - Page 19
Attach the CAMERA MOUNTING
 |
View all JVC TK-C1460U manuals
Add to My Manuals
Save this manual to your list of manuals |
Page 19 highlights
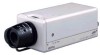
q IRIS VIDEO DC w Cameramounting bracket Installation of camera • Mounting from the bottom This camera is originally designed to be mounted from the bottom, as shown q. The hole is standard photographic panhead screw size (1/4-20 UNC). Example the Fixing unit or Pan/Tilt unit. • Mounting from the top Remove the CAMERA MOUNTING BRACKET from the bottom of the camera by removing two fixing screws as shown w. Attach the CAMERA MOUNTING BRACKET to the top, then mount the camera on the Fixing Unit as shown e. Make sure that two original screws are used when mounting the CAMERA MOUNTING BRACKET. Be sure to use a 6 mm long locking screw for the cameramounting bracket. (This camera is used indoor and under similar conditions.) Fixing screws e IRIS VIDEO DC E-19
-
 1
1 -
2
-
3
-
4
-
5
-
6
-
7
-
8
-
9
-
10
-
11
-
12
-
13
-
 14
14 -
 15
15 -
 16
16 -
 17
17 -
 18
18 -
 19
19 -
 20
20 -
 21
21 -
 22
22 -
 23
23 -
 24
24 -
25
-
26
-
27
-
28
-
29
-
30
-
31
-
32
-
33
-
34
-
35
-
36
-
37
-
38
-
39
-
40
-
41
-
42
-
43
-
44
-
45
-
46
-
47
-
48
-
49
-
50
-
51
-
52
-
53
-
54
-
55
-
56
-
57
-
58
-
59
-
60
-
61
-
62
-
63
-
64
-
65
-
66
-
67
-
68
-
69
-
70
-
71
-
72
-
73
-
74
-
75
-
76
-
77
-
78
-
79
-
80
-
81
-
82
-
83
-
84
-
85
-
86
-
87
-
88
-
89
-
90
-
91
-
92
-
93
-
94
-
95
-
96
-
97
-
98
-
99
-
100
-
101
-
102
-
103
-
104
-
105
-
106
-
107
-
108
-
109
-
110
-
111
-
112
-
113
-
114
-
115
-
116
-
117
-
118
-
119
-
120
-
121
-
122
-
123
-
124
-
125
-
126
-
127
-
128
-
129
-
130
-
131
-
132
-
133
-
134
-
135
-
136
-
137
-
138
-
139
-
140
-
141
-
142
-
143
-
144
-
145
-
146
-
147
-
148
-
149
-
150
-
151
-
152
-
153
-
154
-
155
-
156
-
157
-
158
-
159
-
160
-
161
-
162
-
163
-
164
-
165
-
166
-
167
-
168
-
169
-
170
-
171
-
172
-
173
-
174
-
175
-
176
-
177
-
178
-
179
-
180
-
181
-
182
-
183
-
184
-
185
-
186
-
187
-
188
-
189
-
190
-
191
-
192
-
193
-
194
-
195
-
196
-
197
-
198
-
199
-
200
-
201
-
202
-
203
-
204
-
205
-
206
-
207
-
208
-
209
-
210
-
211
-
212
 |
 |
