Jensen MP5010K Installation Guide
Jensen MP5010K - 240 Watt AM/FM Manual
 |
UPC - 043258016416
View all Jensen MP5010K manuals
Add to My Manuals
Save this manual to your list of manuals |
Jensen MP5010K manual content summary:
- Jensen MP5010K | Installation Guide - Page 1
tried to make the instructions in this owner's manual clear and easy to follow. If you take a few minutes to look through it, you'll learn how to use all of the features of your new JENSEN car stereo for maximum enjoyment. Installation Troubleshooting 6 Operation 8 Specifications/Warranty 21 - Jensen MP5010K | Installation Guide - Page 2
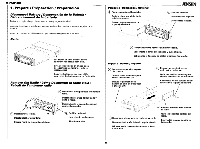
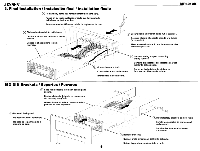
Domestic / Domestic° / National 0 Remove dashboard faceplate. Quite Ia place frontal del table o de instrumentos. Enlevez le panneau avant de la planche de bord. JENSEN 0 Unscrew brackets. Destornille los soportes. Devissez les ferrures. 0 Disconnect wiring harness and remove radio. Desconecte el - Jensen MP5010K | Installation Guide - Page 3
Install support strap to make unit more stable. Instale wiring color codes. Jensen Una o conecte a presion. Vea los codigos de color del cableado. Effectuez les branchements par raccord ou sertissage. Suivez les codes de couleur du cablage. 1111111 Attach wiring adapter to car wiring harness - Jensen MP5010K | Installation Guide - Page 4
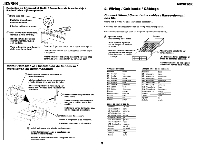
MP5010K Wiring Diagram / Diagrama de cableado / Diagramme de cablage © e 0 0 0 0 0 0 000 10A O'P nen Ma 000 Dna JENSEN Antenna Connector Conector para la antena Connecteur d'antenne CD Changer Connector Conector para del cambiadiscos de CD Connecteur du changeur de CD RCA Outputs to AMP - Jensen MP5010K | Installation Guide - Page 5
dans le demifourreau. MP5010K 0 0 Secure Radio to bracket using nut (if possible). Asegure el radio al soporte usando una tuerca (si es posible). Fixez le nouvel autoradio aux ferrures avec des ecrous (si possible). 0 Connect wiring adapter to existing wiring harness. O Connect antenna lead - Jensen MP5010K | Installation Guide - Page 6
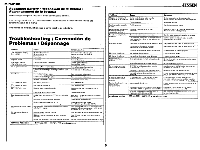
batterie. Troubleshooting / Correcci6n de Problemas / Depannage Problem Does not operate (display does not light) No power to unit No speakers operate (display lights normally) Not all speakers operate Cause No power to yellow wire No power to red wire Blown fuse. Blown fuse. Speaker harness not - Jensen MP5010K | Installation Guide - Page 7
JENSEN' Troubleshooting (continued) / Correction de Problemas (continuation) / D6pannage (suite) Probleme Cause L'apparell ne fonctionne pas Aucune alimentation au fil jaune (raffichage ne s'allume pas) Aucune alimentation au fil rouge Mesure a prendre Verifiez la connexionet les - Jensen MP5010K | Installation Guide - Page 8
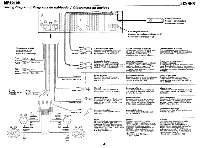
remission du bip sonore. Lorsque le bip sonore est active, ((i))) apparaff dans l'affichage. JENSEN' Volume Knob Perilla del volumen Bouton de volume JENSEN PWR 00 0 0 (OD))) , Oi c) ,SEL„ MP5010K CD RECEIVER/MP3 PLAYER aid DIGITAL AUDIO M/a. al rlfSZ 10A6.74. r r SUB-OUT 60W x 4 LOUD - Jensen MP5010K | Installation Guide - Page 9
JENSEN' (6:00 AM or 6:00 PM). See U.S. or European Frequency Spacing instructions on page 12. Visualization del reloj de 12-horas o 24-horas changer les heures; appuyez sur *► pour changer les minutes. MP5010K 1 CIENTEJS?SJ ,7-- PWR 0 0 MP501OK CD RECEIVER/R03 PLAYER disc SUB-OUT 60W x 4 MP3 SF - Jensen MP5010K | Installation Guide - Page 10
MP5010K Operation (continued) / Operacion (continuacion) / Fonctionnement (suite) JENSEN Time Priority Press and provisoirement AUX Entrée signaux auxiliaires l'horloge. I 4ENSEN) PWR 0 O O SEL MP5010K CD RECEIVER/MP3 PLAYER disc DIGITAL AUDIO SUB-OUT 60W 4 P3 OPEN SHIFT AS/PS 0.111 - Jensen MP5010K | Installation Guide - Page 11
JENSEN Operation (continued) / Operacion (continuacion) / Fonctionnement (suite) Detachable Faceplate / Placa cubertora removible / Plaque Voyant de securite MP5010K Remove Radio from Dash / Extraccion del radio del automovil / Retrait de la radio tableau de bord 0 Remove faceplate. Quite la placa - Jensen MP5010K | Installation Guide - Page 12
MP501OK JENSEN Radio Operation / Operacion de la Radio / Fonctionnement de la Radio 1-1ENSEN) PWR o O cip A4P5010K CD RECEIVEFt/MP3 PLAYER dirg-a DIGITAL AUDIO O MUTE 9 DISP C1 LOUD 0 MODE 1 Manual Tuning 1. Press 4^ or W for more than 3 seconds to select manual tuning mode. 2. Press 4* or - Jensen MP5010K | Installation Guide - Page 13
JENSEN® Radio Operation (continued) / Operacion de la Radio (continuacion Les nouvelles stations remplacent les stations memorisees pour cette bande. 1 q, E- NSF_ST PWR 0 0 CD (7((;;) • Sq.,. 11,4P5010K CD RECEIVER/MP3 PLAYER dikt LOC DIGITAL AUDIO C) MUTE SCAN FOL1ER 1 • • •••Il II ■• • - Jensen MP5010K | Installation Guide - Page 14
CD se trouve a demi engage dans la fente. Insert CD Press OPEN. Faceplate will swing down. Insert CD label side up into slot. Push panel up to close. Para Insertar el CD vers le haut pour le fermer. JENSEN PWR 0 %(cc•))) 0 o SEL oc MP5010K CD RECEIVER/MP3 PLAYER disc DIGITAL AUDIO RUM WIL - Jensen MP5010K | Installation Guide - Page 15
JENSEN® MP501OK CD Player Operation (continued) / Operacion del reproductor de CD (continuacion) / Fonctionnement du lecteur CD (suite) PWR 0 o (((•») 1 0 0 MP5010K CD RECEIVER/MP3 PLAYER drgb DIGITAL AUDIO Maim, oto> N,••...116) RPT RDM INT O MUTE • SCAN SI FOLDER " PGM RPT RDM INT 1 - Jensen MP5010K | Installation Guide - Page 16
JENSEN CD Player Operation (continued) / Operacion del reproductor de CD (continuation) / Fonctionnement du lecteur CD (suite) PROGRAM MODE Press the PGM button for more than 3 seconds, PROGRAM icon starts flashing indicating you are now in Program Mode. Program up to 24 CD MP5010K CD RECEIVER/ - Jensen MP5010K | Installation Guide - Page 17
JENSEN' MP3 Player Operation / Operacion del reproductor de MP3 / Fonctionnement du lecteur MP3 MP5010K MP3 Support / Soporte MP3 del MP5010K / Soutien MP3 par le MP5010K MP3 Format: • Supports the MP5010K will only support up to eight nested directories (ISO9660 format). Whenever a CD is created - Jensen MP5010K | Installation Guide - Page 18
26; track number 10 in the Disco folder would be number 35 (25 + 10); and so on. JENSEN Acceso directo El programa MP5010K "mira" el numero total de pistas musicales en el CD. Usted puede tener acceso directo a cualquier pista del disco usando los botones de preprogramaci6n (1 a 0). Sin embargo - Jensen MP5010K | Installation Guide - Page 19
JENSEN MP501OK MP3 Operation (continued) / Operacion del reproductor de MP3 (continuation) / Fonctionnement du lecteur MP3 (suite) Loading an MP3 CD When a CD clENSEN PWR 0 0 0 ' (((0))) CD SEL, MP5010Kco RECEIVER/MP 3PLAYER difd +tr. mad D ID3 El MP5010K visualizara identificadores - Jensen MP5010K | Installation Guide - Page 20
Reverse, Pause, Repeat, Random and Intro Scan functions can be performed on CDs played through the CD Changer.See CD Player instructions. Nota El MP5010K este disenado para controlar un cambiadiscos opcional de CD. El cambiador de discos compactos reproduce todas las canciones en el disco y luego - Jensen MP5010K | Installation Guide - Page 21
O c) MODE PGMORDM0 RPT INT c) 0 SHIFT BAND SEL 41 (w) TUWTAK-I FOLDER A voLV LOUD cliNSEN) MP5010K REMOTE CONTROL UNIT Jensen MP5010K Remote Control Control Remoto MP5010K de Jensen Telecommande MP5010K de Jensen JI (BAND /7 MUTE PWR Jensen IR20 Remote Control Control remoto 1R20 de - Jensen MP5010K | Installation Guide - Page 22
10 amperios ATO Dimensiones 7" x 7" x 2" (177.8mm x 177.8mm x 50.8mm) Las espectifcaciones estan sujetas a cambio sin previo aviso. Caracteristiques JENSEN Lecteur CD Rapport signal/bruit Reponse de frequence Separation de canal ConvertisseurD/A >90 dB 20 Hz - 20 KHz >65 dB 1 bit Recepteur - Jensen MP5010K | Installation Guide - Page 23
modification, improper installation, incorrect line voltage, unauthorized repair or failure to follow instructions supplied with the removal and/or installation of the product. If the product is shipped for warranty service, you must prepay the initial shipping charges, but Jensen will pay the - Jensen MP5010K | Installation Guide - Page 24
JENSENAudio CONSUMER INFORMATION CARD THANKS FOR PURCHASING A JENSEN CAR AUDIO RECEIVER REGISTER YOUR PURCHASE NOW FOR • Warranty Confirmation By returning this card we will have your purchase information on file in the event we need to - Jensen MP5010K | Installation Guide - Page 25
:in,. Thank you for purchasing a JENSEN Car Audio receiver. You can help us to continue providing you sound system? Equalizer (A) Currently Own (B) Intend to Add u 1. u Amplifier u 2. Subwoofer u 3. u CD Player/Changer O 4. Other speakers u 5. u .cd cEniniICI V rrinciaPr hethre - Jensen MP5010K | Installation Guide - Page 26
to: JENSEN Car Audio Customer Service 2950 Lake Do-It-Yourself 22. .7 Recreation Vehicles 23. L Listen to Records/ Tapes/CDs 24. Li Surf the Internet 25. Avid Book Reading 26. 7 ' you to receive important mailings and special offers from a number of fine companies whose products and services relate - Jensen MP5010K | Installation Guide - Page 27
B) Model year: receiver be installed by? Retired? 0 2. u 1. 0 Self, friend or family member A Student? O 3. 2. 0 Retailer where unit was purchased Self Employed/Business Owner CD & cassette that came with vehicle 07. 0 $60,000-$74,999 14. 0 $250,000 & over 13. A.) Did you purchase JENSEN
-
 1
1 -
 2
2 -
 3
3 -
 4
4 -
 5
5 -
 6
6 -
 7
7 -
8
-
9
-
10
-
11
-
12
-
13
-
14
-
15
-
16
-
17
-
18
-
19
-
20
-
21
-
22
-
23
-
24
-
25
-
26
-
27
 |
 |
JENSEN
MP501
OK
CIFNSE)
PWR
VP.
MP5010K
CD
RECEIVERIMP3
PLAYER
\\
z,.._
.
OPE71
SUB
-OUT
60W
x
4
e
ir.'23
0
0
OrrAI
4.1010
•1741
o
•••
•
O
MUTE
DC
(SELH•H)
•
•
...
I
I
SCAN
V
FOLDER
Is
1
I
2
PGM
3
ingy
LOC
mem
LOUD')
<t ato
RP7
ROM
WIC=
S
760,1
• •
a
D
2
.
■7;
•
!
•
••••
Le
•
%VI
.
m
e
•
•
RPT
4
RDM
INT
5
6
7
CDC
CONTROLLER
8
9
SHIFT
ASIPS
0
,
e))
LOUD
0
BAND
O
MODE
Thank
You!
Thank
you
for
choosing
a
JENSEN
product.
We've
tried
to
make
the
instructions
in
this
owner's
manual
clear
and
easy
to
follow.
If
you
take
a
few
minutes
to
look
through
it,
you'll
learn
how
to
use
all
of
the
features
of
your
new
JENSEN
car
stereo
for
maximum
enjoyment.
Installation
Troubleshooting
6
Operation
8
Specifications/Warranty
21
Muchas
gracias!
Muchas
gracias
por
escoger
un
producto
JENSEN.
Hemos
hecho
lo
posible
para
que
las
instrucciones
en
este
manual
sean
claras
y
faciles
de
seguir.
Si
se
da
unos
pocos
minutos
para
leerlo,
aprendera
a
usar
todos
los
elementos
de
su
nuevo
estereo
Jensen
para
carros
para
que
pueda
disfrutarlo
al
maxim°.
Instalacion
1
Correcion
de
problemas
6
Operacion
8
Especificationes/Garantie
21
Je
vous
remercie!
Nous
vous
remercions
d'avoir
choisi
un
produit
JENSEN.
Nous
nous
sommes
attach6s
a
rendre
les
instructions
qu'il
contient
claires
et
faciles
a
suivre.
Si
vous
prenez
quelques
minutes
pour
le
parcourir,
vous
saurez
comment
utiliser
toutes
les
fonctions
de
votre
nouvel
autoradio
stereo
Jensen
pour
en
profiter
au
maximum.
Installation
Depannage
6
Functionnement
8
Caracteristiques/Garantia
21
Installation
/
Instalacion
Getting
Started
/
Para
Empezar
/
Pour
commencer
It's
a
good
idea
to
read
all
of
the
instructions
before
you
begin
the
installation.
Es
una
buena
idea
leer
todas
las
instrucciones
antes
de
empezar
la
instalaci0n.
II
serait
d'ailleurs
preferable
de
lire
toutes
les
directives
avant
de
commencer
('installation.
Tools
and
Supplies
/
Herramientas
y
materiales
/
Outiles
et
fournitures
Tools
and
Supplies
Needed
•
Torx
type,
Flat
and
Phillips
screwdrivers
•
Wire
cutters
and
strippers
•
Tools
to
remove
existing
radio
(screw
driver,
socket
wrench
set
or
other
tools.)
•
Electrical
tape
•
Crimping
tool
•
Volt
meter/Test
light
•
Crimp
connections
•
18
gauge
wire
for
power
connections
•
16-18
gauge
speaker
wire
•
Speaker
Requirements:
Only
connect
speakers
rated
in
the
load
impedance
range
of
2
to
8
ohms.
Speakers
with
a
load
impedance
less
than
2
ohms
could
damage
the
unit.
Herramientas
y
materiales
necesarios
•
Tipo
t0rico,
destornilladores
de
estrella
y
de
cabeza
plana
•
Cortadores
de
alambre
y
pelacables
•
Herramientas
para
sacar
la
radio
vieja
(destornillador,
Ilaves
ajustables
u
otras
herramientas)
•
Cinta
aislante
•
Herramienta
especial
para
ajustar
conexiones
de
presion
•
Voltimetro/Luz
de
prueba
•
Conectores
de
presion
•
Cable
de
calibre
18
para
conexiones
de
corriente
•
Cable
de
calibre
16-18
conector
para
altoparlantes
•
Requisitos
de
los
altoparlantes:
Se
debe
conectar
el
componente
musical
solo
a
altoparlantes
que
posean
un
promedio
de
carga
de
impedancia
de
2
a
8
ohms.
Los
altoparlantes
con
una
carga
menor
de
2
ohms
pueden
dafiar
el
radio.
Outils
et
fournitures
necessaires
•
Tournevis
(ordinaire,
cruciforme
et
Torx)
•
Pinces
a
couper
et
a
denuder
les
fils
•
Outils
necessaires
pour
enlever
la
radio
existante
(tournevis,
ensemble
de
Iles
a
douille
ou
autres
outils)
•
Ruban
adhesif
electrique
•
Pince
a
sertir
•
Voltmetre
/
ampoule
d'essai
•
Connecteurs
a
sertir
•
Fil
de
calibre
18
pour
les
connexions
d'alimentation
•
Fil
de
calibre
16-18
pour
haut-parleur
•
Exigences—haut-parleur:
Ne
raccordez
qu'a
des
haut-parleurs
dont
('impedance
de
charge
varie
de
2
a
8
ohms.
Des
haut-parleurs
avec
une
impedance
inferieure
a
2
ohms
pourraient
endommager
le
radio.