Kenwood DDX370 Instruction Manual - Page 79
Accessories/Installation Procedure - wiring
 |
View all Kenwood DDX370 manuals
Add to My Manuals
Save this manual to your list of manuals |
Page 79 highlights
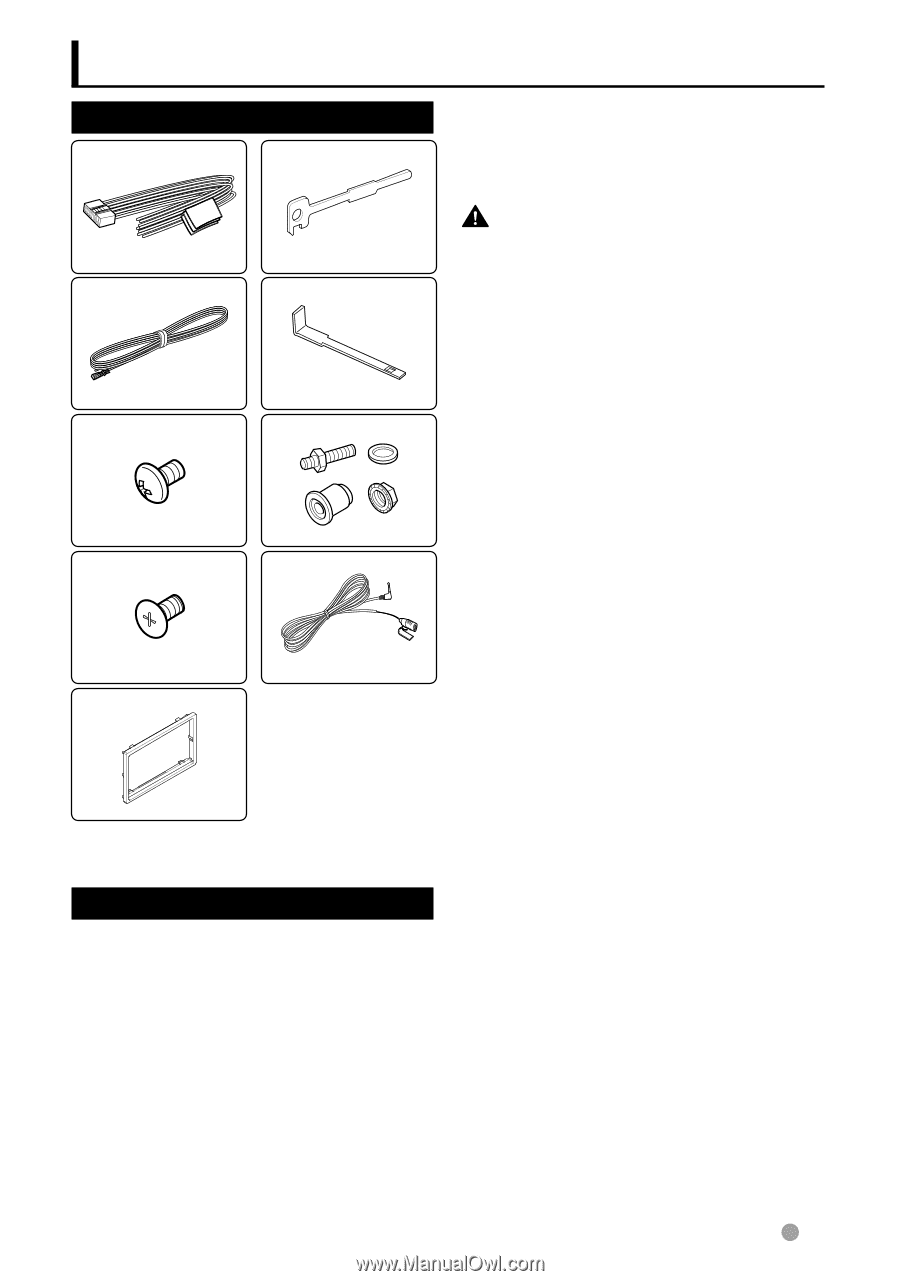
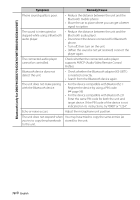
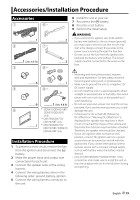
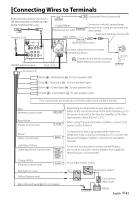
Accessories/Installation Procedure Accessories 1 6 *1 ..........1 ..........2 2 7 *2 ..........1 (2m: 6.5 ft) 3 8 *2 ..........2 ..........6 ..........1 4 9 *3 ..........6 ..........1 (3m: 9.8 ft) 5 *1 DDX470/DDX4070BT/ DDX370/DDX3070 only. *2 DDX790/DDX770/ DDX7070BT only. ..........1 *3 DDX790/DDX770/ DDX7070BT/ DDX470/ DDX4070BT only. Installation Procedure 1 To prevent a short circuit, remove the key from the ignition and disconnect the · battery. 2 Make the proper input and output wire connections for each unit. 3 Connect the speaker wires of the wiring harness. 4 Connect the wiring harness wires in the following order: ground, battery, ignition. 5 Connect the wiring harness connector to the unit. 6 Install the unit in your car. 7 Reconnect the · battery. 8 Press the reset button. 9 Perform the Initial Setup. WARNING • If you connect the ignition wire (red) and the battery wire (yellow) to the car chassis (ground), you may cause a short circuit, that in turn may start a fire. Always connect those wires to the power source running through the fuse box. • Do not cut out the fuse from the ignition wire (red) and the battery wire (yellow). The power supply must be connected to the wires via the fuse. ¤ • Mounting and wiring this product requires skills and experience. For best safety, leave the mounting and wiring work to professionals. • Make sure to ground the unit to a negative 12V DC power supply. • Do not install the unit in a spot exposed to direct sunlight or excessive heat or humidity. Also avoid places with too much dust or the possibility of water splashing. • Do not use your own screws. Use only the screws provided. If you use the wrong screws, you could damage the unit. • If the power is not turned ON ("Miswiring DC Offset Error", "Warning DC Offset Error" is displayed), the speaker wire may have a shortcircuit or touched the chassis of the vehicle and the protection function may have been activated. Therefore, the speaker wire should be checked. • If your car's ignition does not have an ACC position, connect the ignition wires to a power source that can be turned on and off with the ignition key. If you connect the ignition wire to a power source with a constant voltage supply, such as with battery wires, the battery may be drained. • Only for DDX790/DDX770/DDX7070BT: If the console has a lid, make sure to install the unit so that the faceplate will not hit the lid when closing and opening. English 79
-
 1
1 -
2
-
3
-
4
-
5
-
6
-
7
-
8
-
9
-
10
-
11
-
12
-
13
-
14
-
15
-
16
-
17
-
18
-
19
-
20
-
21
-
22
-
23
-
24
-
25
-
26
-
27
-
28
-
29
-
30
-
31
-
32
-
33
-
34
-
35
-
36
-
37
-
38
-
39
-
40
-
41
-
42
-
43
-
44
-
45
-
46
-
47
-
48
-
49
-
50
-
51
-
52
-
53
-
54
-
55
-
56
-
57
-
58
-
59
-
60
-
61
-
62
-
63
-
64
-
65
-
66
-
67
-
68
-
69
-
70
-
71
-
72
-
73
-
 74
74 -
 75
75 -
 76
76 -
 77
77 -
 78
78 -
 79
79 -
 80
80 -
 81
81 -
 82
82 -
 83
83 -
 84
84 -
85
-
86
-
87
-
88
-
89
-
90
-
91
-
92
 |
 |