Konica Minolta bizhub 181 IC-206 User Manual - Page 223
When MANUAL is selected, key to select the appropriate scanning size,
 |
View all Konica Minolta bizhub 181 manuals
Add to My Manuals
Save this manual to your list of manuals |
Page 223 highlights
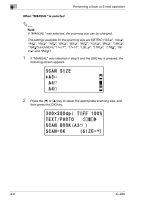
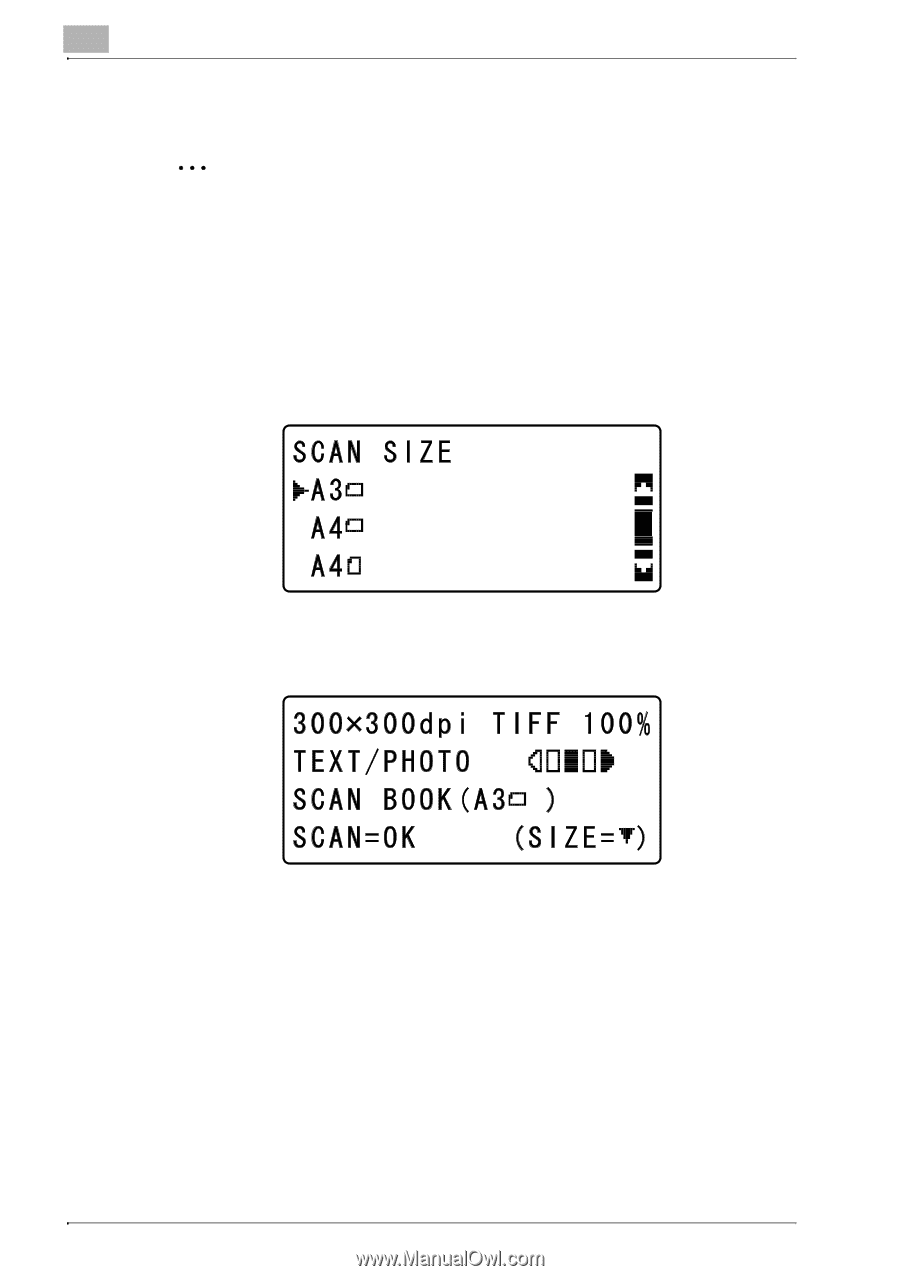
9 Performing a Scan to E-mail operation When "MANUAL" is selected 2 Note If "MANUAL" was selected, the scanning size can be changed. The settings available for the scanning size are METRIC ("A3w", "A4w", "A4v", "A5w", "A5v", "B4w", "B5w", "B5v", "FLSw", "8Kw", "16Kw", "16Kv") and INCH ("11×17", "11×14", "LGLw", "LTRw", "LTRv", "INVw" and "INVv") 1 If "MANUAL" was selected in step 5 and the [OK] key is pressed, the following screen appears. 2 Press the [,] or [+] key to select the appropriate scanning size, and then press the [OK] key. 9-8 IC-206
-
 1
1 -
2
-
3
-
4
-
5
-
6
-
7
-
8
-
9
-
10
-
11
-
12
-
13
-
14
-
15
-
16
-
17
-
18
-
19
-
20
-
21
-
22
-
23
-
24
-
25
-
26
-
27
-
28
-
29
-
30
-
31
-
32
-
33
-
34
-
35
-
36
-
37
-
38
-
39
-
40
-
41
-
42
-
43
-
44
-
45
-
46
-
47
-
48
-
49
-
50
-
51
-
52
-
53
-
54
-
55
-
56
-
57
-
58
-
59
-
60
-
61
-
62
-
63
-
64
-
65
-
66
-
67
-
68
-
69
-
70
-
71
-
72
-
73
-
74
-
75
-
76
-
77
-
78
-
79
-
80
-
81
-
82
-
83
-
84
-
85
-
86
-
87
-
88
-
89
-
90
-
91
-
92
-
93
-
94
-
95
-
96
-
97
-
98
-
99
-
100
-
101
-
102
-
103
-
104
-
105
-
106
-
107
-
108
-
109
-
110
-
111
-
112
-
113
-
114
-
115
-
116
-
117
-
118
-
119
-
120
-
121
-
122
-
123
-
124
-
125
-
126
-
127
-
128
-
129
-
130
-
131
-
132
-
133
-
134
-
135
-
136
-
137
-
138
-
139
-
140
-
141
-
142
-
143
-
144
-
145
-
146
-
147
-
148
-
149
-
150
-
151
-
152
-
153
-
154
-
155
-
156
-
157
-
158
-
159
-
160
-
161
-
162
-
163
-
164
-
165
-
166
-
167
-
168
-
169
-
170
-
171
-
172
-
173
-
174
-
175
-
176
-
177
-
178
-
179
-
180
-
181
-
182
-
183
-
184
-
185
-
186
-
187
-
188
-
189
-
190
-
191
-
192
-
193
-
194
-
195
-
196
-
197
-
198
-
199
-
200
-
201
-
202
-
203
-
204
-
205
-
206
-
207
-
208
-
209
-
210
-
211
-
212
-
213
-
214
-
215
-
216
-
217
-
 218
218 -
 219
219 -
 220
220 -
 221
221 -
 222
222 -
 223
223 -
 224
224 -
 225
225 -
 226
226 -
 227
227 -
 228
228 -
229
-
230
-
231
-
232
-
233
-
234
-
235
-
236
-
237
-
238
-
239
-
240
-
241
-
242
-
243
-
244
-
245
-
246
-
247
-
248
-
249
-
250
-
251
-
252
-
253
-
254
-
255
-
256
-
257
-
258
-
259
-
260
-
261
-
262
-
263
-
264
-
265
-
266
-
267
-
268
-
269
-
270
-
271
-
272
-
273
-
274
-
275
-
276
-
277
-
278
-
279
-
280
-
281
-
282
-
283
-
284
-
285
-
286
-
287
-
288
-
289
-
290
-
291
-
292
-
293
-
294
-
295
-
296
-
297
-
298
-
299
-
300
-
301
-
302
-
303
-
304
-
305
-
306
-
307
-
308
-
309
-
310
-
311
-
312
-
313
-
314
-
315
-
316
-
317
-
318
-
319
-
320
-
321
-
322
-
323
-
324
-
325
-
326
-
327
-
328
-
329
-
330
-
331
-
332
-
333
-
334
-
335
-
336
-
337
-
338
-
339
-
340
-
341
-
342
-
343
-
344
-
345
-
346
-
347
-
348
-
349
-
350
-
351
-
352
-
353
-
354
-
355
-
356
-
357
-
358
-
359
-
360
-
361
-
362
 |
 |
9
Performing a Scan to E-mail operation
9-8
IC-206
When “MANUAL” is selected
2
Note
If “MANUAL” was selected, the scanning size can be changed.
The settings available for the scanning size are METRIC (“A3
w
”, “A4
w
”,
“A4
v
”, “A5
w
”, “A5
v
”, “B4
w
”, “B5
w
”, “B5
v
”, “FLS
w
”, “8K
w
”, “16K
w
”,
“16K
v
”) and INCH (“11×17”, “11×14”, “LGL
w
”, “LTR
w
”, “LTR
v
”, “IN-
V
w
” and “INV
v
”)
1
If “MANUAL” was selected in step 5 and the [OK] key is pressed, the
following screen appears.
2
Press the [
,
] or [
+
] key to select the appropriate scanning size, and
then press the [OK] key.