Konica Minolta bizhub C3100P bizhub C3100P Applied Functions User Guide - Page 16
[Import/Export] - [Authentication], [Date/Time Settings] - [Manual Settings]
 |
View all Konica Minolta bizhub C3100P manuals
Add to My Manuals
Save this manual to your list of manuals |
Page 16 highlights
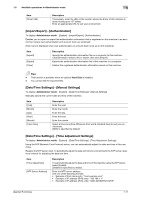
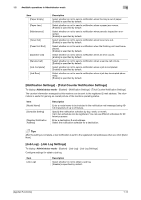
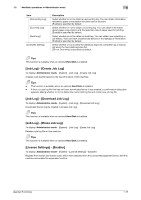
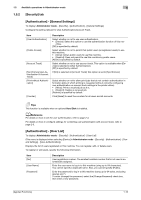
1.5 Available operations in Administrator mode 1 Item [Driver URL] Description If necessary, enter the URL of the location where the driver of this machine is stored (using up to 127 bytes). Enter an appropriate URL to suit your environment. [Import/Export] - [Authentication] To display: Administrator mode - [System] - [Import/Export] - [Authentication] Enables you to import or export the authentication information that is registered on this machine in an environment where user authentication and account track are employed. (This menu is displayed when user authentication or account track is set up on this machine.) Item [Import] [Export] [Clear] Description Imports the authentication information file on a computer to this machine. Click [Browse] to select a file to import, then click [Import]. Exports the authentication information file of this machine to a computer. Deletes the registered authentication information saved on this machine. Tips - This function is available when an optional Hard Disk is installed. - You cannot edit the exported files. [Date/Time Settings] - [Manual Settings] To display: Administrator mode - [System] - [Date/Time Settings] - [Manual Settings] Manually specify the current date and time of this machine. Item [Year] [Month] [Day] [Hour] [Minute] [Time Zone] Description Enter the year. Enter the month. Enter the day. Enter the hour. Enter the minute. Select a time zone (time difference from world standard time) to suit your environment. [GMT] is specified by default. [Date/Time Settings] - [Time Adjustment Settings] To display: Administrator mode - [System] - [Date/Time Settings] - [Time Adjustment Settings] Using the NTP (Network Time Protocol) server, you can automatically adjust the date and time of this machine. Register the NTP server used. To periodically adjust the date and time by connecting to the NTP server, specify an interval for adjusting the date and time. Item [Time Adjustment] [NTP Server Address] Description To automatically adjust the date and time of this machine using the NTP server, select [Enable]. [Disable] is specified by default. Enter the NTP server address. Use one of the following formats. • Example of host name entry: "host.example.com" • Example of IP address (IPv4) entry: "192.168.1.1" • Example of IP address (IPv6) entry: "fe80::220:6bff:fe10:2f16" [Applied Functions] 1-11
-
 1
1 -
2
-
3
-
4
-
5
-
6
-
7
-
8
-
9
-
10
-
 11
11 -
 12
12 -
 13
13 -
 14
14 -
 15
15 -
 16
16 -
 17
17 -
 18
18 -
 19
19 -
 20
20 -
 21
21 -
22
-
23
-
24
-
25
-
26
-
27
-
28
-
29
-
30
-
31
-
32
-
33
-
34
-
35
-
36
-
37
-
38
-
39
-
40
-
41
-
42
-
43
-
44
-
45
-
46
-
47
-
48
-
49
-
50
-
51
-
52
-
53
-
54
-
55
-
56
-
57
-
58
-
59
-
60
-
61
-
62
-
63
-
64
-
65
-
66
-
67
-
68
-
69
-
70
-
71
-
72
-
73
-
74
-
75
-
76
-
77
-
78
-
79
-
80
-
81
-
82
-
83
-
84
-
85
-
86
-
87
-
88
-
89
-
90
-
91
-
92
-
93
-
94
-
95
-
96
-
97
-
98
-
99
-
100
-
101
-
102
-
103
-
104
-
105
-
106
 |
 |
